Use two or more cameras with one or more RamperPros
A RamperPro controller can control two cameras at the same time. They can each can run individual settings or you can tie the cameras so that you can run stereo or 3D shoots. The engine setup is described in the Camera discovery and time lapse engine selection.
How to connect two cameras to the RamperPro
It is important that the correct USB and remote cable are connected to the same camera. This is how to do this:
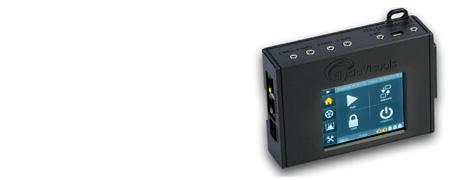
- Connect your two cameras via USB to the RamperPro and power both cameras.
- The RamperPro will detect both cameras and it will show the model name at the bottom of the touch screen.
- Press the bottom left camera name at the touch screen. That will show you an overview of the camera. This is camera 1. Connect the remote cable and PC sync cable to cam1 and sync1
- Connect the remote cable and the PC sync cable of the other camera to cam1 and sync1
You can now start your time lapse with the connected cameras.
How to daisy chain multiple RamperPros
RamperPro firmware 3060 and higher supports the possibility to daisy chain multiple RamperPro controllers. That way you can use as many cameras as you want. This is used for example for 360 degrees shoots with 5 cameras at the same time, connected to 3 RamperPros.
You can daisy chain the controllers via the MoCoBus that is located at the left side of the RamperPro. Use an RJ45 (aka computer network cable) between your controllers. There are two RJ45 connectors at the MoCoBus and that makes it possible to make a chain of as many RamperPros as you want.
How does it work
This firmware will trigger all cameras at the same time. This is done by making one RamperPro the master, all others are non-master. The ramping speed/shutter speeds/ISO values are currently not shared between master and slave yet. This can be changed in future firmware updates.
It is extremely important to setup every RamperPro exactly the same way! Please make sure that all the runtime parameters are the same on all units.
Make one RamperPro master ->system(tools icon)->arrow down->system icon: then press arrow down until you can make the unit master. This setup screen gives a new parameter: Post shot delay (in milliseconds). What does this do. It might happen that the slave unit needs more time to finish its exposure cycle due to a bit longer shutter speed. You don't want this slave to miss the trigger from the master. This parameter makes the master wait a bit (it makes its interval a bit longer). I guess a value of around 1 second is fine to start with. Make the other RamperPro slave -> set the value to "is MoCoBus master" = "no". The non master units will only fire when they get a signal from a master via the MoCoBus. So, you need to connect the units to each other with an RJ45 cable via the MoCoBus.
Also make sure to:
- Setup both RamperPros (the ComplexTL) parameters exactly the same way
- Make sure to enable "Tie for stereo". That way both cameras on one RamperPro will ramp exactly the same
How to start all the RamperPro controllers
First start the slave RamperPro. Let it run through its initialization. Then start the master unit. The slave unit(s) will wait for the trigger commands from the RamperPro
How to use the App with multiple controllers
The RamperPro will, by default, create a WiFi network called ramperpro. But you can set a unique WiFi network on each RamperPro that you are using. Navigate to the system menu (tools icon). The press the arrow down until you see the WiFi setup. There you can give your RamperPro a unique network number. That way you can connect to each and every RamperPro with your smart phone, tablet or laptop.