System settings
Select the desired system setting menu
 The "Settings" button on the home screen, that is shown on the left here, brings you to the various system setting screens. There are several screens available under this button. You can use the arrow up and arrow down buttons to navigate through these pages. The first two pages are shown below. The third page will give you an overview of the three firmwares that are running on the RamperPro. That screen will also show the input voltage when a voltage of over 5 volts is supplied to the large power plug that is located next to the USB connectors. The hardware revision of your RamperPro can also be found on this third page.
The RamperPro System Menu from ElysiaVisuals on Vimeo.
 |
 |
Basic camera settings
 This screen brings you to some settings that you can define for the camera's that you are using. These are settings that define how long the camera button should be pressed by the RamperPro of how long to delay before a motion control device is triggered. The settings are available over two pages, so please use the arrow buttons to navigate through the various options.
| Feature | Description |
| Button press time | This is the time in Millie seconds that the camera "button" we be triggered by the RamperPro. This time cannot be too slow otherwise the camera will not detect that it is triggered. You need a value of around 100, other cameras will work with a value of around 250. |
| Focus tab time | This is the time in milli seconds that the camera auto focus we be triggered by the RamperPro. This time cannot be too slow otherwise the camera will not detect that it is triggered. You need a value of around 100, other cameras will work with a value of around 250. |
| Post delay time | The time in milli seconds that the RamperPro will wait to do any action after an image is taken. An example can be a value of 1000. That would mean that an external motion control system will be triggered 1 second (1000 milli seconds) after an image is taken. |
| Use camera 1 settings | This value is only available for camera two. A value of "Yes" indicates that all settings for camera 2 are taken from the settings of camera 1. |
System settings
 This is an overview of a few basis system settings of the RamperPro like screen saver settings, the backlight and a few other features. This settings page consists of more than 1 page!. Use the arrow up and down buttons to navigate through them.
| Feature | Description |
| Screensaver | This is the time after which the screen saver will turn off the screen of the RamperPro. Every press on the touch screen will reset the timer that keeps track about when the screen saver should be enabled. |
| Enable screensaver | Enable or disable the screen saver. |
| Include LED's | You can even dim the 4 LEDs that are on the side of the RamperPro when the screen saver turns off the back light. The LEDs will be activated as soon as the touch screen is pressed so that the screen saver is woken up. |
| Backlight | The value of the backlight of the RamperPro screen. You can set the back light to a low value to prevent light pollution. |
| Enable help | This enables or disables the help system. The labels on the various RamperPro setting screens can be pressed after which a popup will describe the meaning and purpose of the setting. This can lead to accidental popups if you press labels. You can disable these properties by setting this value to "No". |
| Aftershotspro XMP | Aftershotspro is an affordable software package that can process images just like Adobe Lightroom can do this. Set this value to yes if you are using Aftershots Pro. The RamperPro will then also create specific XMP files in the format and naming convention of Aftershotspro. |
| Use positive EV correction | The RamperPro will create an XMP file per image. This file contains the exposure correction that is needed to get a very smooth exposure ramping sequence without any flickering. You therefore don't need any deflicker software when you use the RamperPro. This setting indicates if you want to use negative or positive corrections in your XML files.
Negative values could result in exposure pumping, especially when you ramp by using standard shutter speeds in manual. We therefore recommend to use possible XMP corrections when you ramp mostly in manual mode. Negative values will work fine in bulb mode. |
I/O settings
 The RamperPro interfaces to all major motion control platforms. You can even control 2 different platforms at the same time, one for each connected camera for example. You can find an elaborate explanation of how to connect and use motion control hardware on the interfacing with motion control hardware page of this manual. Each I/O connector that is indicated with Ext1 and Ext2 has two so called input / output pins that can be used to either trigger an external system or to receive a trigger. The I/O connectors are referred to by ring or tip. That is the ring or tip of the 2.5mm TRS plug that fits into the Ext1 or Ext2 connectors. The table below describes the various settings, but the interfacing page explains how to use these settings in various situations.
| Feature | Description |
| Enabled | Is the I/O pin enabled or not? |
| Input | Indicates if the pin is an input or an output pin. Most pins will be an output pin, because the RamperPro can then trigger the connected motion control system. |
| FragonFrame | This is an experimental feature that is not available yet. We plan to release a DragonFrame adapter for the RamperPro in the summer of 2014. Set this setting to No for now. |
| Output trigger time | This feature is only available for pins that are enabled, are not an output pin and when DragonFrame is not activated. This value describes how long the connected motion control system will be triggered in microseconds. A value of 50 will work with the MX3 or TB3. |
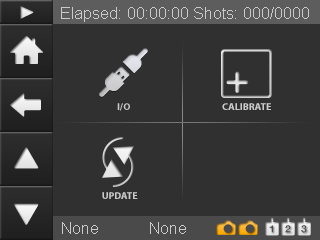
How to calibrate the touch screen
 The touch screen of the RamperPro is factory calibrated. But it could be that you need to calibrate it again when the touch screen is not accurate enough. It can also happen that you need to calibrate the touch screen after a firmware upgrade since that might overwrite old settings. In that case the calibration screen is the first screen that you will see when the RamperPro is started.
You can (re)calibrate the touch screen by pressing the calibrate icon. You will now see a small cross on the touch screen. Please the center of this cross with the stylus as accurate as possible. After this two consecutive crosses will be shown. Touch the center of these two crosses as accurate as possible too. The touch screen calibration screen will be closed after calibration and you will be navigated to the main system settings page.
Check and update your firmware version
 The RamperPro is a highly advanced device that contains of an embedded Linux device and two separate micro controllers that control and trigger your camera's. This might sound technical to some users, but the bottom line is that the RamperPro can be seen as a three processor device that needs three different software programs.
The main application is what you see on the touch screen and it is this application that you will need to upgrade the most in order to get bug fixes or free additional features. The two embedded controllers run embedded software that needs a bit more work if you want to upgrade them.
Upgrading the main software of the RamperPro doesn't require any technical skills or knowledge. Just connect the RamperPro to the Internet via a standard RJ45 network cable. Make sure that this cable provides Internet access without the use of any proxy settings. Now press the Upgrade icon. The RamperPro will now automatically detect if there is any firmware upgrade available. It will also check if you need to upgrade the embedded software; the next paragraph will explain you how to do this. You don't need to upgrade the embedded software in most cases. You can now press the screen where the RamperPro asks if you want to upgrade the main software. The new firmware is now automatically downloaded and installed by the RamperPro. The software will restart and you are now ready to use your RamperPro again if you don't need to upgrade the embedded firmwares.
Settings not available
Some system settings cannot be changes when a timelapse engine is running. That way you cannot accidentally change settings that are of great/negative influence on your timelapse movie. You cannot find the I/O settings or the touch screen calibration screen as an example of this.