Important before you start
Properly setup your Canon dSLR
Make sure to set ‘External Speedlite control’ to “Enable”. You also need to make sure that the ISO and shutterspeed steps are in 1/3 stop increments (and not in 1 stop increments). These are the default values of your camera, so you are fine if you have never changed them on your camera.
How to power the RamperPro
The RamperPro has no built-in battery. We have done that because we believe that its better to have options when you want to power the RamperPro. The unit will approximately use 5 Watts. That means that you will have a very long runtime when you use a LiPo battery like our RamperPro battery kit. There are two ways that you can use to power your RamperPro:
- Use a "USB" battery with a 5V output. There is a mini USB connection at the back of the RamperPro that you can use to power the unit. This USB port is not a "real" USB port; it is only there to power the RamperPro from a steady 5V power supply. Some laptops may give enough power to power the RamperPro, but we don't recommend this because the RamperPro draws more current than the average USB port of a laptop can deliver.
- You can connect any 12V power source to the side of the RamperPro. The RamperPro has a highly efficient power circuit that can handle input voltages up to 24V. The built-in voltage meter of the RamperPro will give you feedback about how much juice you have left.
There is a third way that you can use. The RamperPro features two MoCoBus connectors. You can also provide 12V via these MoCoBus connectors. The use of the MoCoBus is for future use when more MoCoBus enables motion control hardware will become available on the market. You should think of MoCoBus enabled stepper motors for example. The RamperPro will then become a fully featured motion controller.
You can now trigger your camera via USB
Please test if USB triggering works for you. There are cameras that are not storing their images to their memory card in this mode! This is a new feature and we love to hear your feedback so that we can improve this feature where needed.
RamperPro firmware 3068 and higher now support USB triggering of your camera. That means that you don't always have to connect the remote trigger cable and PC sync cable as described in the section below. Just connect the USB cable betwen the RameprPro and your camera. Make sure that USB triggering is configured on your RamperPro! Navigate to the camer1 and camera2 icons in the system menu (tools icon in the button bar). There you can set the property "Trigger by USB" to true.
We don't recomend to use USB triggering when you want to use two cameras in stereo mode with your RamperPro. Then its very imporant that both cameras are triggered at the same time; you need to use the remote trigger cable in that case. We also recommend to use remote trigger cables when you shoot with 3 or more cameras when you daisy chain multiple RamperPro controllers via the MoCoBus.
Connect your camera to the RamperPro
You need to connect at least two cables between the RamperPro and your camera if you want to use the ramping mode of the RamperPro. Note that you only need the trigger cable when you are using the RamperPro in "Easy" mode since that mode doesn't support USB control: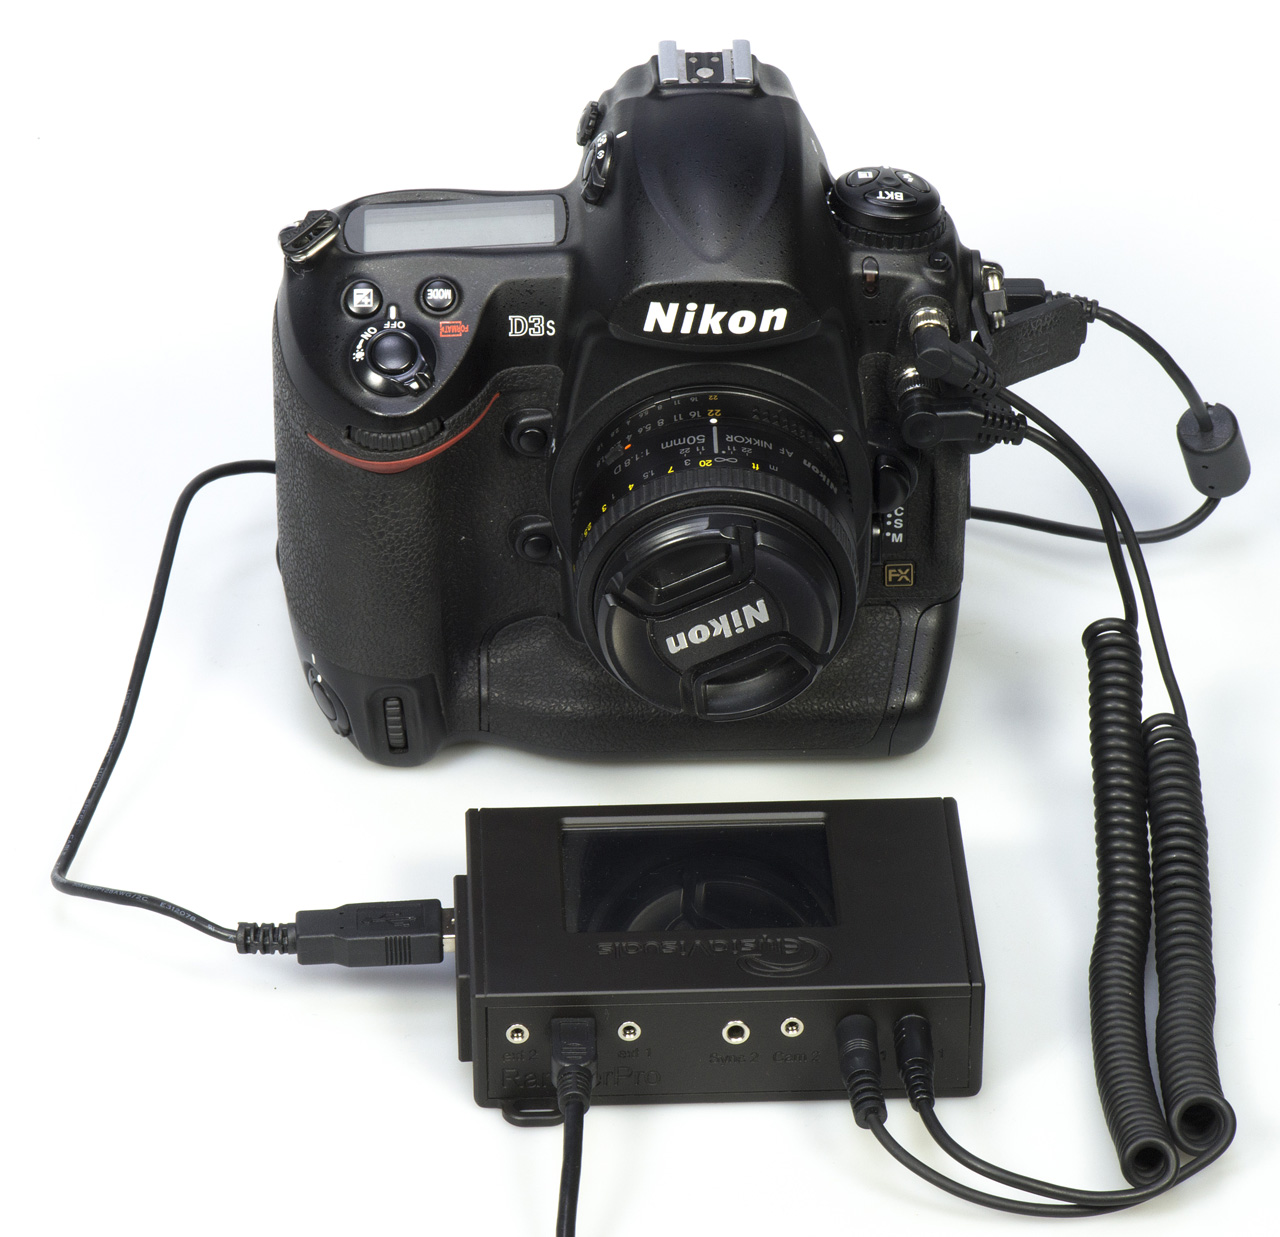
- The first is the camera trigger/remote cable. This cable is used to trigger the camera. Please get the correct cable for your camera when you get the RamperPro. This cable runs from the Cam1 port to the remote trigger port on your camera.
- The second cable is a so called PC Sync cable. This cable is connected to the flash port of you camera. This cable is used in bulb mode by the RamperPro to measure and determine the actual bulb shutter speed of the exposure. You can shoose to leave this cable out if you are not using bulb mode or when you are using a mirror less camera. You can find more about bulb mode on the "Switching between Manual and Bulb exposure" manual page;
- The third cable is a USB cable. This cable is used to control your camera. The RamperPro will automatically set all settings on your camera that are needed to get a smooth exposure ramp. This means for example that the RamperPro will control the shutter speed, ISO value, exposure mode (manual), flash mode (long exposure) etc. on your camera.
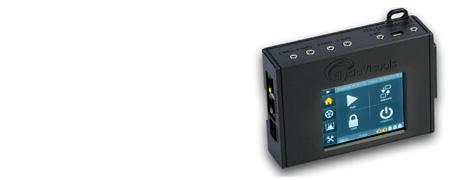
Here you see the back of the RamperPro. The connections for camera one are at the side of the unit. The connectors for camera two are in the middle of the unit. It doesn't matter which USB port you are using per camera. The ext 1 and ext 2 connectors are needed when you want to connect your RamperPro to a time lapse motion control device like the MX2, MX3 or TB3.
Help, my camera doesn't have a PC sync connection
Some cameras like the Nikon D610 or D750 don't have a PC sync connection. In that case you can get a hot shoe adapter. Another trick can be not to use bulb mode (also in the situation where you forgot to bring one with you).
The USB connection between your camera and the RamperPro
We have seen that some camera's become unreliable when you touch any of the buttons or if you stop and then start a timelapse sequence. This is especially true with some, older, Canon models. This is not a big issue is you need to know what to do. Please keep yourself to the following:
- Set all camera settings like white balance settings or if you want to shoot in RAW or RAW + jpeg before you connect the USB cable between the RamperPro and the camera.
- Don't press any of the buttons of your camera while it is connected to the RamperPro. The RamperPro will tell you when it's save to switch between Bulb mode and Manual mode for example.
- When in doubt restart your camera; we have seen this on Canon models. This is never ever needed during a shoot! But this might be true between two shoots. Turn off your camera and wait until the RamperPro notifies you that the camera connection was lost. Then turn on your camera.
Starting up the RamperPro
The RamperPro uses Linux as an embedded operating system to function. A minor drawback of this approach is that the RamperPro needs some time to startup. Please be patient when you power the Ramper Pro as it will take around 20 seconds before the user interface of the unit will be available.
Shutting down the RamperPro

Please take care to shutdown the RamperPro the proper way. You cannot just power down your PC and the same is true for the RamperPro. Just removing power can result in a corrupt SD card. So, please take care when you want to power off the RamperPro. Just press the "Shutdown" button on the main screen and confirm this by pressing the big button that you will see on the power off screen. The screen of the RamperPro will then turn black. Please wait at least 10 seconds after the screen turned black before you remove power. That's it!
The RamperPro can both be used to make a movie of a sunset or a sunrise. We will only mention sunsets in examples when we are explaining the generic usage of the RamperPro to keep the manual as simple as possible.