The ElysiaVisuals RamperPro time lapse controller
The history of the RamperPro
The history of the ElysiaVisuals RamperPro time lapse controller started in 2011. The general consensus at that time was that it is not possible to make good sunset time lapse movie with a Nikon camera. These movies are made by ramping the exposure time of the camera. Its getting darker but the exposure is made longer in small steps which results day to night transitions. The same is true the other way around for sun rises. Classic ramping solutions worked by using bulb ramping. The camera is set to bulb and the bulb time is accurately controlled by the time lapse controller. This gives a limited use because you cannot use fast shutter speeds or bulb times faster than approximately 0.3 seconds. Classic bulb ramping cannot be done with a Nikon because you cannot achieve any desired bulb speeds because Nikon uses discrete steps in bulb.
Here the RamperPro steps in. You can use any desired shutter speed or any desired bulb speed to create ramping sequences. The camera is automatically controlled via USB by the controller. That makes it possible to automatically shift the ISO during your shoot. The RamperPro can therefore easily ramp over 20 stops from bright day light to stars. We like to talk about exposure ramping and not about bulb ramping because you are not limited to bulb mode when you use the RamperPro.
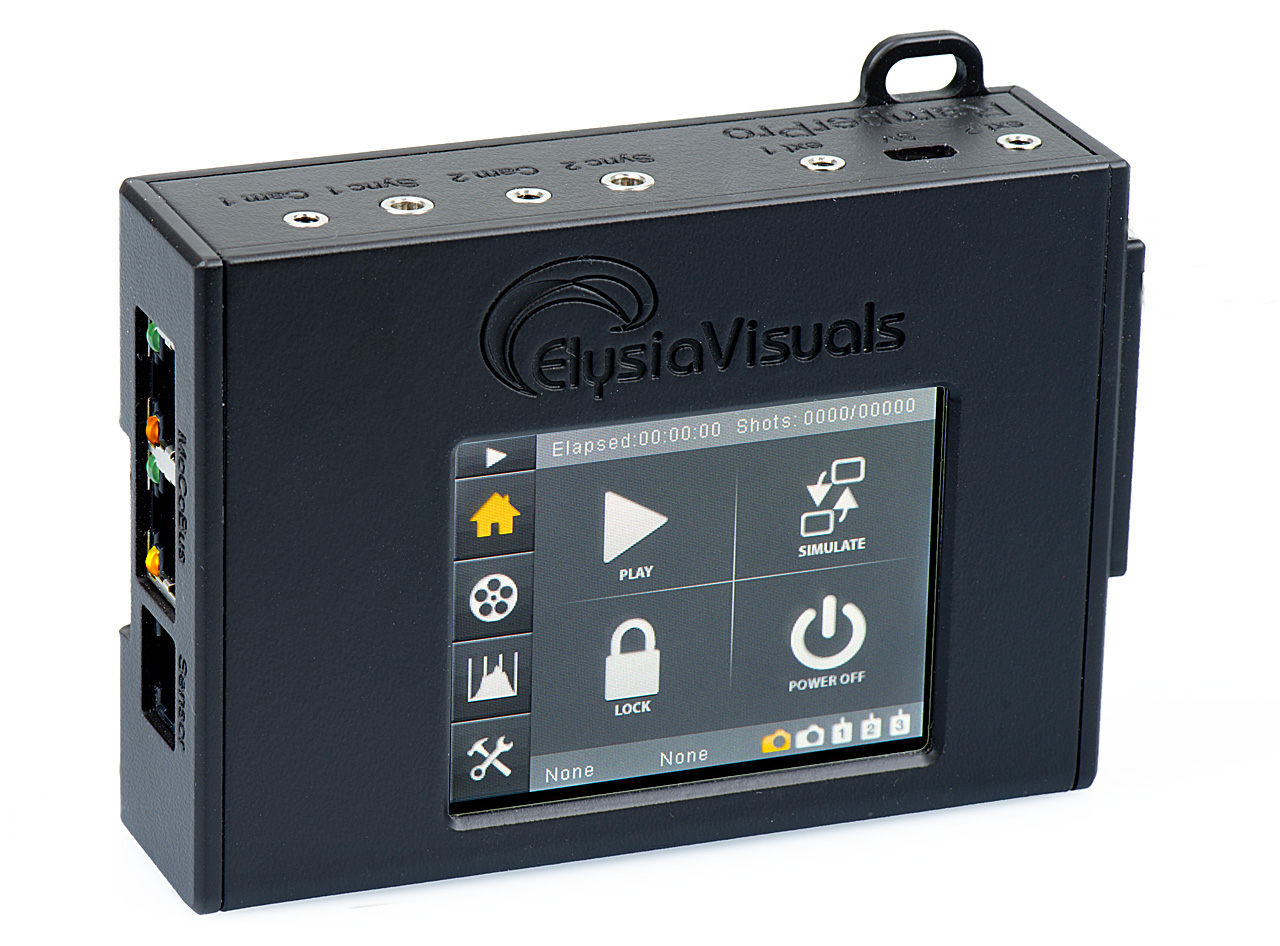
The RamperPro still uses bulb mode to get the best out of your digital Nikon, Canon or any other brand camera. We use three cables to connect a camera in order to get full control. The RamperPro uses a USB cable to control shutter speeds or any other camera settings. The remote connection of your camera is also connected to the RamperPro to trigger the camera. We don't use USB to trigger the camera because this can cause lag. This way the RamperPro can fire the camera very accurately; it can even trigger two camera's at exactly the same time. The third cable to your camera is only needed in bulb mode. The RamperPro uses this cable the accurately measure the exposure time of the camera in bulb mode. The RamperPro can detect if this cable is not available or not connected properly and the controller will show an error message when this is true.
The RamperPro is in stock and available for immediate shipment. Please contact us if you are located outside the European area because we can then invoice you without VAT.
XMP to the rescue
So, how does the RamperPro work in combination with Nikon camera's or when it uses discrete shutter speeds? The RamperPro creates XMP files per image that it takes. These XMP files contain all the information for Adobe Lightroom or Adobe After Effects to automatically compensate for any exposure discrepancies. You only need to own one of these software packages and you are good to go. There is no need to use or own any other deflicker software package or any of the special time lapse software packages that are available. Just place the XMP files as created by the RamperPro next to your images and import them in to Adobe Lightroom. That is just about it to create stunning, flicker free, time lapse movies with the ElysiaVisuals RamperPro. Now, you don't have to wait anymore until slow deflicker applications are done with their rendering and hope that they give you good results.
Intuitive touch screen interface
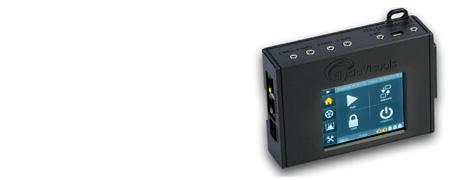
The user interface of the RamperPro consists of a 2.8" touch screen. The highly intuitive interface consists of icons that make navigating through the various screens easy. Settings can be entered by sliders or an on-screen numeric keypad.
Control two camera's at the same time
You can fully control two cameras at the same time with the RamperPro. This can even be different models or even different brands. You can choose to shoot each camera with different settings or you can tie them together for 3D mode. Both cameras will be synched exactly with each other when you tie them.
Different time lapse engines
You choose two different time lapse engines. The basic engine is a standard intervalometer, the advanced engine gives you exposure ramping. Both engines offer interval fairing. That means that you can make the interval shorter or longer during a number of shots. Interval fairing is triggered by a key frame in basic mode and by an exposure speed in ramping mode.
Full automatic mode with an advanced external digital light sensor
A sunset is far from linear. Ambient light can easily decline at 15 minutes per stop before sunset, this can be only a few minutes after sunset. This can be seen in many ramping shoots where it gets too dark too soon and where the scene gets lighter in the end. That is the result when you use a fixed ramping speed. You can either use a fixed ramping speed with the RamperPro or you can use an advanced digital light sensor that measures the decline in ambient light. These readings are then used by the ramping engine. This gives you a fully automatic mode that most often gives you the best result. The light sensor measures the decline in light in minutes per stop. There are settings available to compensate for measurement errors and just to be just on the safe side.
On screen preview mode
Many camera's, like Nikon camera's block their playback mode when a USB cable is connected. This is why the RamperPro can be used to preview and assess images when you setup a time lapse sequence. Just press the touch screen of the RamperPro and a preview image is taken by the camera. This image and it's histogram are then shown on the screen of the RamperPro. This preview screen can also be used to adjust the start shutter speed of your time lapse sequence. This ensures that the correct exposure is used when you start a time lapse (ramping) sequence with the RamperPro.
Integration with existing motion control hardware
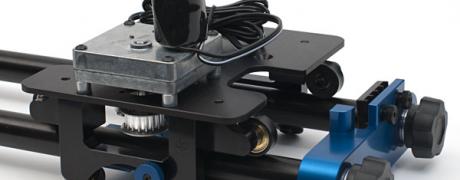
Integration with motion control hardware is very important and the RamperPro has no limitations on that side. There are four IO ports then can be hooked up to the Dynamic Perception MX2 and MX3. You can also connect the RamperPro to an eMotimo TB3 pan and tilt head. The RamperPro acts as an external intervalometer on these devices. Please always use our isolator adapter when you connect the RamperPro to other hardware. That way you optically isolate the RamperPro from the connected second party hardware.
The RamperPro can also be integrated with external intervalometers like our Ditogear™ hardware that you can find on this site. The interval is determined by the DitoGear hardware or any other external intervalometer and the RamperPro will interface to the camera in this mode. This makes it possible to create key framed 5-axis moves combined with all the capabilities of the RamperPro.
A very exiting development is the open source MoCoBus protocol. You can daisy chain many MoCoBus devices like nanoMoCo enabled stepper motors, the MX3 and the RamperPro. The RamperPro has two fully enabled MoCoBus connectors that make it possible for the RamperPro to be an advanced motion controller for MoCoBus devices. This means that you can control a nanoMoCo or NMx enabled Stage Zero or Stage One dolly with the RamperPro.
The RamperPro has many settings that are needed to configure the device. Don't be overwhelmed by this. Please note that most settings can be set twice because the RamperPro is in fact two advanced time lapse controllers in one package. Secondly, many settings are overruled when you use the automatic mode.
RamperPro features
- Purpose designed dedicated hardware
- Highly portable, fits in your pocket
- 2.8" Touch screen interface
- Dimmable backlight. Backlight will turn of fully in screen saver mode
- All status leds can be shut off to prevent any light pollution
- Dual camera support via dual fully independent hardware pipelines
- Two USB2 connections
- Bulb exposure time measurement via two fully isolated power supplies
- Optically isolated camera triggering
- An external digital light sensor can be added to create a highly accurate fully automatic exposure ramper
- All connections are electronically protected
- Synchronized 3D mode
- Image preview function with histogram
- Exposure ramping mode with ISO shifting
- Basic intervalometer
- Automatic ramping mode
- Interval fairing
- Direct integration with Dynamic Perception MX2 and MX3, eMotimo TB3 black and many other motion control solutions
- Two MoCoBus connections. Can both act as bus master or slave
- Built in accelerometer, the device is your joystick
- nanoMoCo or NMx motion controller
- 5V input when no MoCoBus enabled hardware is connected
- 12-24V input when MoCoBus enabled hardware is connected
The RamperPro will be available at the end of 2013. Contact us now if you want to be sure that you can get one from the first batch
Note that some of these features require additional hardware. Some RamperPro kits do not contain these items by default.
related products - Related Products
- Login om te reageren