Advanced mode - Exposure (bulb) ramping
We are a bit behind with the manual because we have introduced a totally new way to setup the RamperPro. Please keep checking this page as we update it. Here is a short video about how to setup the RamperPro in its' current firmware
Introduction
 The advanced mode is the exposure ramping mode of the RamperPro. You need to use this mode when you want to shoot a sunset or a sunrise. There are two ways that you can use to configure this highly advanced feature of the RamperPro. The easiest way is the "non expert mode". That mode will only show you the most necessary settings that are needed to setup an unattended sunset or sunrise; all other settings are defaulted for you. The expert mode will show all the settings of the RamperPro. Some of these settings can be a bit overwhelming when you first use the RamperPro. You can probably shoot 95% of your time lapse movies in the non expert mode. We therefore recommend to start easy. We also recommend to shoot a sunset first when you want to learn the RamperPro. Shooting sunsets is much easier than shoot sunrises because you have no way that can can over expose your images during sunset shoots.
This video shows how easy it is to setup an unattended sunrise or sunset in only four steps
How to setup your unattended sunset or sunrise in four steps from ElysiaVisuals on Vimeo.
Expert mode. How to setup all the advanced settings of the RamperPro
The RamperPro is based on a concept that we call ramping speed. That is the speed that the RamperPro needs to ramp to keep up with changing light conditions during a sunset or a sunrise. The ramping speed is mostly determined by the light sensor of the RamperPro. The light sensor combined with the histogram mode of the RamperPro will make sure that the proper exposure of your images is realized. The "non expert mode" settings will properly setup the technical details for sunrises and sunsets.
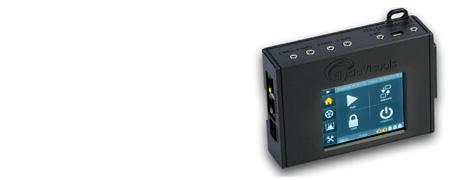
Its very important to start your sequence with the correct start exposure. Make sure to setup the correct start and end ISO values. You can test these values by pressing the histogram button on the home screen. There you can press the touch screen after which the RamperPro will properly setup your camera and then it will take a test image. Please evaluate the image and histogram there. You can modify the start exposure directly from this setup screen by pressing the + and - icons.
The end exposure of your sequence is the exposure where the RamperPro should start ramping. There are two ways that the RamperPro will stop ramping. The first is when the end shutter speed and end ISO is reached. The second situation is where the histogram mode of the RamperPro will detect a properly exposed image. This automatic stopping will not work in dark conditions where you ramp from day to stars because the histogram will be quite dark in that situation. But the automatic stopping works perfectly in situations with a lot of light like in cities.
RamperPro tutorial - How to create stunning sunsets with the RamperPro from ElysiaVisuals on Vimeo.
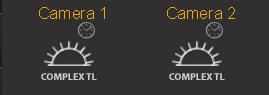
There are many settings that determine the exact behavior of the RamperPro. These settings are available on the various screens that become available when you press the Camera 1 and Camera 2 Complex TL buttons. The following settings can be set in order to configure the advanced mode of the RamperPro.
Settings
| Feature | Description |
| Interval ramping | Indicates if you want to change the interval during the shoot. The interval can be made longer or shorter by setting the desired start and end interval. The change in the interval can be triggered by either a key frame or when an specific exposure (in seconds) is reached by the ramper. Disabling interval ramping gives you a fixed interval. |
| Interval | The interval in seconds before a next shot is taken by the RamperPro |
| Use external intervalometer | You can use external intervalometers to trigger the RamperPro. An example of this is when you use DitoGear motion control hardware. The motion control hardware can trigger the RamperPro to take the next shot; that way you are perfectly synchronized with the motion control hardware. Just connect the camera output of the external intervalometer directly to the I/O port that is linked to the camera for which you are setting this value. |
| Shots before | The number of non ramping images that are shot before ramping start. The RamperPro will use the start shutter speed and start ISO to set the exposure on the camera. You don't need this setting a many cases. The light sensor will measure when a sunset starts. So you can perfectly start a sunset timelapse one hour before sunset when you use the light sensor. In that case there is no need to use shots before to reach the exact moment of the sunset. |
| End by runtime | You can now set either a fixed number of images or a runtime to define how long the RamperPro should be shooting images. This makes it much easier to combine the RamperPro with a motion control device because you now exactly know how many images the RamperPro will shoot. The simulation mode will show you the number of total images when you define the length of your shoot by entering a time; this also takes into account interval ramping. |
| Time per stop | This sets the speed of the exposure ramper when you are not using an external light sensor. The time per stop is the amount of time that it takes the ambient light to change per stop. A setting of around 10 minutes around sunset is a workable value. This setting is overruled when you use a light sensor, because the sensor will make this setting dynamic. Disabling the light sensor will thus use a fixed ramping speed base on "Steps per stop". This is not the best situation because you will ramp too slow at the beginning of a suns set and this is why we created the advanced light sensor. |
| Start exposure | The start shutter speed that you want to use for the ramping sequence. This value can be tweaked to be perfect later on with the preview screen that is available on the home screen. This preview screen enables you to take an image with your camera so that you can evaluate the histogram. The + and - buttons on that screen enable you to modify the "Start exposure" too. You can either use a shutter speed by setting a value with the slider. You can also slide the slider to the right and choose "Manual". You can then enter a manual speed (in seconds). |
| End exposure | The end shutter speed of the ramping sequence.ou can either use a shutter speed by setting a value with the slider. You can also slide the slider to the right and choose "Manual". You can then enter a manual speed (in seconds). |
| Start ISO | The ISO that you want to start with. This ISO value together with the "Start exposure" determine the exposure of you initial images. This is also the exposure that is used by the preview screen. |
| End ISO | The ISO that is set on the camera at the end of the ramping sequence. This ISO value together with the "End exposure" determines the exposure at the end of the ramping sequence. The actual end ISO and end shutterspeed can automatically be overruled when you use the image analysis mode. |
| Start Bulb speed | The RamperPro can use normal shutter speeds like 1/8000 during a ramping sequence. But you can use longer shutter speeds after a sunset or at the start of a sunrise. We recommend to use the bulb mode of your camera for the realization of longer shutter speeds. This value determines the minimal shutter speed (in seconds) after which the RamperPro will use the bulb mode on your camera. A value of 0.5 seconds is a safe value. This means that all shutter speeds longer than 0.5 seconds will be made in bulb mode during a ramping sequence. Note that Nikon cameras will be set to Bulb mode automatically by the RamperPro. Most, if not all, Canon cameras need to be set to bulb manually because these cameras don't support "Set to bulb" via USB. Another important thing to remember is that you need to connect the PC sync cable to your camera when you are enabling Bulb mode here. This cable is used to determine the correct shutter speed in bulb mode and to measure the actual Bulb speed that was used by the camera during exposure. |
| ISO Shift speed | The RamperPro can automatically shift the ISO while ramping. This means that for a sunset you can start with ISO 100 and end with ISO 1600 for example. The RamperPro will change the ISO value when a shutter speed is reached during ramping of this value. Lets say that your camera supports ISO values in 1/3 stops (100, 125, 160 etc). The RamperPro will move to the next available ISO value when the ramping shutter speed reached the value of "Reciprocity speed" and it will lower the ramping shutter speed with 1/3 stop to compensate in order to get the proper exposure. We recommend to use a value that is at least 1/3 of a stop longer than the "Start Bulb speed". Otherwise the RamperPro will switch back to normal speeds after an ISO shift (since the ramping shutter speed will be set back to a speed lower than "Start Bulb speed". A "Reciprocity speed' of 0.7 seconds is safe when you set "Start Bulb speed" to 0.5 seconds. |
| Frame rate | This value is only used in simulation mode. This is the play back frame rate that you want to use when you create a movie of your images. This setting is used to show the length of your resulting movie. |
| use auto mode with light sensor | This indicates if you want to use an external light sensor. The light sensor will overrule the "Steps per stop" setting because the light sensor will determine the ramping curve automatically by measuring the trend in the changing environmental light. Note that the RamperPro will use the value of "Steps per stop" when you ramping sequence is started when no light sensor is connected. |
| Minimum time per stop | The light sensor measures the "time per stop" that ambient light is changing. This value will become too fast when it is getting darker. One of the reasons for this is that the sensor needs light to calculate a reliable value. This value is just not good enough when it is getting to dark for the sensor. This in practice can easily result in calculated measurements of 3 minutes per stop during a sun set. That means that the RamperPro will ramp one stop per 3 minutes. That is way too fast since this will result in over exposed images. The "Minimum time per stop" indicates the minimum ramping speed that the RamperPro can use regardless of the sensor readings. A value of 5 to 6 minutes is a save value here. It is normal that the RamperPro calculates a "time per stop" of 20 to 30 minutes before a sunset, so that is the ramping speed that the RamperPro will use when you start. The time per stop will than become faster since the sun is setting, but never faster than the value of this setting. |
| Sensor gain | This value is multiplied by the calculated time per stop. You can see this new setting, that is 1.0 by default, as a sensor calibration value. A value of 0.9 will make the RamperPro ramp 10% faster than calculated purely by the light sensor. We have tested this setting extensively. A value of 0.9 is probably what most users need; a value of 1.0 will give you the original performance of the RamperPro. A value less than 1 makes the RamperPro ramp faster than calculated by the light sensor. A value larger than 1 makes the RamperPro ramp slower than calculated. A value between 0.7 is good for sunsets, sunrises need a smaller value like 0.67 or 0.55. |
| Use camera 1 settings | This value is only available for camera two. A value of "Yes" indicates that all settings for camera 2 are taken from the settings of camera 1. |
Using semi automatic mode with the light sensor
You can set the ramping speed by setting the "Time per stop" value. This defines the total time per stop that the RamperPro will use during a shoot. This can give good results; but these results might not be perfect. A sunset or sunrise is far from linear when it comes to how fast the change in ambient light is. The amount of ambient light might change in 30 minutes per stop before a sunset, 10 minutes per stop just before a sunset and only 5 minutes per stop during a sunset. You can only have a perfect ramping profile when you use a light sensor. We have chosen to use an advanced digital light sensor that you can mount on the hot shoe of your camera. That way the sensor is always facing your subject. The sensor can then measure ambient light, but especially calculate the change in ambient light in time. This data can then be used by the exposure ramping algorithm to adjust the exposure ramping profile.
The light sensor uses a damping algorithm. It will not be influenced by sudden changes of light like a cloud before the sun or when a clouded sky is blown clean of clouds by the wind. This means that the time per stop that is used by the RamperPro cannot move both ways. The time per stop can only go faster during a sunset and slower during a sunrise. This means the following. Let's say that the RamperPro is ramping with 10 minutes per stop, but the light sensor measures 14 minutes per stop during a sunset. The 10 minutes per stop will not be changes to 14 because that would mean that the RamperPro will slow it's ramping speed during a sunset. The used time per stop of 10 minutes will only be adjusted when the light sensor measures a value that is less than 10 minutes.
How to use the advanced digital light sensor
- Place the light sensor on the hot shoe of your camera and let it face the subject that you are going to photograph. Please make sure that you don't point the sensor directly to the sun!
- Give the light sensor at least 5 to 10 minutes to "learn" the direction and speed of the changing ambient light. The RamperPro will start to measure light as soon as a light sensor is connected to the unit. It is very important to give the RamperPro time to learn the profile of the changing light. Measuring starts as soon a you power the RamperPro. You can always check the measures time per stop by navigating to the last page of the simulation screen. That way you can check if the light profile is reliable. Say that you are starting a sunset 40 minutes before sunset. The time per stop on the simulation screen should be over 30 minutes when you have given the RamperPro enough time to measure light.
- Enable the usage of the light sensor in the advanced settings page
How to start a sequence and how to use the preview screen
 The only “unknown”parameters of your sequence are the end shutterspeed and end ISO. These two determine the desired end exposure. This is difficult to measure/predict by the RamperPro since even the light meter of a modern digital camera has difficulties with determining the proper exposure values of a sky full of stars. You need to know the correct shutterspeed and ISO of the end exposure when you don't want to use the image analysis function. It is our experience that you will learn this very quickly. An end exposure of around 2 seconds at ISO 1600 and F8 gives a ball park estimate of a sky line one hour after sunset. You will get the best results if you are able to make some test images a day before your actual shoot. But it is our experience that you will quickly learn that the best settings are.
All other parameters can be safely determined upfront or they can be determined by the RamperPro because the ramping speed in minutes per stop can be calculated with the light sensor. Follow the following steps to start your sequence:
- Set the desired start and end values for both the shutterspeed and ISO.
- Set the desired shots before and shots after.
- Check all other settings based on your needs. Most default values will most probably work for you.
- Determine if you want to use the light sensor. Connect the sensor at least 10 minutes before you start your shoot. Don’t block the sensor because that will influence its’readings.
 Check you shoot at the simulate screens (available from the home screen). Here you can check if the number of expected images and the total runtime are in line with what you want to shoot. The simulation output is shown for all enabled cameras. Please use the up/down buttons because the simulation is shown on a number of screens. The simulation output is only printed once when the RamperPro is in 3D mode. You can also see the readings of the light sensor at the last screen of the various simulation output screens.
- Go to the image preview screen (press the histogram in the left button bar). Take a preview images and assess the histogram. The current version of the screen doesn't’t support bulb preview images; this will be fixed in a future version of the firmware. You can change the start shutterspeed value by pressing the “-“ and “+” buttons.
- Either press the small play button on the left button bar or the big one on the home screen when the histogram of the preview screen shows you that the start values are correct.
- You can optionally extend these steps by configuring the RamperPro to use motion control hardware. These steps will be covered later in this manual.
The RamperPro will now startup. It will first run though the startup sequence:
- All camera settings are set like ISO, shutterspeed, manual mode, flash settings.
- Flash settings are not set automatically on Canon camera’s (yet). Please make sure the use the normal settings that allow synchronization with long shutter speeds
- Not all cameras can be set to manual and bulb via USB (especially the case with the Canon models). Please follow the instructions on the screen of the RamperPro
- A test images is taken at 1/80th of s second. This makes sure that at least one image is present on the card. This image is used to determine the file counter as used by the camera.
The RamperPro will now start if no runtime errors are detected. The end exposure will now be reached by either using the fixed ramping speed or by using the advanced light sensor. The use of the sensor makes it difficult the determine the total runtime and total number of images taken upfront since the ramping curve is dynamic and based on the change in environmental light.
It is safe to start 60 minutes before sunset when you use the light sensor. The minutes per stop calculation will result in a large value which means that the RamperPro will barely ramp the exposure. This makes it possible to start quite some time before the actual sunrise. You can choose to set the “shots after” value to a large number. That way you are sure that the RamperPro will continue shooting when the end exposure is reached. You can then determine yourself when you want to stop shooting.
How to use the image analysis mode
A very new, but exciting feature of the RamperPro is the image analysis mode. This is a mode where your camera needs to write jpeg images. This can either be in jpg or in RAW + jpeg mode. Every jpeg image is downloaded from the camera an analyzed. This way the RamperPro can "see" that images are over or under exposed. This information is then used by the ramping algorithm. This prevents over exposure for sunsets or under exposure for sunrises. Note that it takes time before an image is downloaded and analyzed. We therefore recommend to use an interval of around 10 seconds or longer when you enable this mode.
This mode makes it possible to ramp completely automatically. You only need to determine the start exposure, but that is easy when you use the preview mode of the controller. This image analysis software is very new and still a bit experimental but our tests have given us such good results that we have decided to release the functionality. The following table shows that parameters, that are available under the Advanced TL button, that you need to set when you want to enable the full auto mode of the RamperPro.
This mode works by evaluating the histograms that the RamperPro calculates out of the images from your camera. Defining the correct settings might be challenging in the beginning and that is the area where future firmwares will assist you better. But the default values will probably work when you just enable the histogram mode of the RamperPro.
The clipping areas which are the left bars of the histogram to determine under exposure or right bars of the histogram to determine over exposure can be configures in the settings menu. You can also define the number of pixels that you define as still acceptable. Every bar in a histogram can hold a maximum value of 100. Lets say that you define the right clipping area to be 5 bars wide. This means that the RamperPro will calculate a total value of 500 (5 * 100) when the image is fully over exposed. That is because the right part of the histogram will be totally filled. The cut off value that you can set determined the value that you define as still acceptable. A value of 5 bars and a cut off of 250 tells the RamperPro that over exposure is defined when 250 pixels are filled on the right 5 bars of the histogram.
| Feature | Description |
| Histogram mode | Set this value to yes if you want to enable the image analysis mode of the RamperPro. |
| Show previews | Select this option if you want to review your images on the RamperPro display. This is very useful for Nikon shooters because Nikon camera's don't support image playback when these cameras are connected via USB. This mode will extract a preview image from the downloaded jpeg image and it will show it on the RamperPro display (available on the runtime overview screens). Note that this mode can be uses separate from the "Histogram mode". |
| Right clipping | The sets the right part of the histogram that is used to determine over exposure (needed for sunsets) |
| Right cut off | This sets the total amount of pixels that are acceptable in the right clipping area. |
These settings may sound complex, but lets investigate the following two settings. Let's say we are ramping a sunset of a city. The right clipping area is set to 1 and the right cut off is set to 6. This tells the RamperPro that over exposure is detected as soon as the value of 6 is found in the outer right part of the histogram. We have tested these two values and we had great results when we did our tests in a city or when we were shooting directly into the sun.
Please do the following when you want to use the Histogram mode:
- Set a very high end exposure for sunsets (like ISO 3200 and a shutterspeed of 60 seconds) or a very fast exposure for sun rises (like ISO 100 and 1/8000 for the shutterspeed). This might sound strange, but the histogram mode acts like a hand break. You will never reach there settings.
- Set the clipping parameters. Start with the factory defaults and tweak them for your needs. We will post more about these parameters in the future.
- Set a high value of shots after. This prevents the RamperPro from stopping too early. This will probably be changed in the future so that you have more control about the number of images in your shoot or about the total runtime of the shoot.
The image analysis software and the light sensor work great when used together. Please check the next page that gives more information about the light sensor and the image analysis mode.
Runtime overview screens
The simulate button on the home screen will change in a runtime overview button when the RamperPro is running. You can then use this button to see the various runtime results. There is a timeline that shows how many images are made in shots before, normal exposure speeds, bulb speeds. There is also a graph that shows the amount of ramped stops against the number of images that are taken. There are also screens that show the exposure speed that is used, the current ISO, the name of the current image that is written by the camera etc. The last two screens of the overview mode show the measured and used time per stop when you use the light sensor and a screen that shows the image histogram that is pulled out of the jpeg images from your camera in full auto mode.
Important note about removing the light sensor
The light sensor of the RamperPro is hot pluggable. You can plug it in after you have powered the RamperPro. The controller will then automatically detect the sensor and it will start to measure ambient light. You can unplug the light sensor at any time, but we don't recommend to unplug the light sensor while you are exposure ramping.