The A7Riii has a different setup because this new camera is able to store the images on its' internal memory card. Please read this blog post about the A7Riii [1] if you want to use this camera with the RamperPro.
There are a few things that are different from other cameras when you want to use the RamperPro with a Sony Alpha camera. Sony made a strange decision with their current camera firmwares. The camera is not storing its' images to the internal SD card as soon as you connect these cameras to a PC/Mac/RamperPro.
The images from the camera (CR2) are therefore downloaded to the RamperPro. That takes time, but we pulled a lot of tricks to make this as speedy as possible. There is an effect on the minimum interval because of this. The Sony A7RII with its huge files can ramp with an interval of around 10 seconds (which would fit our personal shooting in almost all cases).
This also means that you need a large SD card inside the RamperPro to hold all the images. This is why we introduced the delete icon a few firm wares ago. That way you can delete the RAW images from the RamperPro directly from the system menu.
Sony cameras can only connect either a USB cable or a trigger cable (S2). The reason for this is because the port on the A7 can either hold a remote (S2) cable or a USB cable, not both
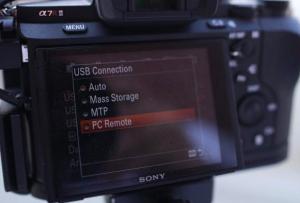
For ramping Sony cameras are controlled via USB only. This means that you need to connect a (micro) USB cable between your Sony camera and the RamperPro.
Note: The camera is not triggered via USB in the basic (intervalometer) mode of the RamperPro. Then you need to use an S2 trigger cable between the cam1 port of the RamperPro and your Sony camera. This has the advantage that you can used shorter intervals like you can with any other external intervalometer.
There are a few settings that need to be setup properly in the menu of your Sony Alpha so that it can work with the RamperPro:
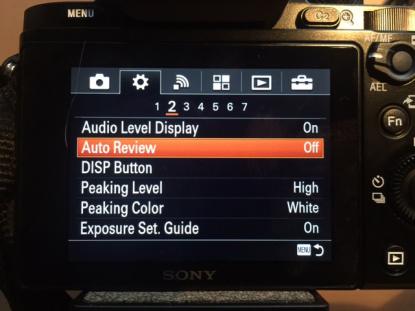
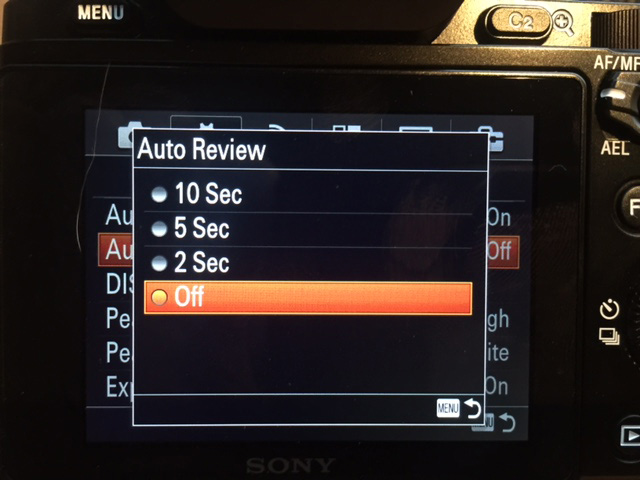
Its is also important to switch off "Auto Review". This will lead to an unwanted delay on your camera and your camera will not correctly take over the USB commands from the RamperPro:
 |
 [2] [2] |
| Set "Auto Review" Off | Any other value than "Off" will lead to a loss of USB commands. |
You only need to connect one cable between the RamperPro and a Sony camera. This is a micro USB cable. We supply high quality TetherPro micro USB cables in our online store [3]. You don't need a USB cable when you are using the normal intervalometer mode of the RamperPro (easy mode). Please connect an S2 cable between the cam1 or cam2 port of the RamperPro and your camera when you want to use the RamperPro without its' ramping features.
The images are not stored on the memory card of the camera. That is why you need a large memory card inside the RamperPro. You can create such a card yourself or you can get one from our online store. We offer a fully installed and ready to use 128GB memory card for the RamperPro that you can find here in our store [4].
Make sure to get the correct memory card for your RamperPro. The RamperPro1 uses an SD card, the RamperPro2 uses a MicroSD card. MicroSD cards are almost always supplied with an adapter, so these cards will fit both models of the RamperPro.
You can create the large RamperPro memory card with free software on your Mac computer. First you must make sure to download and install XQuartz. This installation is pretty straight forward. You can find this software on the XQuartz project page at: http://www.xquartz.org/ [6]
You need two memory cards to prepare the large Sony compatible memory card. One that is inside the RamperPro while you create the memory card. This can be the 8GB card that was supplied with your controller. Just make sure to use firmware 3059 or higher on this memory card.
The large card that you want to use with your Sony camera must be connected to the RamperPro via a memory card reader. Please make sure to install the RamperPro SD card image on this card as it is explained earlier on this page. Place the large card in your card reader and connect it to your RamperPro.
Make sure that your RamperPro is connected to your local network via a network cable. You can now start the RamperPro if you haven't done this already.
You can now prepare the memory card. You first need to know the network IP address of your RamperPro. You can do this by entering the command arp -a in a terminal window.
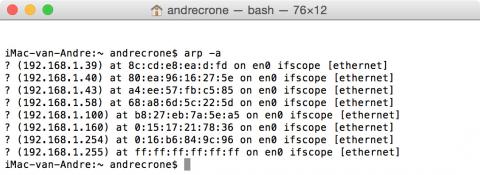
One of the IP addresses will be linked to your RamperPro. In this case its 192.168.1.100. Now you can startup the software that can prepare your memory card by entering this command in the terminal window: ssh -X ramperpro@192.168.1.100 gksudo gparted
The password that you need to enter is: ramperpro
Ignore the warnings that you will see in your terminal window. This should look like:
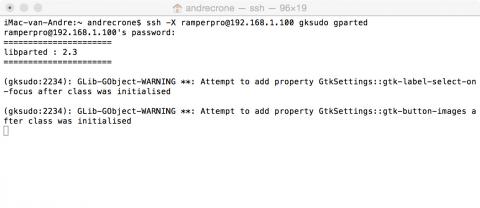
You are now running a piece of software on your RamperPro. But the graphical interface is shown on your Mac! This software is gparted which is an open source partition manager. You can use this partition manager to modify the partition of the memory card that is placed in your card reader.
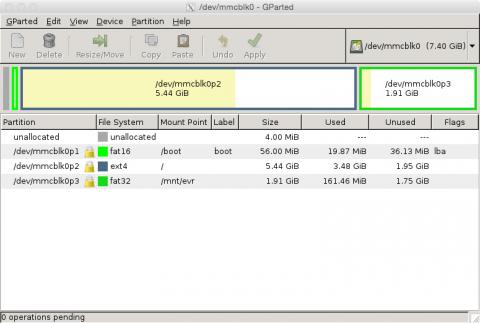
Select the correct device by selecting the 2nd option at the top right (under /dev/mmcblk0). Then you will see the new memory card. Resize the last partition on this card to the maximum size. Make sure to hit the "Apply" button afterwards. Then the card will be prepared (this can take a while).
Shutdown the RamperPro and you are ready to use the memory card that is in your card reader. You can do so by swapping it out for the one that is inside the RamperPro.
Conrad Olivier created a perfect video that hows how to create a RamperPro (micro)SD memory card with Sony support on Windows:
Links
[1] http://www.elysiavisuals.com/content/how-use-sony-alpha-%CE%B17r-iii-ramperpro
[2] http://www.elysiavisuals.com/sites/default/files/img_1219_0.jpg
[3] http://www.elysiavisuals.com/content/tetherpro-usb-cable-ramperpro
[4] http://www.elysiavisuals.com/content/ramperpro-128gb-memory-card-sony-a7
[5] http://www.elysiavisuals.com/content/how-fix-startup-problems
[6] http://www.xquartz.org/