 [1]The history of the ElysiaVisuals RamperPro time lapse controller started in 2011. The general consensus at that time was that it is not possible to make good sunset time lapse movies with a Nikon camera. These movies are made by ramping the exposure time of the camera. Its getting darker but the exposure is made longer in small steps which results day to night transitions. The same is true the other way around for sun rises. Classic ramping solutions worked by using bulb ramping. The camera is set to bulb and the bulb time is accurately controlled by the time lapse controller. This gives a limited use because you cannot use fast shutter speeds or bulb times faster than approximately 0.3 seconds. Classic bulb ramping cannot be done with a Nikon because you cannot achieve any desired bulb speeds because Nikon uses discrete steps in bulb.
Here the RamperPro steps in. You can use any desired shutter speed or any desired bulb speed to create ramping sequences. The camera is automatically controlled via USB by the controller. That makes it possible to automatically shift the ISO during your shoot. The RamperPro can therefore easily ramp over 20 stops from bright day light to stars. We like to talk about exposure ramping and not about bulb ramping because you are not limited to bulb mode when you use the RamperPro.
The RamperPro still uses bulb mode to get the best out of your digital Nikon, Canon or any other brand camera. We use three cables to connect a camera in order to get full control. The RamperPro uses a USB cable to control shutter speeds or any other camera settings. The remote connection of your camera is also connected to the RamperPro to trigger the camera. We don't use USB to trigger the camera because this can cause lag. This way the RamperPro can fire the camera very accurately; it can even trigger two camera's at exactly the same time. The third cable to your camera is only needed in bulb mode. The RamperPro uses this cable the accurately measure the exposure time of the camera in bulb mode. The RamperPro can detect if this cable is not available or not connected properly and the controller will show an error message when this is true.
The RamperPro offers true automatic exposure ramping. The RamperPro uses an external light sensor that is used to determine the trend in the ambient light. That way the RamperPro can detect if you are shooting a sunset or a sunrise. The light sensor measures the trend in light in minutes per stop. This means that the RamperPro will automatically start ramping during a sunset. The minutes per stop is large (40 minutes) 30 minutes before a sunset and around 10 minutes during the actual sunset. This is very accurately measured by the RamperPro and used in the ramping algorithm.
We have added a unique feature that has never been available on a hand-held time lapse controller. The RamperPro can download the actual jpeg images that are shot by the camera. This only works when your camera is set in raw + jpeg. The downloaded jpeg images are then analyzed by the RamperPro. The resulting histogram is used by the ramping software. This way you can never have over exposed images when you are shooting a sunset. The histogram analysis software acts as a hand break when you are accidentally ramping too fast or when the defined end exposure is too bright.
RamperPro feature overview [2] from ElysiaVisuals [3] on Vimeo [4].
Make sure to set ‘External Speedlite control’ to “Enable”. You also need to make sure that the ISO and shutterspeed steps are in 1/3 stop increments (and not in 1 stop increments). These are the default values of your camera, so you are fine if you have never changed them on your camera.
The RamperPro has no built-in battery. We have done that because we believe that its better to have options when you want to power the RamperPro. The unit will approximately use 5 Watts. That means that you will have a very long runtime when you use a LiPo battery like our RamperPro battery kit [5]. There are two ways that you can use to power your RamperPro:
There is a third way that you can use. The RamperPro features two MoCoBus connectors. You can also provide 12V via these MoCoBus connectors. The use of the MoCoBus is for future use when more MoCoBus enables motion control hardware will become available on the market. You should think of MoCoBus enabled stepper motors for example. The RamperPro will then become a fully featured motion controller.
RamperPro firmware 3068 and higher now support USB triggering of your camera. That means that you don't always have to connect the remote trigger cable and PC sync cable as described in the section below. Just connect the USB cable betwen the RameprPro and your camera. Make sure that USB triggering is configured on your RamperPro! Navigate to the camer1 and camera2 icons in the system menu (tools icon in the button bar). There you can set the property "Trigger by USB" to true.
We don't recomend to use USB triggering when you want to use two cameras in stereo mode with your RamperPro. Then its very imporant that both cameras are triggered at the same time; you need to use the remote trigger cable in that case. We also recommend to use remote trigger cables when you shoot with 3 or more cameras when you daisy chain multiple RamperPro controllers via the MoCoBus.
You need to connect at least two cables between the RamperPro and your camera if you want to use the ramping mode of the RamperPro. Note that you only need the trigger cable when you are using the RamperPro in "Easy" mode since that mode doesn't support USB control: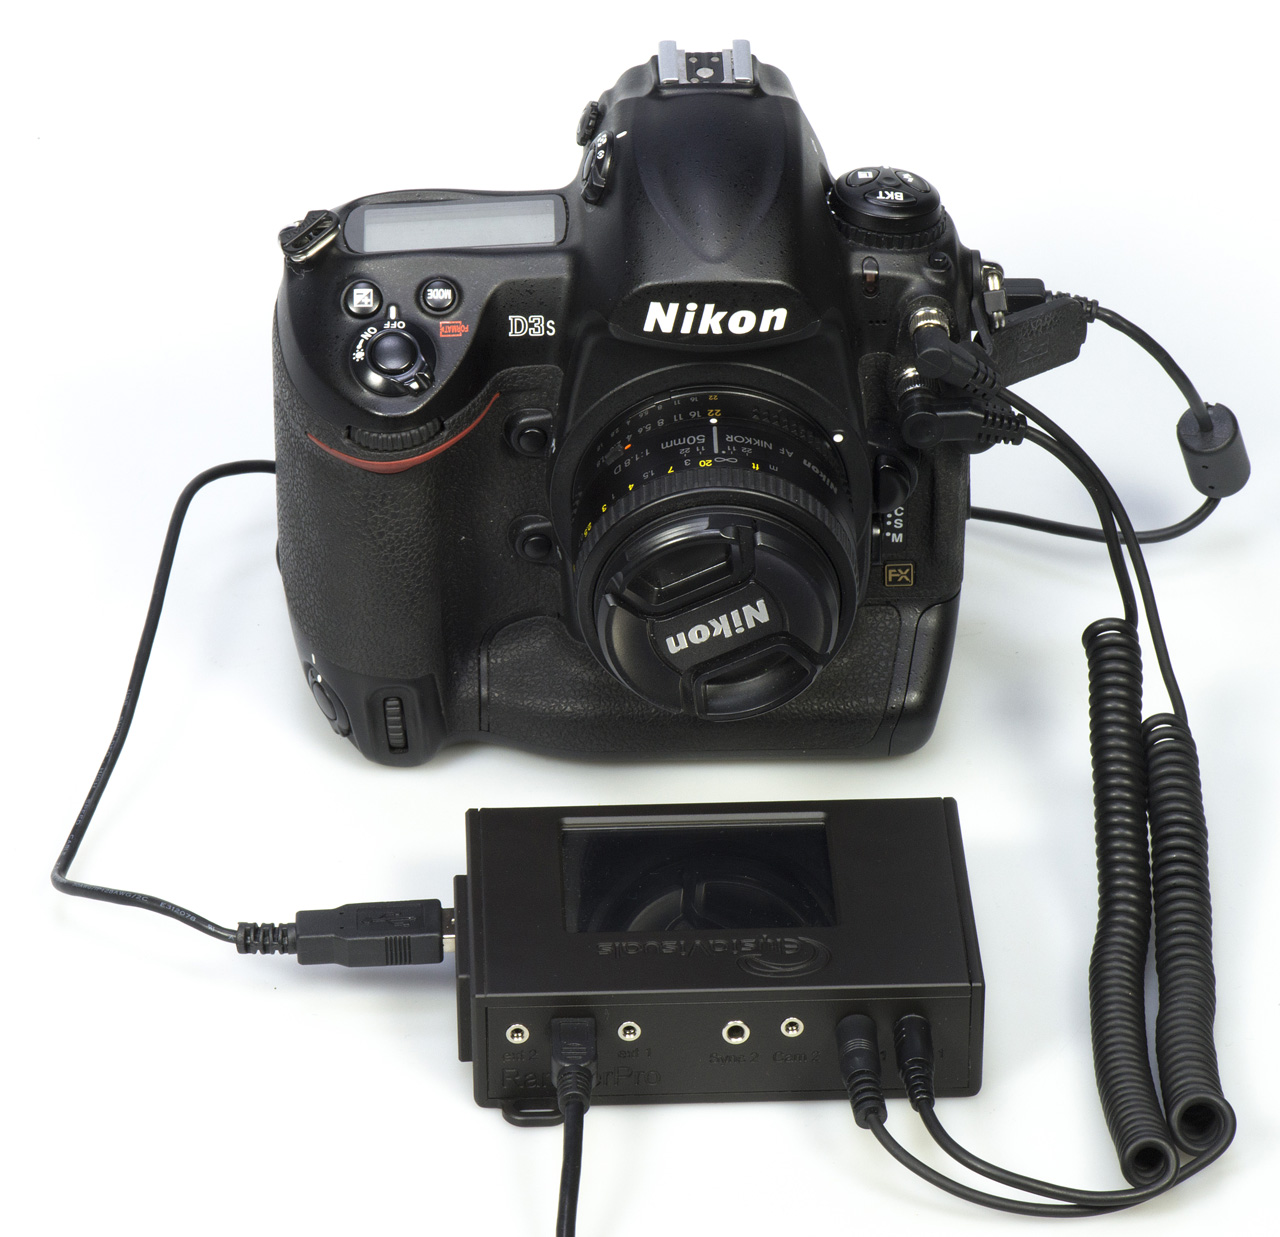 [6]
[6]
Here you see the back of the RamperPro. The connections for camera one are at the side of the unit. The connectors for camera two are in the middle of the unit. It doesn't matter which USB port you are using per camera. The ext 1 and ext 2 connectors are needed when you want to connect your RamperPro to a time lapse motion control device like the MX2, MX3 or TB3.
Some cameras like the Nikon D610 or D750 don't have a PC sync connection. In that case you can get a hot shoe adapter [8]. Another trick can be not to use bulb mode (also in the situation where you forgot to bring one with you).
We have seen that some camera's become unreliable when you touch any of the buttons or if you stop and then start a timelapse sequence. This is especially true with some, older, Canon models. This is not a big issue is you need to know what to do. Please keep yourself to the following:
The RamperPro uses Linux as an embedded operating system to function. A minor drawback of this approach is that the RamperPro needs some time to startup. Please be patient when you power the Ramper Pro as it will take around 20 seconds before the user interface of the unit will be available.

Please take care to shutdown the RamperPro the proper way. You cannot just power down your PC and the same is true for the RamperPro. Just removing power can result in a corrupt SD card. So, please take care when you want to power off the RamperPro. Just press the "Shutdown" button on the main screen and confirm this by pressing the big button that you will see on the power off screen. The screen of the RamperPro will then turn black. Please wait at least 10 seconds after the screen turned black before you remove power. That's it!
The RamperPro can both be used to make a movie of a sunset or a sunrise. We will only mention sunsets in examples when we are explaining the generic usage of the RamperPro to keep the manual as simple as possible.
 [9]The RamperPro has a touch screen interface. There are no physical buttons that you need to control the unit. You can operate the RamperPro by pressing the icons with your finger or with the supplied touch screen stylus.
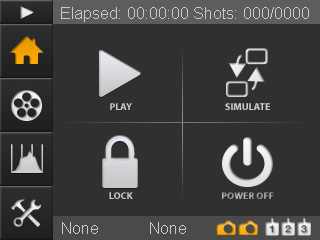
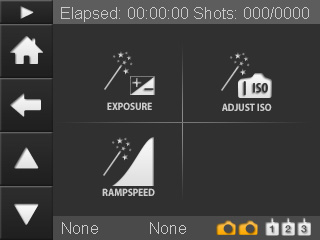
At the left you see the default home screen of the RamperPro. The header of the screen will always show you information that is within the context of the current screen. In this case you see runtime information. This runtime information will be updated when the RamperPro is actually running. The footer shows two orange cameras. This means that the RamperPro is configured to run for two cameras. A white camera indicates an inactive camera. The text "None" indicates that no camera is connected via USB. These two texts will be replaced by the name of the camera(s) that are discovered by the controller when you connect them via USB. You can press the "None" texts or the name of the discovered camera name. That will show you a screen with the details of the connected camera. That way you can see which camera is found to be number one and which camera is detected as camera two.
There are two different button bars that are always displayed on the left of the screen. Here you see the "Home', "Movie settings", "Preview" and "System settings" buttons. You are currently on the home screen, that is why the home button is orange. You can always start the RamperPro by pressing the small "Play" button that is displayed on the top of the button bar. That will initiate the start sequence and the RamperPro will start to take pictures if no configuration errors are detected.
The center of the screen contains the main action buttons. Different screens can display different action buttons that open up the functionality of the RamperPro. The "Play" button is used to start the RamperPro. The "Simulate" button displays a detailed runtime simulation overview of the configured timelapse sequences. This can be an overview per camera if the cameras are configured to have different settings. The "Lock" button locks all buttons except for the "Unlock" button that will appear when you lock the screen. That way you cannot accidentally stop a timelapse when the unit is running. The "Power off" button is used to power down the RamperPro in a graceful manner.
All buttons have alternating colors that you will see when you press a button. That way you can easily see if you have really selected the correct button. You can always move your finger of stylus away from the button while you press it. That way can can release your "press" outside the button area. That way you are not actually pressing the icon and therefore you are not actually selecting the underlying functionality.

There are two different left navigation bars. The first bar is for example shown on the home screen. There is also a left navigation bar that is used for screens when multiple options are available.
You can scroll though screens when the available options don't fit on one screen. An example is the configuration of the exposure ramping engine. There are just too many options to show at once. The RamperPro will show the navigation bar as show at the left when you can scroll though the various options. Use the "Up" and "Down" buttons to navigate through the different pages. You can always navigate back to the previous page by pressing the "Back" button. The icon at the top of the navigation bar indicates the context or setting of the page that you are currently in.
Parameter values that are changed are saved as soon as one of the buttons on the navigation bar are pressed. This basically means that changed values are saved as soon as you navigate away from the screen.
 [10]
[10]
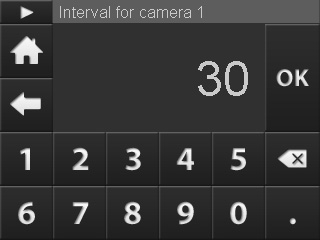
There are two ways that you can use to enter or modify parameters. There are sliders that you can use. You can modify the value of these sliders by dragging the slider over the screen. There is also an on-screen keyboard that you can use to enter your value of choice. You can simply press the value on the parameter screen that you want to modify. The value will get an orange border if you select it. This will then show the on-screen keyboard that you see at the left. The title of the screen will always show you which parameter you are modifying. You can use the buttons the modify the value. You can also modify time values with this keyboard. The keyboard will then show a cursor that indicates the digit that you are currently modifying.
It if of course possible to enter strange parameter settings. The validity of certain parameter values is depending on the value of other parameters. An example is that the end ISO must be larger than the start ISO when you are exposure ramping a sunset. The RamperPro will check these parameters in their context when you either press the "Play" or the "Simulate" button. These configuration "errors' are not validated in the on-screen keyboard because that would result in many messages while you are still configuration your timelapse sequence.
You can press the "Back" button in the left button bar if you which to exit this screen without modifying the actual value. Press the "Ok" button if you want to save the value. All values are saved almost immediately. This means that the RamperPro will always startup with all parameter values of the previous session. You can also always return to the home screen by pressing the "Home" button.
The RamperPro contains a lot of fields that you can use to configure the various parameters that control your timelapse sequence. All of these fields have a label that indicates the meaning of the field. You can get help of the field by pressing its' label. That will give you a popup that describes the meaning of the field. Note: The initial release of the RamperPro firmware will not contain a detailed field description for all parameters. These descriptions will be added in (free) future releases of the firmware.
The RamperPro automatically detects a change on the USB connections. The screen will give feedback when a new camera is detected or when a camera is removed. Cameras that are not supported by the RamperPro will be rejected by the software and these cameras can not be used with the controller. The numbering of the connected cameras cannot be influenced since this depends on how they are detected by the USB bus. Your camera will always be connected as camera one when you connect only one camera to the USB bus. It might be possible that this camera will become camera two when you add a second camera to the USB bus.
The trick is to first connect two cameras via USB. You can then see on the display which camera became camera one and which became camera two. You can then connect the shutter release and PC sync cables to the corresponding cameras. You can take a preview image with the RamperPro. That image is then shown on the touch screen. You need to connect both the USB cable and the trigger cable if you want to take a preview image. This way you can always check if the cables for camera one and two are correctly installed because camera one should fire for preview image 1 and camera two should fire for preview image 2.
 The current version of the RamperPro supports two different modes. "Easy" mode and "Advanced" mode. More modes, like HDR, will be added in the future. Easy mode is a basic intervalometer while advanced mode provides you full exposure ramping possibilities. At the left you see the movie settings screen that you can reach from the home screen.
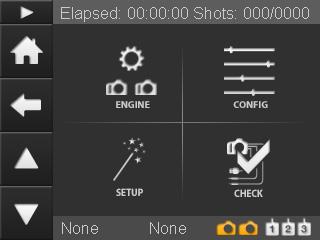
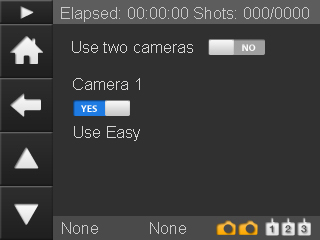
The "ENGINE" screen provides the configuration of the different modes per camera. You can define if you want to use one or two camera's. You can set the desired mode (Easy or Advanced) per camera and you can specify if you want to make a stereoscopic time lapse where two camera's are synchronized. The section below describes the various options of the engine selection screen.
The "CONFIG" screen provides access to the settings of the Easy and Advanced modes per camera. These settings are explained in more detail in the appropriate section of this manual.
The "SETUP" screen shows you the various steps that you need to perform when you want to connect your camera or motion control device to the RamperPro. A future version of this screen will consist of a real wizard that will configure the interface with motion control hardware for you.
THe "CHECK" screen shows a check list that you can use when you are starting a timelapse. This way you cannot make any mistakes when you are configuring your camera. We are working on a new firmware that will automatically check if your camera is connected properly.
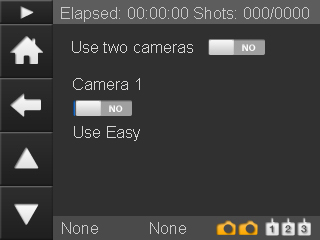
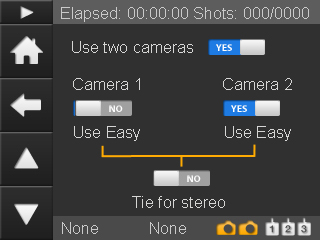
Lets start with describing how you can set the desired engine for your camera(s). The engine selection screen will only show certain options when they are valid. You cannot set the "Stereo" mode when you only select one camera for example. This is a feature that many configuration screens of the RamperPro are using.
The following table describes the settings that you can find on the engine selection screen.
| Feature | Description |
| Use two cameras | Do you want to use one or two camera's? |
| Use Easy | Here you set the actual engine per camera. Set this setting to "Yes" if you want to use the basic intervalometer functionality for the selected camera. Set this value to "No" if you want to use the exposure ramping mode for the selected camera. |
| Tie for stereo | Set this value to "Yes" if you want to make stereoscopic timelapse sequences. You cannot set the value for camera two if you set this to Yes since the settings for camera one will then be used for both camera's. |
The following screens show some examples of various settings on the engine selection screens.
 [11] Only one camera is used in basic intervalometer mode. [11] Only one camera is used in basic intervalometer mode. |
 [12] Only one camera is used in exposure ramping mode. [12] Only one camera is used in exposure ramping mode. |
 [13]Two camera's are used. The first runs in exposure ramping mode. The second camera runs in intervalometer mode. [13]Two camera's are used. The first runs in exposure ramping mode. The second camera runs in intervalometer mode. |
 [14]Two camera's are used in stereoscopic mode. Both camera's will run in exposure ramping mode. [14]Two camera's are used in stereoscopic mode. Both camera's will run in exposure ramping mode. |
It is possible to have one camera in basic mode and one camera in advanced mode. The advanced mode camera must always be camera one in this case. This is because the first camera that is connected to the USB connectors is defined as camera one.
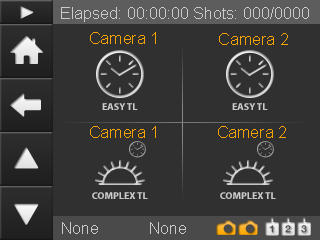 [15]The "CONFIG" button on the parameters screen leads to the screen on the left. The four icons will lead you to the parameters of the time lapse engines.
You can enter all parameters twice; one per camera. You can always use the settings from camera one for camera two. You can do so by setting the "Use camera one settings" flag. All settings are stored for later use. That way you can setup your parameters up-front. Don't be overwhelmed by the large number of parameters that you can set (especially for the exposure ramper). You will probably set most parameters only once and the default values will work in many situations. The full automatic mode of the advanced engine will overrule many settings for example.
Which set of parameters is used?
The RamperPro will use the settings of engine one when you run the controller in stereo mode, so when "Tie for stereo" is selected. This leaves the settings for engine two untouched. There is a flag on all engine two parameter sets that says "Use camera one settings". This means that the controller will use the settings from engine/camera one when you have selected this flag. The controller will use the settings from engine or camera two in all other cases.
You can always check your expected runtime behavior by running a Simulation. The "Simulate" button is available on the home screen of the RamperPro. The provided simulation will only be shown once when you have selected "tie for stereo" because the two camera's will show the same output. You will see a simulation per camera when you are not running in stereo mode. The provided feedback gives you information about the runtime of the sequence and a lot more.
The simulation screen will also show the real time output of the light sensor when you have selected an advanced engine and when you have configured that you want to use the light sensor. The output shows the change in ambient light (Sun setting, Sun rising) and the measured amount of light in Lux. The calculated EV value is calculated based on the Lux value for ISO 100.
 The basic intervalometer mode of the RamperPro gives you an intervalometer that can be used for "normal" timelapse sequences. Just set the interval between the images that you want to shoot and you are good to go. Don't forget to set the "Number of images" setting because that sets the amount of images that the basic intervalometer will take before it will automatically stop. Set this value to a high value if you don't know how many images you are going to take upfront.
The basic mode supports interval ramping. That makes it possible to make the interval longer or shorter over a number if images.
| Feature | Description |
| Interval ramping | You can ramp the interval if you like. This means that you can change the interval over time. You just need to set the exposure from which you want to start interval ramping. You can make the interval longer or shorter by entering the required start and end interval. Just set the desired start frame where interval fairing should start and the end frame where the end interval should be reached. You can only enter the start and end interval if you enable interval ramping. |
| Interval | The interval in seconds before a next shot is taken by the RamperPro |
| Shutter speed | There are two ways that you can use to determine the shutter speed of your images. You can either set the camera to a manual speed or in aperture mode. That way the camera will set the exposure of your images. You can also set the camera to Bulb mode and set the required shutter speed here in seconds. Note that most camera's don't support fast shutter speeds in Bulb mode, a value of at least 0.3 should work here. |
| Number of Images | The maximum number of images that you want to shoot. Set this value to a high value if you need to shoot an "unlimited" number of images. |
| Use camera 1 settings | This value is only available for camera two. A value of "Yes" indicates that all settings for camera 2 are taken from the settings of camera 1. |
The shutter speed of your camera can be set in two different ways when you run the basic intervalometer mode of the RamperPro:
There is no USB control on your camera when you use basic mode. The only cable that you need to connect is the trigger cable. Please don't connect the USB cable to a Canon camera when the camera is operated in basic mode. A USB cable will block all operations and the RamperPro will not take any images. Only connect a USB cable when you are running the advanced mode because then the blocking USB mode is overcome by the software of the RamperPro.
 The advanced mode is the exposure ramping mode of the RamperPro. You need to use this mode when you want to shoot a sunset or a sunrise. There are two ways that you can use to configure this highly advanced feature of the RamperPro. The easiest way is the "non expert mode". That mode will only show you the most necessary settings that are needed to setup an unattended sunset or sunrise; all other settings are defaulted for you. The expert mode will show all the settings of the RamperPro. Some of these settings can be a bit overwhelming when you first use the RamperPro. You can probably shoot 95% of your time lapse movies in the non expert mode. We therefore recommend to start easy. We also recommend to shoot a sunset first when you want to learn the RamperPro. Shooting sunsets is much easier than shoot sunrises because you have no way that can can over expose your images during sunset shoots.
This video shows how easy it is to setup an unattended sunrise or sunset in only four steps
How to setup your unattended sunset or sunrise in four steps [16] from ElysiaVisuals [17] on Vimeo [4].
The RamperPro is based on a concept that we call ramping speed. That is the speed that the RamperPro needs to ramp to keep up with changing light conditions during a sunset or a sunrise. The ramping speed is mostly determined by the light sensor of the RamperPro. The light sensor combined with the histogram mode of the RamperPro will make sure that the proper exposure of your images is realized. The "non expert mode" settings will properly setup the technical details for sunrises and sunsets.
Its very important to start your sequence with the correct start exposure. Make sure to setup the correct start and end ISO values. You can test these values by pressing the histogram button on the home screen. There you can press the touch screen after which the RamperPro will properly setup your camera and then it will take a test image. Please evaluate the image and histogram there. You can modify the start exposure directly from this setup screen by pressing the + and - icons.
The end exposure of your sequence is the exposure where the RamperPro should start ramping. There are two ways that the RamperPro will stop ramping. The first is when the end shutter speed and end ISO is reached. The second situation is where the histogram mode of the RamperPro will detect a properly exposed image. This automatic stopping will not work in dark conditions where you ramp from day to stars because the histogram will be quite dark in that situation. But the automatic stopping works perfectly in situations with a lot of light like in cities.
RamperPro tutorial - How to create stunning sunsets with the RamperPro [18] from ElysiaVisuals [3] on Vimeo [4].
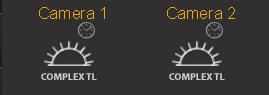
There are many settings that determine the exact behavior of the RamperPro. These settings are available on the various screens that become available when you press the Camera 1 and Camera 2 Complex TL buttons. The following settings can be set in order to configure the advanced mode of the RamperPro.
| Feature | Description |
| Interval ramping | Indicates if you want to change the interval during the shoot. The interval can be made longer or shorter by setting the desired start and end interval. The change in the interval can be triggered by either a key frame or when an specific exposure (in seconds) is reached by the ramper. Disabling interval ramping gives you a fixed interval. |
| Interval | The interval in seconds before a next shot is taken by the RamperPro |
| Use external intervalometer | You can use external intervalometers to trigger the RamperPro. An example of this is when you use DitoGear motion control hardware. The motion control hardware can trigger the RamperPro to take the next shot; that way you are perfectly synchronized with the motion control hardware. Just connect the camera output of the external intervalometer directly to the I/O port that is linked to the camera for which you are setting this value. |
| Shots before | The number of non ramping images that are shot before ramping start. The RamperPro will use the start shutter speed and start ISO to set the exposure on the camera. You don't need this setting a many cases. The light sensor will measure when a sunset starts. So you can perfectly start a sunset timelapse one hour before sunset when you use the light sensor. In that case there is no need to use shots before to reach the exact moment of the sunset. |
| End by runtime | You can now set either a fixed number of images or a runtime to define how long the RamperPro should be shooting images. This makes it much easier to combine the RamperPro with a motion control device because you now exactly know how many images the RamperPro will shoot. The simulation mode will show you the number of total images when you define the length of your shoot by entering a time; this also takes into account interval ramping. |
| Time per stop | This sets the speed of the exposure ramper when you are not using an external light sensor. The time per stop is the amount of time that it takes the ambient light to change per stop. A setting of around 10 minutes around sunset is a workable value. This setting is overruled when you use a light sensor, because the sensor will make this setting dynamic. Disabling the light sensor will thus use a fixed ramping speed base on "Steps per stop". This is not the best situation because you will ramp too slow at the beginning of a suns set and this is why we created the advanced light sensor. |
| Start exposure | The start shutter speed that you want to use for the ramping sequence. This value can be tweaked to be perfect later on with the preview screen that is available on the home screen. This preview screen enables you to take an image with your camera so that you can evaluate the histogram. The + and - buttons on that screen enable you to modify the "Start exposure" too. You can either use a shutter speed by setting a value with the slider. You can also slide the slider to the right and choose "Manual". You can then enter a manual speed (in seconds). |
| End exposure | The end shutter speed of the ramping sequence.ou can either use a shutter speed by setting a value with the slider. You can also slide the slider to the right and choose "Manual". You can then enter a manual speed (in seconds). |
| Start ISO | The ISO that you want to start with. This ISO value together with the "Start exposure" determine the exposure of you initial images. This is also the exposure that is used by the preview screen. |
| End ISO | The ISO that is set on the camera at the end of the ramping sequence. This ISO value together with the "End exposure" determines the exposure at the end of the ramping sequence. The actual end ISO and end shutterspeed can automatically be overruled when you use the image analysis mode. |
| Start Bulb speed | The RamperPro can use normal shutter speeds like 1/8000 during a ramping sequence. But you can use longer shutter speeds after a sunset or at the start of a sunrise. We recommend to use the bulb mode of your camera for the realization of longer shutter speeds. This value determines the minimal shutter speed (in seconds) after which the RamperPro will use the bulb mode on your camera. A value of 0.5 seconds is a safe value. This means that all shutter speeds longer than 0.5 seconds will be made in bulb mode during a ramping sequence. Note that Nikon cameras will be set to Bulb mode automatically by the RamperPro. Most, if not all, Canon cameras need to be set to bulb manually because these cameras don't support "Set to bulb" via USB. Another important thing to remember is that you need to connect the PC sync cable to your camera when you are enabling Bulb mode here. This cable is used to determine the correct shutter speed in bulb mode and to measure the actual Bulb speed that was used by the camera during exposure. |
| ISO Shift speed | The RamperPro can automatically shift the ISO while ramping. This means that for a sunset you can start with ISO 100 and end with ISO 1600 for example. The RamperPro will change the ISO value when a shutter speed is reached during ramping of this value. Lets say that your camera supports ISO values in 1/3 stops (100, 125, 160 etc). The RamperPro will move to the next available ISO value when the ramping shutter speed reached the value of "Reciprocity speed" and it will lower the ramping shutter speed with 1/3 stop to compensate in order to get the proper exposure. We recommend to use a value that is at least 1/3 of a stop longer than the "Start Bulb speed". Otherwise the RamperPro will switch back to normal speeds after an ISO shift (since the ramping shutter speed will be set back to a speed lower than "Start Bulb speed". A "Reciprocity speed' of 0.7 seconds is safe when you set "Start Bulb speed" to 0.5 seconds. |
| Frame rate | This value is only used in simulation mode. This is the play back frame rate that you want to use when you create a movie of your images. This setting is used to show the length of your resulting movie. |
| use auto mode with light sensor | This indicates if you want to use an external light sensor. The light sensor will overrule the "Steps per stop" setting because the light sensor will determine the ramping curve automatically by measuring the trend in the changing environmental light. Note that the RamperPro will use the value of "Steps per stop" when you ramping sequence is started when no light sensor is connected. |
| Minimum time per stop | The light sensor measures the "time per stop" that ambient light is changing. This value will become too fast when it is getting darker. One of the reasons for this is that the sensor needs light to calculate a reliable value. This value is just not good enough when it is getting to dark for the sensor. This in practice can easily result in calculated measurements of 3 minutes per stop during a sun set. That means that the RamperPro will ramp one stop per 3 minutes. That is way too fast since this will result in over exposed images. The "Minimum time per stop" indicates the minimum ramping speed that the RamperPro can use regardless of the sensor readings. A value of 5 to 6 minutes is a save value here. It is normal that the RamperPro calculates a "time per stop" of 20 to 30 minutes before a sunset, so that is the ramping speed that the RamperPro will use when you start. The time per stop will than become faster since the sun is setting, but never faster than the value of this setting. |
| Sensor gain | This value is multiplied by the calculated time per stop. You can see this new setting, that is 1.0 by default, as a sensor calibration value. A value of 0.9 will make the RamperPro ramp 10% faster than calculated purely by the light sensor. We have tested this setting extensively. A value of 0.9 is probably what most users need; a value of 1.0 will give you the original performance of the RamperPro. A value less than 1 makes the RamperPro ramp faster than calculated by the light sensor. A value larger than 1 makes the RamperPro ramp slower than calculated. A value between 0.7 is good for sunsets, sunrises need a smaller value like 0.67 or 0.55. |
| Use camera 1 settings | This value is only available for camera two. A value of "Yes" indicates that all settings for camera 2 are taken from the settings of camera 1. |
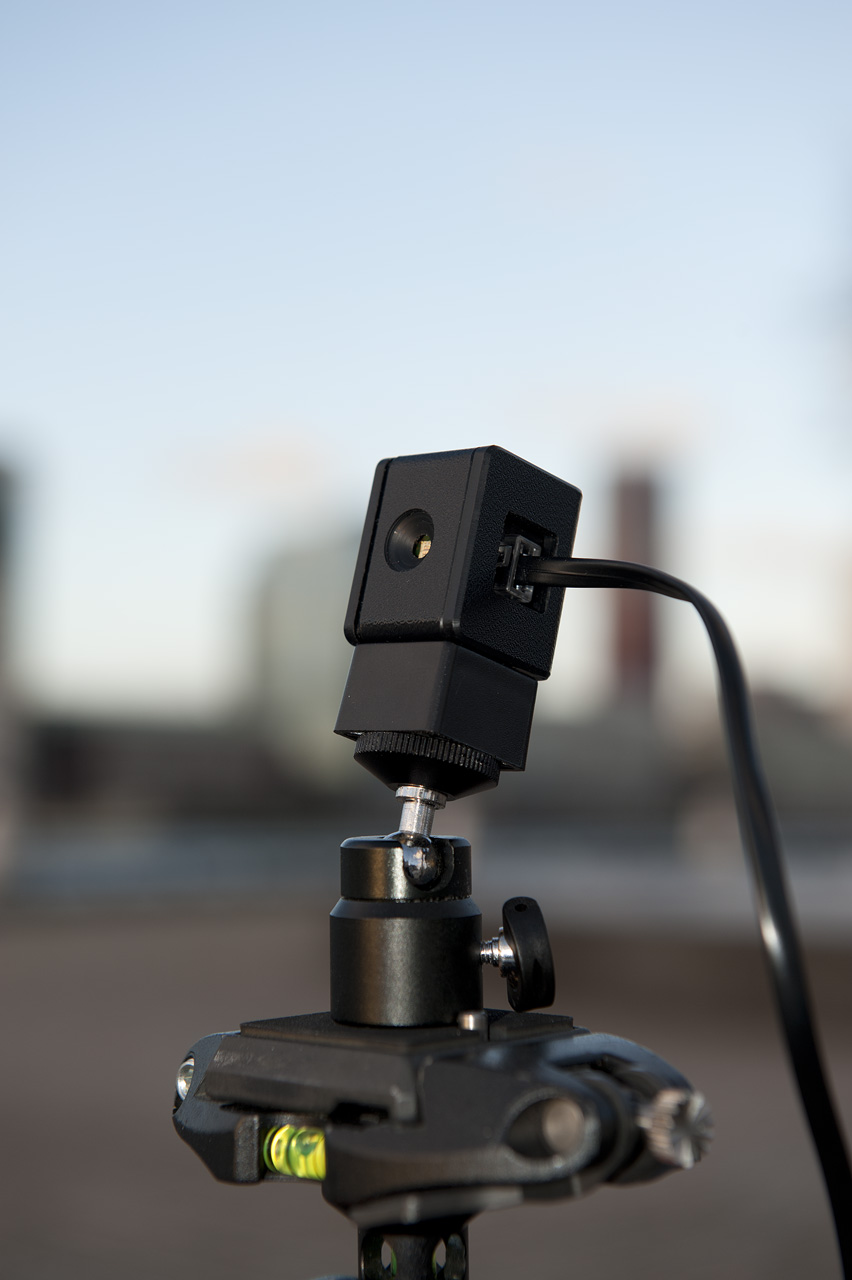
You can set the ramping speed by setting the "Time per stop" value. This defines the total time per stop that the RamperPro will use during a shoot. This can give good results; but these results might not be perfect. A sunset or sunrise is far from linear when it comes to how fast the change in ambient light is. The amount of ambient light might change in 30 minutes per stop before a sunset, 10 minutes per stop just before a sunset and only 5 minutes per stop during a sunset. You can only have a perfect ramping profile when you use a light sensor. We have chosen to use an advanced digital light sensor that you can mount on the hot shoe of your camera. That way the sensor is always facing your subject. The sensor can then measure ambient light, but especially calculate the change in ambient light in time. This data can then be used by the exposure ramping algorithm to adjust the exposure ramping profile.
The light sensor uses a damping algorithm. It will not be influenced by sudden changes of light like a cloud before the sun or when a clouded sky is blown clean of clouds by the wind. This means that the time per stop that is used by the RamperPro cannot move both ways. The time per stop can only go faster during a sunset and slower during a sunrise. This means the following. Let's say that the RamperPro is ramping with 10 minutes per stop, but the light sensor measures 14 minutes per stop during a sunset. The 10 minutes per stop will not be changes to 14 because that would mean that the RamperPro will slow it's ramping speed during a sunset. The used time per stop of 10 minutes will only be adjusted when the light sensor measures a value that is less than 10 minutes.
 The only “unknown”parameters of your sequence are the end shutterspeed and end ISO. These two determine the desired end exposure. This is difficult to measure/predict by the RamperPro since even the light meter of a modern digital camera has difficulties with determining the proper exposure values of a sky full of stars. You need to know the correct shutterspeed and ISO of the end exposure when you don't want to use the image analysis function. It is our experience that you will learn this very quickly. An end exposure of around 2 seconds at ISO 1600 and F8 gives a ball park estimate of a sky line one hour after sunset. You will get the best results if you are able to make some test images a day before your actual shoot. But it is our experience that you will quickly learn that the best settings are.
All other parameters can be safely determined upfront or they can be determined by the RamperPro because the ramping speed in minutes per stop can be calculated with the light sensor. Follow the following steps to start your sequence:
The RamperPro will now startup. It will first run though the startup sequence:
The RamperPro will now start if no runtime errors are detected. The end exposure will now be reached by either using the fixed ramping speed or by using the advanced light sensor. The use of the sensor makes it difficult the determine the total runtime and total number of images taken upfront since the ramping curve is dynamic and based on the change in environmental light.
It is safe to start 60 minutes before sunset when you use the light sensor. The minutes per stop calculation will result in a large value which means that the RamperPro will barely ramp the exposure. This makes it possible to start quite some time before the actual sunrise. You can choose to set the “shots after” value to a large number. That way you are sure that the RamperPro will continue shooting when the end exposure is reached. You can then determine yourself when you want to stop shooting.
A very new, but exciting feature of the RamperPro is the image analysis mode. This is a mode where your camera needs to write jpeg images. This can either be in jpg or in RAW + jpeg mode. Every jpeg image is downloaded from the camera an analyzed. This way the RamperPro can "see" that images are over or under exposed. This information is then used by the ramping algorithm. This prevents over exposure for sunsets or under exposure for sunrises. Note that it takes time before an image is downloaded and analyzed. We therefore recommend to use an interval of around 10 seconds or longer when you enable this mode.
This mode makes it possible to ramp completely automatically. You only need to determine the start exposure, but that is easy when you use the preview mode of the controller. This image analysis software is very new and still a bit experimental but our tests have given us such good results that we have decided to release the functionality. The following table shows that parameters, that are available under the Advanced TL button, that you need to set when you want to enable the full auto mode of the RamperPro.
This mode works by evaluating the histograms that the RamperPro calculates out of the images from your camera. Defining the correct settings might be challenging in the beginning and that is the area where future firmwares will assist you better. But the default values will probably work when you just enable the histogram mode of the RamperPro.
The clipping areas which are the left bars of the histogram to determine under exposure or right bars of the histogram to determine over exposure can be configures in the settings menu. You can also define the number of pixels that you define as still acceptable. Every bar in a histogram can hold a maximum value of 100. Lets say that you define the right clipping area to be 5 bars wide. This means that the RamperPro will calculate a total value of 500 (5 * 100) when the image is fully over exposed. That is because the right part of the histogram will be totally filled. The cut off value that you can set determined the value that you define as still acceptable. A value of 5 bars and a cut off of 250 tells the RamperPro that over exposure is defined when 250 pixels are filled on the right 5 bars of the histogram.
| Feature | Description |
| Histogram mode | Set this value to yes if you want to enable the image analysis mode of the RamperPro. |
| Show previews | Select this option if you want to review your images on the RamperPro display. This is very useful for Nikon shooters because Nikon camera's don't support image playback when these cameras are connected via USB. This mode will extract a preview image from the downloaded jpeg image and it will show it on the RamperPro display (available on the runtime overview screens). Note that this mode can be uses separate from the "Histogram mode". |
| Right clipping | The sets the right part of the histogram that is used to determine over exposure (needed for sunsets) |
| Right cut off | This sets the total amount of pixels that are acceptable in the right clipping area. |
These settings may sound complex, but lets investigate the following two settings. Let's say we are ramping a sunset of a city. The right clipping area is set to 1 and the right cut off is set to 6. This tells the RamperPro that over exposure is detected as soon as the value of 6 is found in the outer right part of the histogram. We have tested these two values and we had great results when we did our tests in a city or when we were shooting directly into the sun.
Please do the following when you want to use the Histogram mode:
The image analysis software and the light sensor work great when used together. Please check the next page [19] that gives more information about the light sensor and the image analysis mode.
The simulate button on the home screen will change in a runtime overview button when the RamperPro is running. You can then use this button to see the various runtime results. There is a timeline that shows how many images are made in shots before, normal exposure speeds, bulb speeds. There is also a graph that shows the amount of ramped stops against the number of images that are taken. There are also screens that show the exposure speed that is used, the current ISO, the name of the current image that is written by the camera etc. The last two screens of the overview mode show the measured and used time per stop when you use the light sensor and a screen that shows the image histogram that is pulled out of the jpeg images from your camera in full auto mode.
The light sensor of the RamperPro is hot pluggable. You can plug it in after you have powered the RamperPro. The controller will then automatically detect the sensor and it will start to measure ambient light. You can unplug the light sensor at any time, but we don't recommend to unplug the light sensor while you are exposure ramping.
 [20]This chapter gives you more details about the external light sensor. It also describes how to use the auto exposure mode of the RamperPro where the images from your camera are analyzed during a timelapse shoot. The combination of the light sensor and the auto mode are described by explaining what is happening during a sunset.
The RamperPro can be used together with the advanced digital light sensor. The light sensor is used to measure the trend in light. The RamperPro samples the ambient light over a specific time period. These samples are then used to calculate how fast it is getting light during a sunrise or how fast it is getting dark during a sunset. There are many misunderstandings about what the light sensor can do. The following is a list of what the light sensor is NOT doing when it is connected to the RamperPro:
The above points already state that the light sensor algorithm is not continuously reacting to any change in light. The time per stop that is calculated is an average over 10 minutes. This results in only small, regular, changes in the ramping curve. The results of the light sensor will give very good results when used properly because the sensor is gradually following the sunset or sunrise.
This may sound as a limited benefit when you use the external light sensor. But that is not true when you understand what the sensor can do and what it cannot do. The following examples are based on a sunset, but the same is true the other way around for a sunrise.
One challenge during the ramping of a sunset is when do you know when to start ramping? This is one thing that the light sensor can do very accurately for you. Suppose that you want to start your timelapse one hour before sunset. That is a situation where the amount of ambient light is already declining; it’s getting dark (a bit). The light sensor will measure this and this will result in a very high time per stop value. You can easily measure 30 to 40 minutes per stop when you start to measure light one hour before a sunset. This means that the RamperPro will need 30 to 40 minutes to ramp one stop away from the start exposure. The measured time per stop will become shorter and shorter when the sun really sets. A value of 10 minutes per stop at the moment of the actual sunset is what we have measured on many occasions. This means that the RamperPro will speed up the ramping speed . The sunset is therefore automatically detected by the RamperPro. It will very gradually ramp 60 minutes before a sunset, but it will ramp faster during or after the sunset.
The “problem” starts after the sunset because that leads to the following situation:
It is very easy to get over exposed images when you set the wrong end exposure. Say you want an end exposure of 10 seconds at ISO 1600 when you want to ramp for bright day light to stars. It will take quite some time to reach a dark sky with stars. This example can easily cover 16 stops depending on the start situation. Let say that we have an average time per stop of 7 minutes as a result of the light sensor (remember that you can set a minimum value to restrict it in the runtime parameters). This would mean that the total runtime to reach the end exposure is 16 stops * 7 minutes = 1 hour and 52 minutes. This will give great results when you really need 10 seconds at ISO 1600 at that moment in time. But you will over exposure your images when it takes 3 hours before the ambient light reached this exposure value. You are ramping to your end situation too fast!
This is where a very exciting new feature of the RamperPro kicks in “Auto Exposure Mode”. This mode will download jpeg images from the camera to the RamperPro. These images are analyzed by evaluating the histogram of these jpeg images. This gives two ways that we can measure light, the trend in light with the light sensor (available directly when you start) and the individual exposures of the images that you are really shooting.
The histogram data of the individual images is used by the RamperPro to influence the ramping speed. It can for example ramp a bit slower when the histogram indicates that over exposure is almost going to occur. This will make sure that you can reach your desired end exposure without having the risk of blown out images.
We now have the best of both worlds. The light sensor will make sure that we start to ramp by following the changing light of a sunset. The histogram analysis algorithm will make sure that we will never have over exposed images by damping the ramping speed when needed.
The auto exposure mode comes at a, slight, cost. It takes time to download the jpeg images from the camera to the RamperPro. It also takes to before the RamperPro has analyzed the downloaded image. A highly compressed 36MP image from a D800 is still a few megabytes. Analyzing these 36 mega pixels is memory and calculation intensive. This means that you will need an interval of around 10 seconds to make sure that these operations can be performed in time.
The auto mode can overrule the end exposure and end ISO value. Let's say that you have set an end exposure or 20 seconds at ISO 1600 but you are shooting in a city. The RamperPro will then most probably never reach this end exposure when it is running in auto mode. The histogram analysis will make sure that the RamperPro will stop ramping when the proper exposure is reached.
 [21]The RamperPro features three different override wizards that you can use to override the exposure, current ISO and ramping speed while you are creating a timelapse sequence. These wizards enable you to intervene without compromising the quality of your shoot. It is always possible that you set some settings that result in a timelapse sequence that was not planned. This can be easily seen because the RamperPro features an image playback function that displays the images that are taken by your camera on the touch screen of the controller. This can be overcome with the three override wizards. Here is a short description of each of them:
The wizards can be found on a page under the "Status" button that is located on the homepage of the RamperPro. That way all runtime overview pages and the override wizards can be found easily because they are grouped together.
The "Exposure" and "ISO" wizards are fairly self-explanatory. Just set the desired correction and press ok. The buttons will then be blocked until the change is processed.
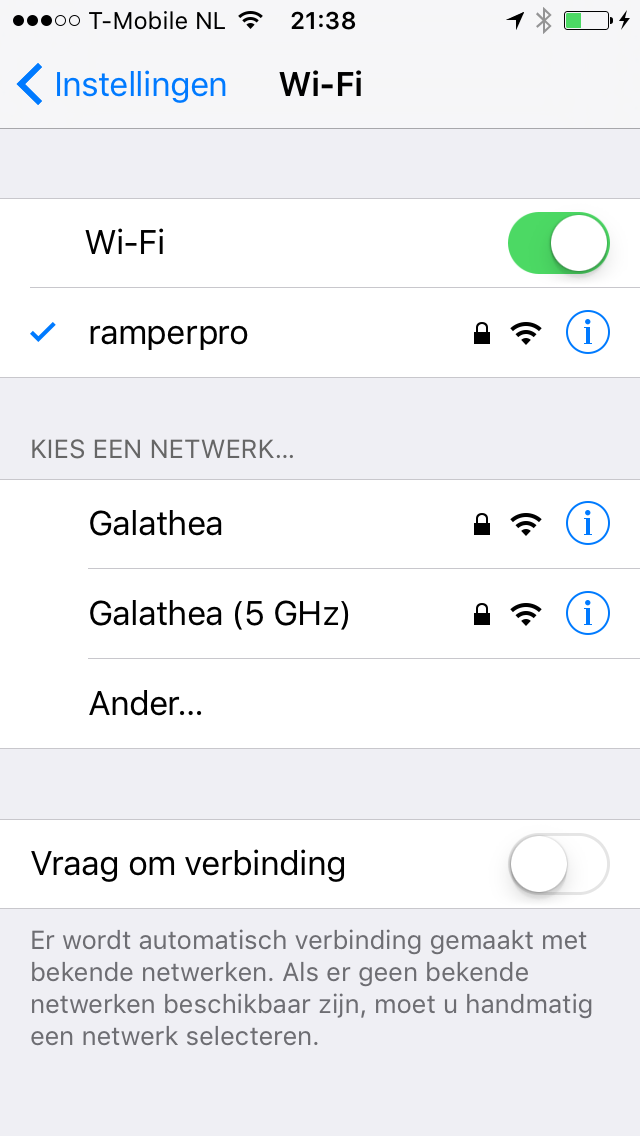
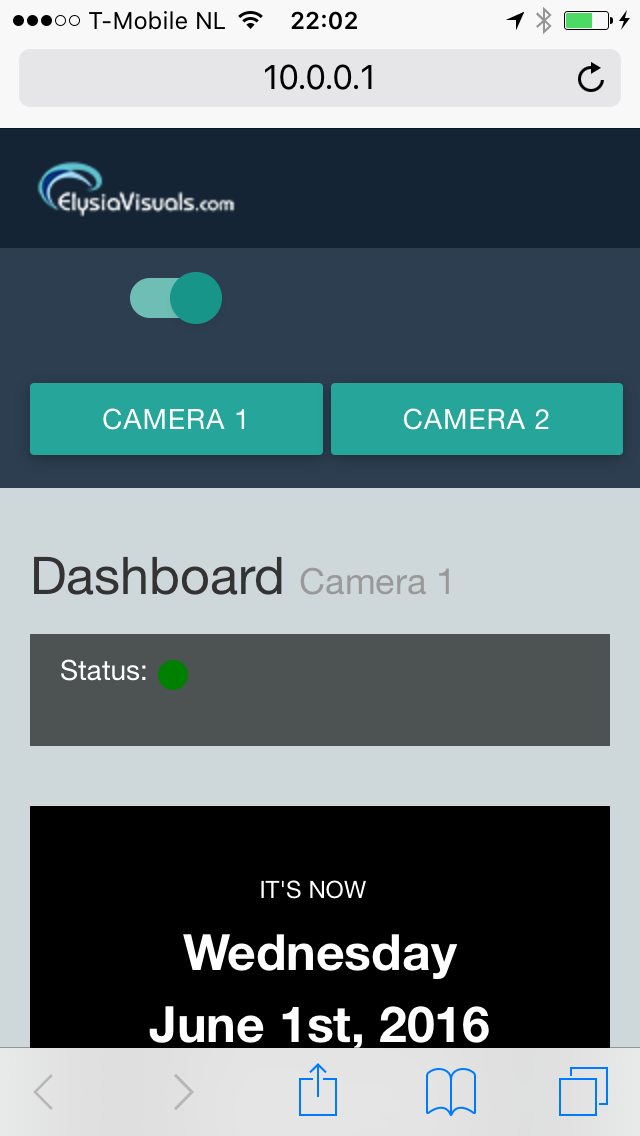
The App support of the RamperPro makes it possible to follow the progress and images of your time lapse shoot on your smartphone, tablet or laptop. You only need to connect to the WiFi network of your RamperPro and point your browser to IP address 10.0.0.1
Step One - How to add WiFi support to your RamperPro1 or RamperPro2
The RamperPro3 has built-in WiFi support. But that doesn't mean that you cannot use the App or WiFi features of the RamperPro. You can add WiFi support to your exising RamperPro1 or RamperPro2 by using a WiFi USB dongle. The WiFi dongle that is supported is the Edimax EW-7811UN that you can also find in our online store [22]. Just make sure to plug in the dongle to your RamperPro before you power the unit.
Step Two - Connect your device to the WiFi network of the RamperPro
Go to the WiFi settings of your device and select the RamperPro network. The default password of this network is: ramperpro
 [23]
[23]
Step Three - Start the App
You can now connect your browser to the RamperPro because your device (which can be any modern smart phone, tablet or laptop) is connected to the WiFi network that is offered by the RamperPro. Point your browser to IP address 10.0.0.1
The Status "ball" indicates that your browser is still properly connected to the RamperPro. It should be green. Refresh your browser if the status indicator is orange.
 [24] [24] |
 [25] [25] |
| Successfully connected | Connection error. Refresh your browser |
The App screens will now be updated automatically when the RamperPro has taken an image in ramping mode or when you take a preview image.
It was mentioned earlier in this manual that sunrises are a bit more difficult to achieve compared to sunsets. The reason is that you have a high risk of over exposing your images. The RamperPro can prevent that when you properly set the correct parameters for astronomical and civil sunrise times. It is therefore more important to properly setup your parameters when you want to start a sunrise shoot. Sunsets are easier to achieve because then the light sensor and histogram mode of the RamperPro combined with the factory default settings will give you very good results out-of-the-box.
This manual page describes some settings that are being used by many RamperPro users for both sunsets and sunrises. Note that it is still very important to setup the proper values for the sunrise and sunset times as described here: Setup for surises and sunsets [26]
| Setting | Value | |
| Light sensor "Sensor Gain" | 0.7 | The sensor gain determines how fast the RamperPro will respond to the light sensor measurements. A smaller gain will lead to faster ramping. You don't need to push ramping during a sunset because light is decreasing and the histogram analysis will prevent over exposure. |
| Light sensor "Minimum time per stop" | 00:05:00 | This value tells the ramper pro how fast it can ramp. Don't set it too a very low value during a sunset otherwise your images tend to get a bit too bright the first 30 minutes after sunset. The exact value depends a bit on your location and time of the year. But a value of around 4:30 to 5:00 minutes is a good starting point. Note: This parameter will be removed in a future firmware and it will be replaced by an automatic algorithm. |
| Histogram mode "Right clipping" | 1 | A value of 1 means that only the far most right part of the histogram is evaluated to see if the images are over exposing. |
| Histogram mode "Right cut off" | 6 | Over exposure is only detected when the histogram is really as far to the right as possible. |
| Use positive EV correction | YES | This ensures smaller steps when the RamperPro switches the shutter speed on your camera during a sunset. This limits flickering. |
| Setting | Value | ||
| Light sensor "Sensor Gain" | 0.60 | The sensor gain determines how fast the RamperPro will respond to the light sensor measurements. You need to RamperPro to ramp as fast as possible during a sunrise because your images will over expose when the RamperPro cannot keep up with the growing amount of light suring runsise. It is important to us a smaller sensor gain to enforce fast ramping during sun | |
| Light sensor "Minimum time per stop" | 00:01:00 | The minimum time per stop value blocks the ramping speed of the RamperPro as soon as the measured speed (by the light sensor) has the value of minimum time per stop. But light can change very fast expecially at sunrise moment when the sun breaks through. A value of around 2 to 1.5 minutes will ensure that the RamperPro can ramp fast enough to keep up with these changing conditions. | |
| Histogram mode "Right clipping" | 5 | You risk over exposure during sunrises. A value 5 means that over exposure is detected earlier by the RamperPro. | |
| Histogram mode "Right cut off" | 1 | Over exposure is only detected very early when the histogram tends to get to far to the right. | |
| Use positive EV correction | No | This ensures smaller steps when the RamperPro switches the shutter speed on your camera during a sunrise. This limits flickering. |
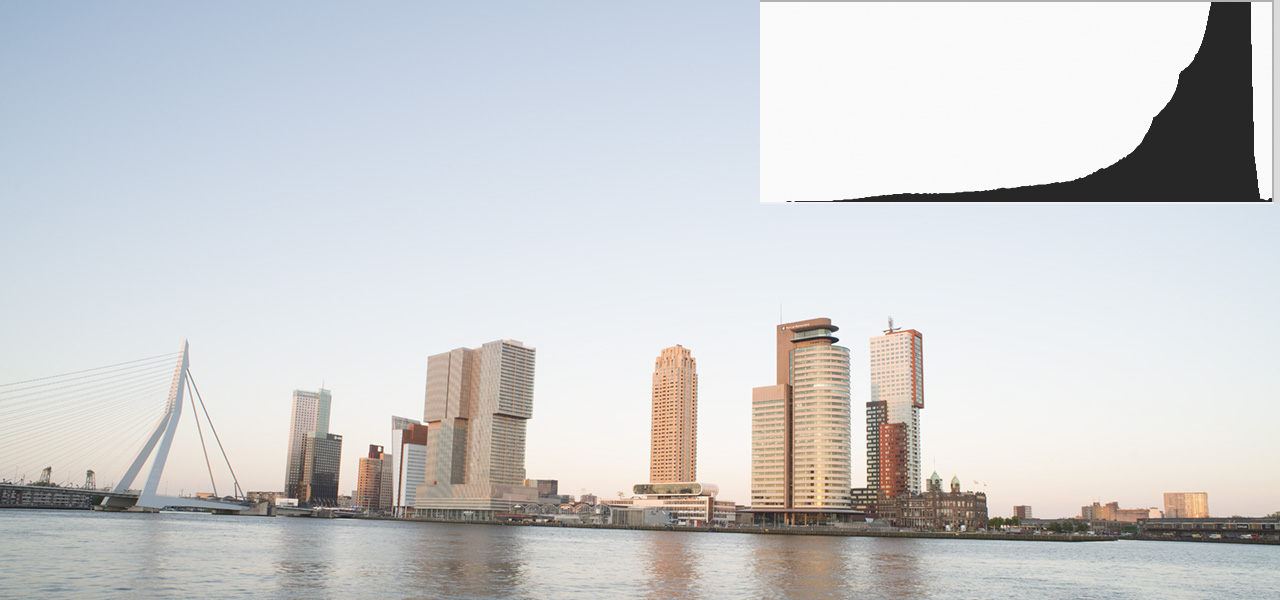
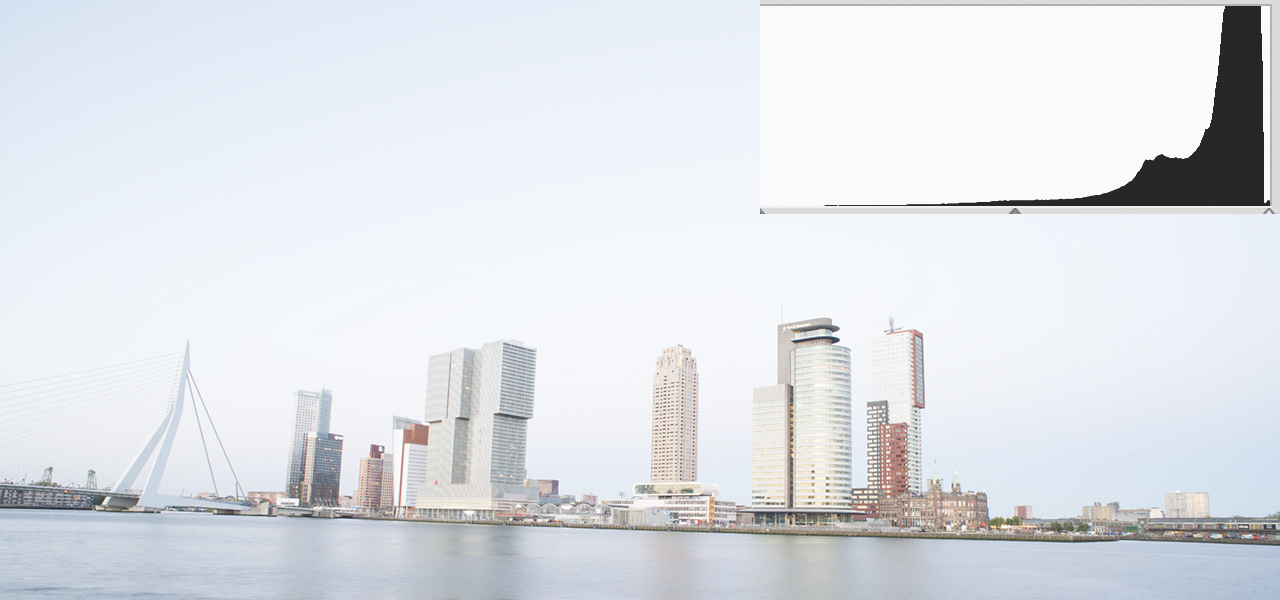
The RamperPro is working based on the concept of "expose to the right". That means that the histogram will be "pushed" to the far right. This gives the most detailed information possible in your image files and that is a great starting point for further post production steps. The amount of how far to the right the RamperPro should expose is defined by the "Right clipping" and "Right cut off" parameters. These parameters are defaulted in the non expert mode; you can set them yourself in expert mode. The histogram is decided in 256 bars, just like a histogram in Photoshop. The right clipping parameters defines how many bars at the far right should be taken into account. The right cut off parameters defines how many pixels are allowed in that area before over exposure is defined.
A few examples of setting up the histogram mode:
Exposing to the right works pretty good until sunset time. The overall shape of the histogram changes after sunset because of the dramatically changed conditions. This also means that you don't want to expose to the far right after sunset. A slight under exposure will result in better results with more contrast in the sky. These slightly under exposed images will also be more in line with the images shot before sunset.
Lets see how two images that are properly exposed to the right look like when we compare the exposure before and after sunset:
 [27] [27] |
 [28] [28] |
| This image is taken before sunset. Its properly exposed and contrast looks good. | This example is taken after sunset. This image is technically properly exposed. The histogram is not clipping. The histogram also shows a different shape compared to the example shot before sunset. Overall the images looks to be very bright. |
The above example shows that you want to, slightly, under expose after sunset. You don't want to overdo it by under exposing too much. The under exposure should only be applied just after sunset to prevent what the above histograms show. The RamperPro should continue to properly expose to the right when its a few stops darker.
The key setting to control all of this is the "Minimum time per stop" parameter that you can find on the light sensor setup page. The "Minimum time per stop" is defaulted to 5 minutes in non expert mode. This is an average value it it works in average conditions. But this could mean that your images get a bit too bright after sunset based on the time of year and the location where you are shooting. You can override the value of the "Minimum time per stop" parameter in the expert mode setup. Setting this value yourself gives fine grained control about how the RamperPro should behave and this is mostly applied to shots taken around sunset time.
The value of "Minimum time per stop" tells the RamperPro how fast it is allowed to ramp. It can be seen as the fasted ramp speed that you allow during your shoot. A value of 5 minutes means that you allow the RamperPro to ramp as fast as 5 minutes per stop. The RamperPro has a highly advanced way to determine how fast it should follow changing conditions, but the light sensor is the most important method to determine this. Light changes the fastest around the actual sunset time. This really depends a lot on the time of year (winter or summer for example) and your location. Ramping occurs much faster in the tropics that is does in Northern European or North American conditions.
You need to use a larger value for "Minim time per stop" when you get images that are too bright as shown in the example. The bright image in the example was shot with a value of 5 minutes. It would have been perfect (during summer in Europe) with a value of 00:06:30 minutes. You need to use a smaller value (00:04:00) for example when your images are too dark after sunset; that is the situation in more tropical situations. You probably need to test this once or twice, but then you get control on your shoot yourself.
We are currently working on a full-auto method for the minimum time per stop parameter. That method should do the trick automatically for you. But we also receive a lot of requests to not remove this parameter since a lot of shooters prefer to take control in their own hands.
A small number of RamperPro users experience a situation where the RamperPro doesn't startup properly. We have seen that this is a power related issue in 99.9% of all cases. The SD card inside the RamperPro holds a lot of software and this card can get corrupted when you either disconnect power too soon after a shutdown or when there was a flaw in the supplied power. You can compare this with an improper shutdown of a computer since that can lead to issues on your computer too. Please wait at least 10 to 15 seconds after the screen turns black when you shut down the RamperPro. Then you can safely remove the power supply.
Please bare in mind that only a small number of users has experienced a corrupt SD card and that it is very easy to create a new SD card with all the required software!
Here is how you can create a new SD card by following the next steps:
You now have a brand new SD card and you can continue to use your RamperPro.
Its wise to keep the zipfile with the RamperPro SD card software. That way you can always create a new (backup) card.
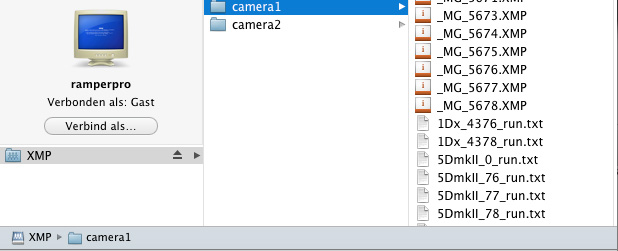
You can always read the XMP files from your RamperPro by connecting the device to your home network. But that won't work on all cases. Suppose you want to grab the XMP files when you are on the road. Then the easiest way is to put the RamperPros' SD card into a card reader. That will work fine on your Mac or a Linux laptop; but this doesn't work on Windows. Windows is unable to read from removable media that holds multiple partitions and that is just how the SD card of the RamperPro is setup.
But, luckily, there is a tool that you can install on your Windows laptop that saves the day. The name of this tool is "DiskInternals Linux Reader" and you can download it here: http://www.diskinternals.com/linux-reader/ [35]
Please install this utility on your Windows laptop. You are then able to read the SD card of your RamperPro via a card reader.
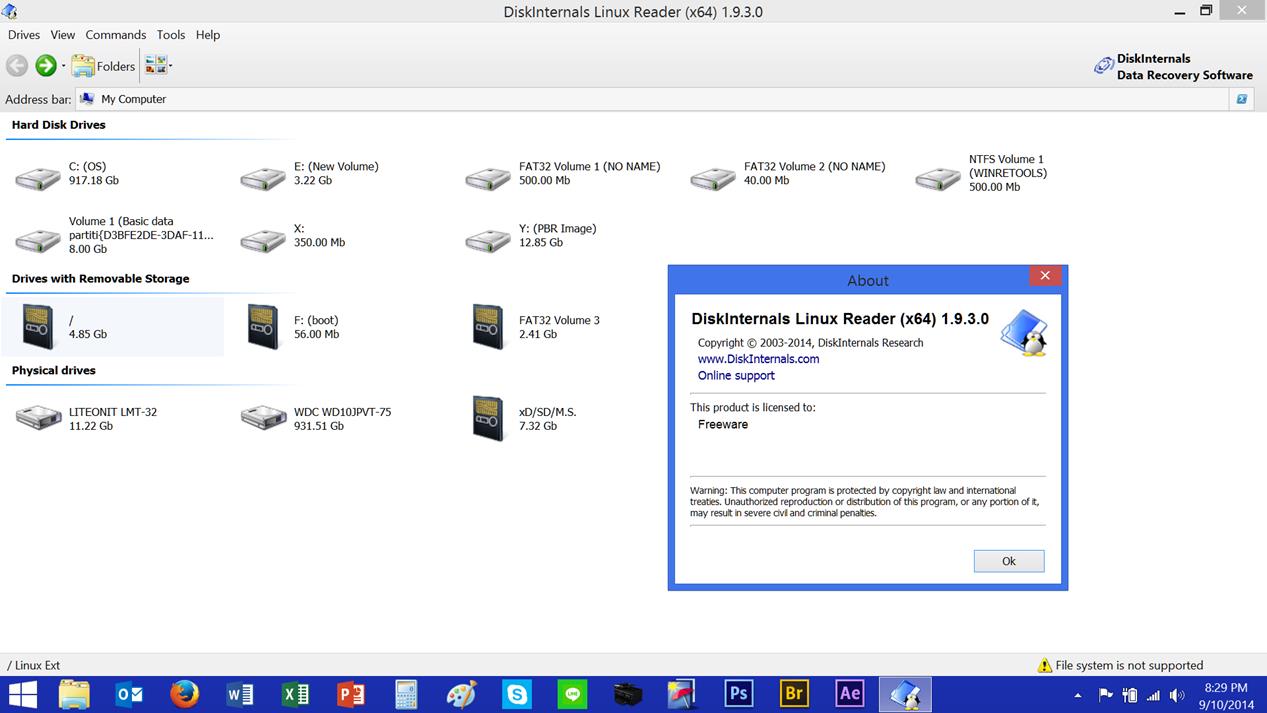 [36] [36] |
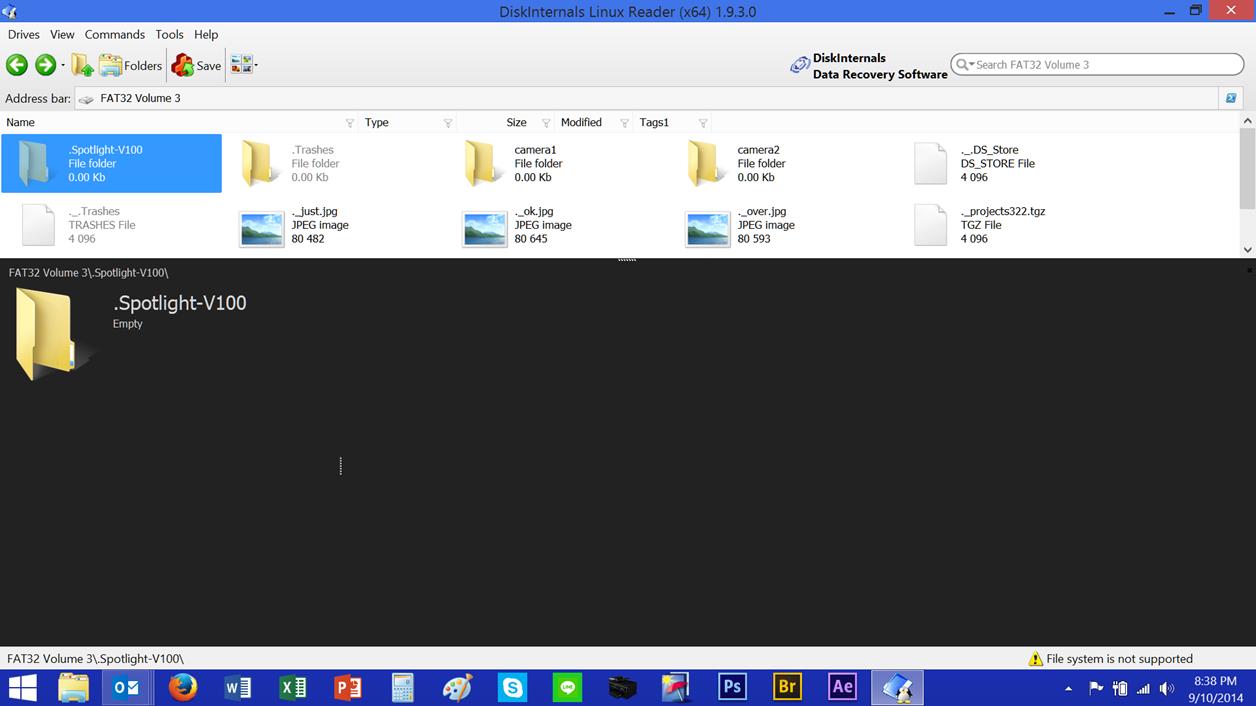 [37] [37] |
| The tool makes it possible to open the RamperPro SD card | And here it shows you the camera1 and camer2 folders with your XMP
files |
The A7Riii has a different setup because this new camera is able to store the images on its' internal memory card. Please read this blog post about the A7Riii [38] if you want to use this camera with the RamperPro.
There are a few things that are different from other cameras when you want to use the RamperPro with a Sony Alpha camera. Sony made a strange decision with their current camera firmwares. The camera is not storing its' images to the internal SD card as soon as you connect these cameras to a PC/Mac/RamperPro.
The images from the camera (CR2) are therefore downloaded to the RamperPro. That takes time, but we pulled a lot of tricks to make this as speedy as possible. There is an effect on the minimum interval because of this. The Sony A7RII with its huge files can ramp with an interval of around 10 seconds (which would fit our personal shooting in almost all cases).
This also means that you need a large SD card inside the RamperPro to hold all the images. This is why we introduced the delete icon a few firm wares ago. That way you can delete the RAW images from the RamperPro directly from the system menu.
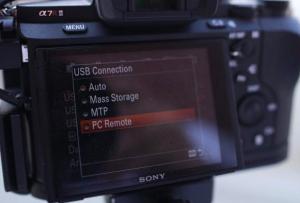
Sony cameras can only connect either a USB cable or a trigger cable (S2). The reason for this is because the port on the A7 can either hold a remote (S2) cable or a USB cable, not both
For ramping Sony cameras are controlled via USB only. This means that you need to connect a (micro) USB cable between your Sony camera and the RamperPro.
Note: The camera is not triggered via USB in the basic (intervalometer) mode of the RamperPro. Then you need to use an S2 trigger cable between the cam1 port of the RamperPro and your Sony camera. This has the advantage that you can used shorter intervals like you can with any other external intervalometer.
There are a few settings that need to be setup properly in the menu of your Sony Alpha so that it can work with the RamperPro:
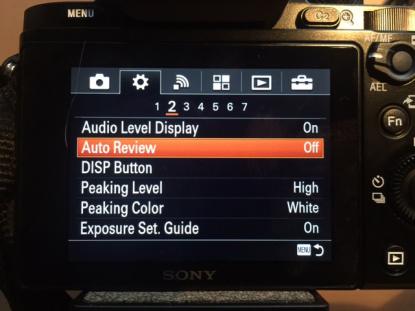
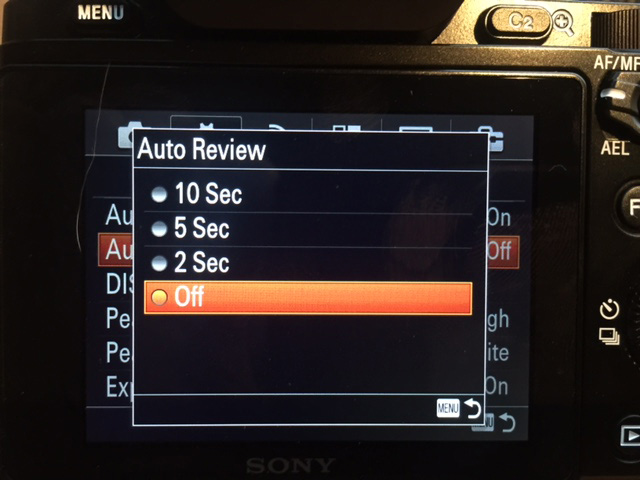
Its is also important to switch off "Auto Review". This will lead to an unwanted delay on your camera and your camera will not correctly take over the USB commands from the RamperPro:
 |
 [39] [39] |
| Set "Auto Review" Off | Any other value than "Off" will lead to a loss of USB commands. |
You only need to connect one cable between the RamperPro and a Sony camera. This is a micro USB cable. We supply high quality TetherPro micro USB cables in our online store [40]. You don't need a USB cable when you are using the normal intervalometer mode of the RamperPro (easy mode). Please connect an S2 cable between the cam1 or cam2 port of the RamperPro and your camera when you want to use the RamperPro without its' ramping features.
The images are not stored on the memory card of the camera. That is why you need a large memory card inside the RamperPro. You can create such a card yourself or you can get one from our online store. We offer a fully installed and ready to use 128GB memory card for the RamperPro that you can find here in our store [41].
Make sure to get the correct memory card for your RamperPro. The RamperPro1 uses an SD card, the RamperPro2 uses a MicroSD card. MicroSD cards are almost always supplied with an adapter, so these cards will fit both models of the RamperPro.
You can create the large RamperPro memory card with free software on your Mac computer. First you must make sure to download and install XQuartz. This installation is pretty straight forward. You can find this software on the XQuartz project page at: http://www.xquartz.org/ [43]
You need two memory cards to prepare the large Sony compatible memory card. One that is inside the RamperPro while you create the memory card. This can be the 8GB card that was supplied with your controller. Just make sure to use firmware 3059 or higher on this memory card.
The large card that you want to use with your Sony camera must be connected to the RamperPro via a memory card reader. Please make sure to install the RamperPro SD card image on this card as it is explained earlier on this page. Place the large card in your card reader and connect it to your RamperPro.
Make sure that your RamperPro is connected to your local network via a network cable. You can now start the RamperPro if you haven't done this already.
You can now prepare the memory card. You first need to know the network IP address of your RamperPro. You can do this by entering the command arp -a in a terminal window.
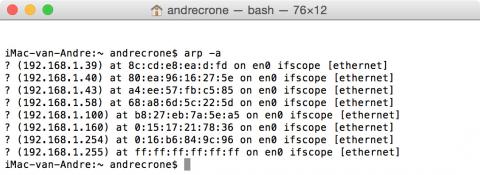
One of the IP addresses will be linked to your RamperPro. In this case its 192.168.1.100. Now you can startup the software that can prepare your memory card by entering this command in the terminal window: ssh -X ramperpro@192.168.1.100 gksudo gparted
The password that you need to enter is: ramperpro
Ignore the warnings that you will see in your terminal window. This should look like:
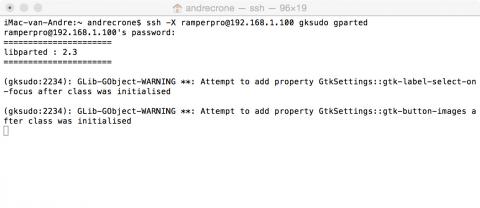
You are now running a piece of software on your RamperPro. But the graphical interface is shown on your Mac! This software is gparted which is an open source partition manager. You can use this partition manager to modify the partition of the memory card that is placed in your card reader.
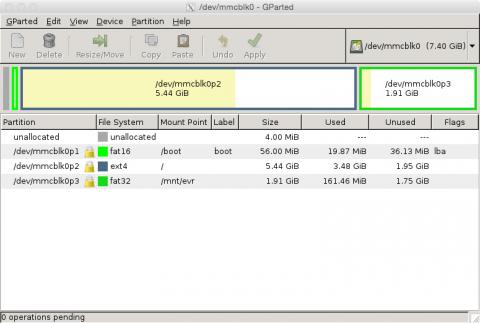
Select the correct device by selecting the 2nd option at the top right (under /dev/mmcblk0). Then you will see the new memory card. Resize the last partition on this card to the maximum size. Make sure to hit the "Apply" button afterwards. Then the card will be prepared (this can take a while).
Shutdown the RamperPro and you are ready to use the memory card that is in your card reader. You can do so by swapping it out for the one that is inside the RamperPro.
Conrad Olivier created a perfect video that hows how to create a RamperPro (micro)SD memory card with Sony support on Windows:
There are many reasons why your camera is not taking an image when it is triggered by the RamperPro. The most common reasons are listed below. Please use another trigger cable when you are still unable to fire your camera. But we have found that broken trigger cables are very rare.
Modern Canon cameras behave a bit strange when they are connected via USB to a PC/Mac or the RamperPro. These cameras cannot be triggered via the remote cord when they cannot confirm that the subject is in focus. This is even true when you switch off the auto focus of the camera! This means that the camera will fail to take an image in dark conditions when the camera cannot confirm the focus (even when auto focus is switched off). There are three ways to overcome this:
Its also possible to trigger the camera via USB and not via the remote trigger cable. That works fine when you are only using one camera. Its not recommended to USB trigger your camera when you are shooting with two cameras in stereo mode. The benefit of using USB and not the remote trigger cable is that you don't need to connect the trigger cable and the PC sync cable. Just connect the USB cable between the RamperPro and your camera. Make sure that USB triggering is configured on your RamperPro! Navigate to the camera1 and camera2 icons in the system menu (tools icon in the button bar). There you can set the property "Trigger by USB" to true.
Your camera will not fire when you have (accidentally) configured the RamperPro to be triggered by an external intervalometer and when the trigger is not there. How to find out:
Your RamperPro is setup for an external interval when all of these points are true. Go to the I/O screen (tools icon and press the arrow down until you find it). Then set the I/O pins (all 4 of them) to be outputs. Use the arrow down from this screen since there are 4 of these settings. You can find more about integrating motion control hardware on this manual page [45].
This chapter describes how to setup the RamperPro for situation where it is really dark, but where you still want to ramp. An example is the dark period after sunset and before the actual appearance of stars (at astronomical dusk time) or when you want to start shooting a sunrise at night for a shoot from stars to day.
The RamperPro is designed with three major design principles in mind. We describe them here so that you have a bit more insight about how the RamperPro achieves over 20 stops sunsets and/or sunrises:
The ramping speed of the RamperPro is determined in eight different ways depending on the situation. The main and by for most important input is the light sensor. The ramping speed is determined very reliably by the light sensor in conditions where there is enough light for the light sensor to measure. It is our experience that the light sensor is reliable from thirty minutes before sunrise until thirty minutes after sunset. The RamperPro is still able to calculate an accurate time per stop after sunset because it can extrapolate the time per stop based on light measurements that were made earlier during the shoot.
But there are situations where its hard to determine the ramping speed because its just too dark to measure light with the light sensor or when the extrapolation functionality during sunsets doesn't have enough information. The RamperPro needs to know the astronomical and civil sunrise and sunset times to overcome this. You can see the astronomical sunset time as the time where the sunset has reached its darkest situation. The astronomical sunrise time is the time where the sun starts to rise, so where light is increasing.
The RamperPro is not calculating a theoretical curve between these two times since then you would also have to enter your exact location. The RamperPro uses its own algorithm to use these times so that the correct ramping speed can be derived in combination with the expose to the right histogram analysis mode.
The configured sunrise and sunset times are overridden by the light sensor software as soon as there is enough light for the sensor to measure. The use of the sensor thus always has precedence over alternative ways to determine the ramping speed.
The RamperPro needs to know what time it is when we use sunset and sunrise times to determine the ramping speed. That is a bit of a challenge since the hardware doesn't have a battery; time is lost when you switch off the RamperPro. But you can still set the time on the RamperPro without doing anything by doing the following:
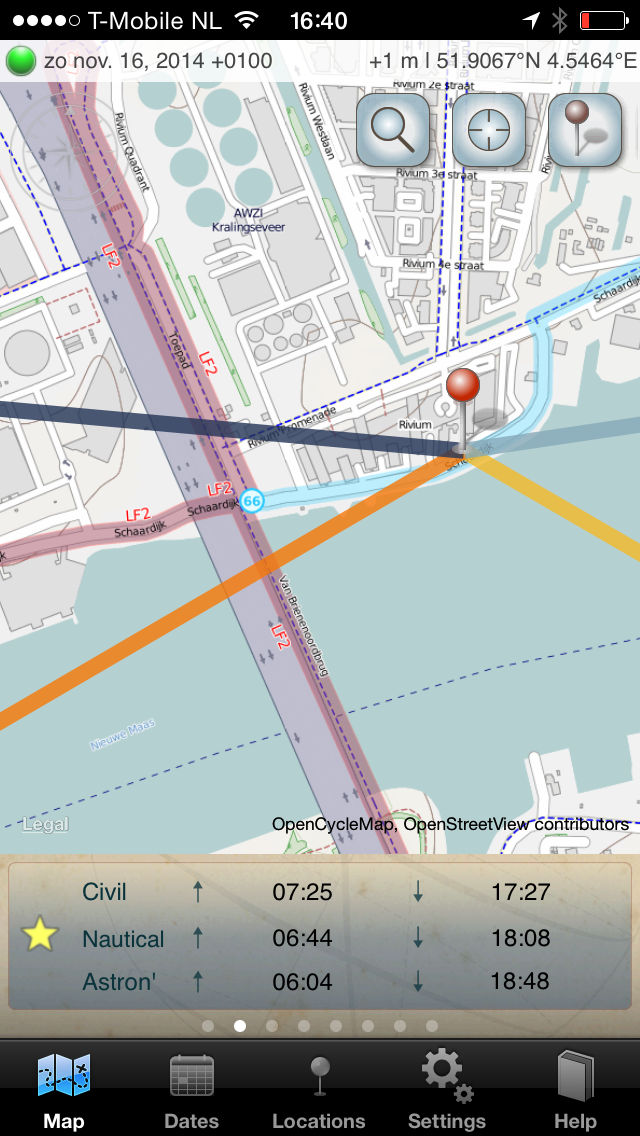
The advanced (ramping) setup screens of the RamperPro have two screens where you can setup the astronomical and civil sunset (dusk) and sunrise (dawn) times. You can find the values of these values in your favorite emphemeris app like, The Photographers Ephemeris, SkySafari or PhotoPills. Just manually enter the proper values in into the RamperPro and then the RamperPro can find a ramping speed by exposing your images to the right.
 [47] [47] |
 [48] [48] |
| Here you see the output of an app called "The Photographers Ephemeris". You can manually enter the astronomical and civil sunset and sunrise time in the configuration of the RamperPro. | SkySafari is an advanced and elaborate app that you can use to plan your time lapse shoots with the RamperPro. This can be sunsets of sunrises, but this app can also help to determine milky way rises etc. You need the civil dusk and astronimical dusk times for sunsets and astronimial and civil dawn times for sunrises. |
Please check the following notes regarding the setup of astronomical and civil time values:
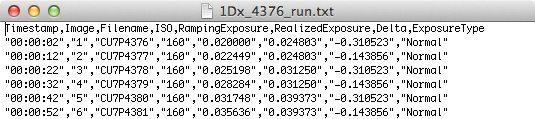
 One of the unique features of the RamperPro is that it can both use manual mode and bulb mode during a ramping shoot. The XMP files of the RamperPro will then smooth out the exposures which results in a smooth and flicker free time lapse movie. In manual mode the RamperPro will use the discrete "normal" shutter speeds of your camera to realize the correct exposures. This means that you can even start with 1/8000th of a second because most cameras support this shutter speed.
Classic ramping and most other controllers only support bulb exposures. The camera is set to bulb and the controller tries to control the bulb exposure as accurate as, technically, possible. This is all based on the assumption that you can measure the exact exposure time via the PC sync port of the camera. That assumption is pretty close; but not 100% accurate. Shutter lag of the opening and closing shutter greatly influence the accuracy. There is always a very small difference between the bulb exposure and the desired exposure. You will not see this when you only use bulb because the offset will be there for every image.
The RamperPro can switch between manual and bulb exposure. The "minimal bulb speed" setting defines when to use bulb. An exposure longer than "minimal bulb speed" will be made in bulb mode, shorter exposures in manual mode. Not all cameras can be switched between manual/bulb via USB though.
Most Canon cameras have a dial switch on which bulb is a setting and not an shutter speed in manual mode. The RamperPro cannot switch these cameras between manual and bulb automatically via USB. The RamperPro will show a popup as soon as you need to manually switch the camera to bulb of manual mode. Some Canon cameras, like the 60D, can be switched to bulb mode because bulb is an exposure value in manual mode. The RamperPro will show a notification screen 2 minutes before a manual action is required. That way you are warned in time. This notification is supported in firmware 3045 and higher.
All Nikon cameras that are supported by the RamperPro can be switched to bulb mode via USB. Some Nikon cameras have a dial switch that is used to switch between M, A, etc. The RameprPro will ask you to set the camera to manual during the initialization of a shoot.
The RamperPro now supports the mirror less GH4 camera and the Sony A7 series. You cannot use bulb exposure on this camera during a ramping sequence. That is because the electronic shutter of these cameras doesn't work the same as the mechanical shutter of a dSLR. It is not possible to measure the exact bulb exposure speed via a PC Sync port (or a hot shoe). You can still get perfect ramping results with there cameras when you use manual shutter speeds!
You can choose to disable the usage of Bulb mode. That could be used on Canon cameras so that you don't need to be at your camera when the RamperPro needs a switch from manual to bulb. Another reason could be when you own a mirror less camera like the Panasonic GH4; those cameras cannot be used in bulb in combination with the RamperPro (due to camera limitations). Just set the "Start bulb speed" parameter to a high value like 40 seconds. You will probably never have an exposure time of 40 seconds, thus the RamperPro will never use bulb in this case.
Some cameras like the Nikon D610 or D750 don't have a PC sync connection. In that case you can get a hot shoe adapter [8]. Another trick can be not to use bulb mode (also in the situation where you forgot to bring one with you).
The shutter speed is made longer and longer during a sunset shoot. In manual mode this is done by using 1/3 stop discrete steps. So you go from 1/250th of 1/200th of a second. This works fine but sometimes these discrete steps lead to minor over exposures when the 1/3 stop steps are too big. This can be seen as "exposure pumping" when you setup the RamperPro the wrong way. Luckily there are ways to remove this exposure pumping by using free software like: http://davidmilligan.github.io/BridgeRamp/ [49]. We advise to set the XMP corrections to be positive when you mostly use manual shutter speeds. That will prevent exposure pumping in your resulting movie!
In bulb mode the exposure steps between shots are very small and that will also result in perfect movies without artifacts like exposure pumping. That is the main reason why you would want to use bulb mode.
 Some cameras like a Nikon D700 have a long minimal shutter speed in bulb mode. You can check this yourself. Set the camera in bulb mode and press the shutter button as short as possible. Some cameras will then exposure pretty long like 1 second on a Panasonic GH4. Some Canons perform much better in theory. These cameras could support shutter speeds in bulb of around 1/20th of a second. The RameprPro, currently, doesn't support these very fast exposures in bulb mode. This is by-design because we aim to have the most reliable shutter speeds in bulb mode as possible. The second reason is that we want to be able to switch between manual mode and bulb mode without seeing artifacts. The software and RamperPro hardware could support faster exposures in bulb mode but we have chosen to implement for reliability.
We strongly recommend to use moderate values for minimal bulb speed like 0.3 seconds on the faster Canons or newer Nikons. Slightly older Nikon cameras work great with a minimal bulb speed value of 0.5 seconds. These longer values will ensure a very reliable exposure in bulb mode.
The switch between manual and bulb must be a smooth as possible. Otherwise this switch will be visible in your time lapse movie (small flicker). The manual exposures on your camera like 1/100th of a second are very reliable and repeatable. The exposures in bulb are reliable too; but they will have minor deviations. These differences are not seen because of the XMP corrections of the RamperPro.
A switch from lets say 1/20th in manual to bulb mode can be seen as a switch to a pretty fast bulb exposure speed. Any deviation will be seen in the end result. Remember that we are measuring the actual exposure in bulb via the PC sync port and that might very not be the desired shutter speed.
This is the second reason why we recommend to switch to bulb when your exposure reaches values of 0.4 seconds or 0.5 seconds. The difference, in stops, between the accurate 0.5 seconds in manual and the corresponding exposure in bulb is small. That will result in a virtually invisible switch between manual mode and bulb mode!
It might be that some camera models, mostly Canons, will work with faster bulb speed settings like 0.2 seconds and not 0.5 seconds. You can easily try this by running a short test sequence. The RamperPro suppports over 30 different camera models and the 0.5 seconds factory default works great on all these cameras.
 The "Settings" button on the home screen, that is shown on the left here, brings you to the various system setting screens. There are several screens available under this button. You can use the arrow up and arrow down buttons to navigate through these pages. The first two pages are shown below. The third page will give you an overview of the three firmwares that are running on the RamperPro. That screen will also show the input voltage when a voltage of over 5 volts is supplied to the large power plug that is located next to the USB connectors. The hardware revision of your RamperPro can also be found on this third page.
The RamperPro System Menu [50] from ElysiaVisuals [17] on Vimeo [4].
 [51] [51] |
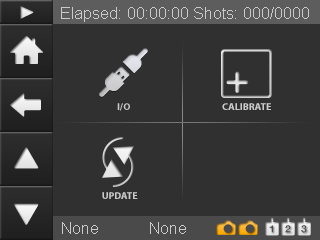 [52] [52] |
 This screen brings you to some settings that you can define for the camera's that you are using. These are settings that define how long the camera button should be pressed by the RamperPro of how long to delay before a motion control device is triggered. The settings are available over two pages, so please use the arrow buttons to navigate through the various options.
| Feature | Description |
| Button press time | This is the time in Millie seconds that the camera "button" we be triggered by the RamperPro. This time cannot be too slow otherwise the camera will not detect that it is triggered. You need a value of around 100, other cameras will work with a value of around 250. |
| Focus tab time | This is the time in milli seconds that the camera auto focus we be triggered by the RamperPro. This time cannot be too slow otherwise the camera will not detect that it is triggered. You need a value of around 100, other cameras will work with a value of around 250. |
| Post delay time | The time in milli seconds that the RamperPro will wait to do any action after an image is taken. An example can be a value of 1000. That would mean that an external motion control system will be triggered 1 second (1000 milli seconds) after an image is taken. |
| Use camera 1 settings | This value is only available for camera two. A value of "Yes" indicates that all settings for camera 2 are taken from the settings of camera 1. |
 This is an overview of a few basis system settings of the RamperPro like screen saver settings, the backlight and a few other features. This settings page consists of more than 1 page!. Use the arrow up and down buttons to navigate through them.
| Feature | Description |
| Screensaver | This is the time after which the screen saver will turn off the screen of the RamperPro. Every press on the touch screen will reset the timer that keeps track about when the screen saver should be enabled. |
| Enable screensaver | Enable or disable the screen saver. |
| Include LED's | You can even dim the 4 LEDs that are on the side of the RamperPro when the screen saver turns off the back light. The LEDs will be activated as soon as the touch screen is pressed so that the screen saver is woken up. |
| Backlight | The value of the backlight of the RamperPro screen. You can set the back light to a low value to prevent light pollution. |
| Enable help | This enables or disables the help system. The labels on the various RamperPro setting screens can be pressed after which a popup will describe the meaning and purpose of the setting. This can lead to accidental popups if you press labels. You can disable these properties by setting this value to "No". |
| Aftershotspro XMP | Aftershotspro is an affordable software package that can process images just like Adobe Lightroom can do this. Set this value to yes if you are using Aftershots Pro. The RamperPro will then also create specific XMP files in the format and naming convention of Aftershotspro. |
| Use positive EV correction | The RamperPro will create an XMP file per image. This file contains the exposure correction that is needed to get a very smooth exposure ramping sequence without any flickering. You therefore don't need any deflicker software when you use the RamperPro. This setting indicates if you want to use negative or positive corrections in your XML files.
Negative values could result in exposure pumping, especially when you ramp by using standard shutter speeds in manual. We therefore recommend to use possible XMP corrections when you ramp mostly in manual mode. Negative values will work fine in bulb mode. |
 The RamperPro interfaces to all major motion control platforms. You can even control 2 different platforms at the same time, one for each connected camera for example. You can find an elaborate explanation of how to connect and use motion control hardware on the interfacing with motion control hardware page [45] of this manual. Each I/O connector that is indicated with Ext1 and Ext2 has two so called input / output pins that can be used to either trigger an external system or to receive a trigger. The I/O connectors are referred to by ring or tip. That is the ring or tip of the 2.5mm TRS plug that fits into the Ext1 or Ext2 connectors. The table below describes the various settings, but the interfacing page explains how to use these settings in various situations.
| Feature | Description |
| Enabled | Is the I/O pin enabled or not? |
| Input | Indicates if the pin is an input or an output pin. Most pins will be an output pin, because the RamperPro can then trigger the connected motion control system. |
| FragonFrame | This is an experimental feature that is not available yet. We plan to release a DragonFrame adapter for the RamperPro in the summer of 2014. Set this setting to No for now. |
| Output trigger time | This feature is only available for pins that are enabled, are not an output pin and when DragonFrame is not activated. This value describes how long the connected motion control system will be triggered in microseconds. A value of 50 will work with the MX3 or TB3. |
 The touch screen of the RamperPro is factory calibrated. But it could be that you need to calibrate it again when the touch screen is not accurate enough. It can also happen that you need to calibrate the touch screen after a firmware upgrade since that might overwrite old settings. In that case the calibration screen is the first screen that you will see when the RamperPro is started.
You can (re)calibrate the touch screen by pressing the calibrate icon. You will now see a small cross on the touch screen. Please the center of this cross with the stylus as accurate as possible. After this two consecutive crosses will be shown. Touch the center of these two crosses as accurate as possible too. The touch screen calibration screen will be closed after calibration and you will be navigated to the main system settings page.
 The RamperPro is a highly advanced device that contains of an embedded Linux device and two separate micro controllers that control and trigger your camera's. This might sound technical to some users, but the bottom line is that the RamperPro can be seen as a three processor device that needs three different software programs.
The main application is what you see on the touch screen and it is this application that you will need to upgrade the most in order to get bug fixes or free additional features. The two embedded controllers run embedded software that needs a bit more work if you want to upgrade them.
Upgrading the main software of the RamperPro doesn't require any technical skills or knowledge. Just connect the RamperPro to the Internet via a standard RJ45 network cable. Make sure that this cable provides Internet access without the use of any proxy settings. Now press the Upgrade icon. The RamperPro will now automatically detect if there is any firmware upgrade available. It will also check if you need to upgrade the embedded software; the next paragraph will explain you how to do this. You don't need to upgrade the embedded software in most cases. You can now press the screen where the RamperPro asks if you want to upgrade the main software. The new firmware is now automatically downloaded and installed by the RamperPro. The software will restart and you are now ready to use your RamperPro again if you don't need to upgrade the embedded firmwares.
Some system settings cannot be changes when a timelapse engine is running. That way you cannot accidentally change settings that are of great/negative influence on your timelapse movie. You cannot find the I/O settings or the touch screen calibration screen as an example of this.
A RamperPro controller can control two cameras at the same time. They can each can run individual settings or you can tie the cameras so that you can run stereo or 3D shoots. The engine setup is described in the Camera discovery and time lapse engine selection. [53]
It is important that the correct USB and remote cable are connected to the same camera. This is how to do this:
You can now start your time lapse with the connected cameras.
RamperPro firmware 3060 and higher supports the possibility to daisy chain multiple RamperPro controllers. That way you can use as many cameras as you want. This is used for example for 360 degrees shoots with 5 cameras at the same time, connected to 3 RamperPros.
You can daisy chain the controllers via the MoCoBus that is located at the left side of the RamperPro. Use an RJ45 (aka computer network cable) between your controllers. There are two RJ45 connectors at the MoCoBus and that makes it possible to make a chain of as many RamperPros as you want.
How does it work
This firmware will trigger all cameras at the same time. This is done by making one RamperPro the master, all others are non-master. The ramping speed/shutter speeds/ISO values are currently not shared between master and slave yet. This can be changed in future firmware updates.
It is extremely important to setup every RamperPro exactly the same way! Please make sure that all the runtime parameters are the same on all units.
Make one RamperPro master ->system(tools icon)->arrow down->system icon: then press arrow down until you can make the unit master. This setup screen gives a new parameter: Post shot delay (in milliseconds). What does this do. It might happen that the slave unit needs more time to finish its exposure cycle due to a bit longer shutter speed. You don't want this slave to miss the trigger from the master. This parameter makes the master wait a bit (it makes its interval a bit longer). I guess a value of around 1 second is fine to start with. Make the other RamperPro slave -> set the value to "is MoCoBus master" = "no". The non master units will only fire when they get a signal from a master via the MoCoBus. So, you need to connect the units to each other with an RJ45 cable via the MoCoBus.
Also make sure to:
How to start all the RamperPro controllers
First start the slave RamperPro. Let it run through its initialization. Then start the master unit. The slave unit(s) will wait for the trigger commands from the RamperPro
How to use the App with multiple controllers
The RamperPro will, by default, create a WiFi network called ramperpro. But you can set a unique WiFi network on each RamperPro that you are using. Navigate to the system menu (tools icon). The press the arrow down until you see the WiFi setup. There you can give your RamperPro a unique network number. That way you can connect to each and every RamperPro with your smart phone, tablet or laptop.
Most images that you shoot with the RamperPro will have a difference between the desired shutterspeed and the actual realized shutterspeed. The desired shutterspeed is the shutterspeed that is calculated by the ramping algorithm. The realized shutterspeed is the speed that was actually used to take the picture. The use of normal shutterspeeds will give discrete steps which will result in hops in the exposure of your timelapse sequence. Nikon cameras have these discrete steps even in their bulb mode; but it must be said that these steps are small on modern cameras like the D800.
This is why the RamperPro is creating a small XMP file for every picture on the SD card of the RamperPro. This XMP file holds the, per image, exposure compensation. This compensation can automatically be used by Adobe After Effects or Adobe Lightroom to compensate the exposure of the images. This result are absolutely flicker free timelapse movies when you use the RamperPro. Visible flickering can only be the result of an inaccurate shutter; but we have not encountered that ourselves yet. The XMP files contain a very accurate exposure compensation value because the RamperPro can very accurately determine that value. The value is calculated when normal shutterspeeds are used while the value is measured via the PC sync cable when the camera is in bulb mode.
There are two ways that can be used to get the XMP files from the RamperPro:
|
|
| Here you see the XMP/camera1 folder on a Mac when the RamperPro is connected via a network connection. |
The camera1 and camera2 folders also contain so called run files. These files contain detailed information about your shoot and the images that were taken. You can use these files to determine the first and last image and thus the first and last XMP file of your timelapse sequence.
Now copy the, preferably RAW, files of your shoot to a folder on your computer or any other location that you use to process your images. Now copy the accompanying XMP files to that same folder. You can now startup your Adobe tool of choice, we use Adobe Light Room in this example. Import the folder into Lightroom. Lightroom will automatically import the XMP files together with your images. You can see that because the exposure compensation per image in Lightroom is already set. We have encountered issues on Apple computers in the past. The XMP files were not recognized by Lightroom and they were not imported. Please read this article [55]on our blog about how to overcome this issue.
You can now crop the images and export them to DNG, TIFF or JPG images that can be used to render your timelapse movie with. We prefer Adobe After Effects for this, but Apples Quick Time Pro or many other software packages should also give you satisfying results.
We deeply recommend to keep a copy of your XMP files. It's easy to overwrite the contents of these files when you make a mistake in Lightroom. You will then loose your valuable information that you need to create flicker free ramping movies with the RamperPro. We always create a subfolder next to the folder that holds the RAW files. We use that folder, called XMP, to store a backup copy of the XML files. Don't rely on the RamperPro as a backup device since the XML files can be overwritten when the filename cycles from 999 to 001.
|
|
| Here you see a part of the run file that shows all images that have been taken during the shoot. |
A description about how to create a timelapse movie based on your images is a bit out of the scope of the RamperPro user manual. We follow a very basic workflow. That looks like this:
You can now make a timelapse movie with your tool of choice like Apple Quick Time Pro or Adobe After Effects.
Firmware 3068 and higher contain the smoothing 2.0 algorithm that creates the smoothest ramping curve possible. There is no need to use any expensive and difficult deflicker software to iron out small imperfections in the XMP data.
It is possible to use the smoothing 2.0 algorithm on shoots made with earlier firmwares! That way you can recreate the XMP files for previous shoots. This is possible by feeding the runfile of your previous shoots into the RamperPro firmware. You need to add so called tags in the runfile that tell the RamperPro which part of the shoot you want to smooth. These tags are automatically written by the RamperPro in firmware 3068 and higher. Here is an example that shows how to modify the runfile:
SmoothStart
"21:01:27","00:06:02","37","_DSC9054","100","0.007472","0.006201","0.268992","Normal","1","00:04:24","0x0","/mnt/evr/camera1/D4S_9018_xmp"
"21:01:38","00:06:13","38","_DSC9055","100","0.007672","0.006201","0.307088","Normal","1","00:04:22","0x0","/mnt/evr/camera1/D4S_9018_xmp"
"21:01:47","00:06:22","39","_DSC9056","100","0.007885","0.007812","0.013341","Normal","1","00:04:21","0x0","/mnt/evr/camera1/D4S_9018_xmp"
"21:01:57","00:06:32","40","_DSC9057","100","0.008098","0.007812","0.051743","Normal","1","00:04:20","0x0","/mnt/evr/camera1/D4S_9018_xmp"
"21:02:07","00:06:42","41","_DSC9058","100","0.008318","0.007812","0.090458","Normal","1","00:04:18","0x0","/mnt/evr/camera1/D4S_9018_xmp"
"21:02:18","00:06:53","42","_DSC9059","100","0.008544","0.007812","0.129172","Normal","1","00:04:18","0x0","/mnt/evr/camera1/D4S_9018_xmp"
"21:02:27","00:07:02","43","_DSC9060","100","0.008804","0.007812","0.172437","Normal","1","00:04:17","0x0","/mnt/evr/camera1/D4S_9018_xmp"
"21:02:37","00:07:12","44","_DSC9061","100","0.009045","0.007812","0.211257","Normal","1","00:04:17","0x0","/mnt/evr/camera1/D4S_9018_xmp"
"21:02:48","00:07:23","45","_DSC9062","100","0.009292","0.007812","0.250183","Normal","1","00:04:16","0x0","/mnt/evr/camera1/D4S_9018_xmp"
"21:02:58","00:07:33","46","_DSC9063","100","0.009574","0.007812","0.293295","Normal","1","00:04:18","0x0","/mnt/evr/camera1/D4S_9018_xmp"
SmoothEnd
The SmoothStart and SmoothEnd tags tell the RamperPro which images need smoothed XMP data. You want to place these tages just before the first image and after the last image that is mentioned in the runfile. But you can choose not to smooth all images.
You now need to copy the runfile to the "smooth" folder on the RamperPros' SD card next to the camera1 and camera2 folder. This can be difficult on WIndows because Windows cannot write on this partition (as explained here [29]). You can still copy the files to the RamperPro in that case. Connect the RamperPro to your home network (with a network cable). Then you will find a device called RamperPro. You can then copy the runfile to the smooth folder.
You can now recreate the XMP files. Navigate to the XMP tool in the system menu. You can find the system menu by pressing the tools icon in the button bar. Press the arrow down until you see the XMP icon. Then follow the instructions that you see on the touch screen of the RamperPro. All you need to do is to press the filename of the runfile that you just copied to the smooth folder. Then the XMP files will be recreated.
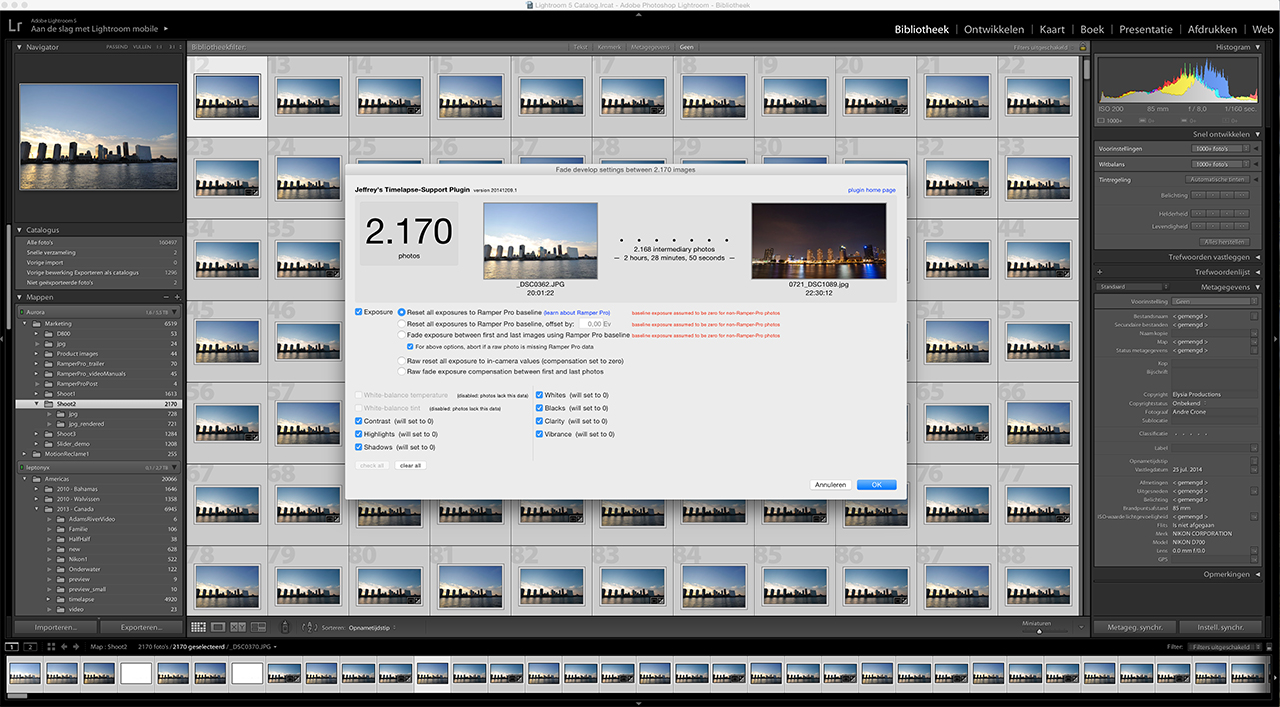 [57]We are very happy to present a new, free, fantastic Lightroom plug in-from Jeffrey Friedl. This native Adobe Lightroom plug-in can be used to bulk process time lapse sequences. The plug-in is RamperPro XMP file aware so you can do all required post processing and still enjoy the flicker free output of the RamperPro.
We have been using the Lightroom plug-in for a while now and it has became an extremely fast way to grade the white balance, exposure, vibrance etc. of the RamperPro shot images. You can made fades or offset the exposure of all images.
This free plug-in will cover most of what you need to process the ETTR output of the RamperPro. The RamperPro is an expose to the right controller. This means that the histogram of the images is kept as bright as possible, without over exposing. The reason for this is that this gives the best situation for easy post processing. This new Lightroom plug-in is all you need to easily post-process your RamperPro images within seconds. The big advantage of this plug-in is that you immediately see the output in Lightroom. Just set grade the white balance and the results are shown.
Note: Yes, this plug-in is RamperPro aware; but it can be used by all timelapse photographers!
You can download your copy here:
http://regex.info/blog/lightroom-goodies/timelapse-support [58]
Other software
Some people prefer to process their images even more in both Adobe Lightroom or in some other post production software package. An example could be to lighten all images with half a stop. That would overwrite the XMP data from the RamperPro which will in turn result into flicker. This is why we have joined hands with LRTimelapse [59]. There is now native support for the RamperPro in LRTimelapse, this enables you to further enhance the images that are taken with the RamperPro.
The main software of the RamperPro is placed on the SD card that you place at the bottom of the unit. The RamperPro can update the firmware automatically when you connect it to the internet via a network cable. Please use the proper connection for this. The double "network" connectors next to the light sensor connector are not network connectors since these are MoCoBus connectors.
The network connector of the RamperPro is available next to the two USB connectors. Connect a network cable and make sure that this network cable provides internet access to the RamperPro. The RamperPro will then acquire an IP address via DHCP; this is the most common network configuration. Navigate to the firmware update screen (see system settings). The unit will then check if any updates are available. You can then update the firmware via this screen.
Please perform the following steps when you want to freshly install a RamperPro SD card:
The MicroSD card of the RamperPro is tugged away at the bottom of the unit. You can use a pointy object to get it out.
We have seen that the zip tool on OSX contains a bug that results in a wrongly unzipped file. We recommend to download the Stuffit tool from the OSX App store. Stuffit extracts the downloaded zip file without problems. We have seen that the default zip tool from Windows is sometimes unable to extract the large zipfile that holds the firmware file. We recommend WinRAR to extract the file. 7-Zip seems to have difficulties with properly extracting the zip file.
It might happen that you MicroSD card gets corrupted in the field. We recommend to take a space MicroSD card with you. That way you can always use your RamperPro.
 [61]The RamperPro can interface with all current motion control hardware like the Dynamic Perception MX2 and MX3 motion controllers or the eMotimo TB3. You can also use external intervalometer to trigger the RamperPro. That way you can use the DitoGear controllers with the RamperPro for example.
The two ext ports (ext1 and ext2) at the back of the RamperPro can be used to integrate the RamperPro with motion control hardware. There are also two MoCoBus connectors available. These are the double RJ45, network connectors next to the light sensor connector. The MoCoBus connectors are for future use when more MoCoBus motion control hardware becomes available (from for example DynamicPerception).
The first I/O port is tied to camera one, the second one to camera two. You might need special adapters to connect external hardware like our I/O isolator [62] or the ElysiaVisuals DragonFrame adapter.
Its probably best if the RamperPro triggers the motion control hardware to move to the next position. That way you are sure that the exposure is finished and that it is safe to move your camera. This needs to be supported by your hardware. Some hardware like DitoGear hardware doesn't have this possibility. You can then configure the RamperPro to be triggered by an external signal. The motion control hardware can then signal the RamperPro to take a picture. A drawback of this mode is that you cannot use interval fairing because the RamperPro is not dictating the interval.
There are currently three different types of integration possible:
You connect motion control hardware to the I/O functionality of the RamperPro with a so called 2.5mm Tip Ring Sleeve (TRS) plug. The tip and ring of the plugs are connected to the RamperPro hardware. You can define the behavior or both this ring and tip in the I/O settings menu [63] in the system menu. There is can either define if the ring or tip acts as an output, needed to trigger an extern system or as an input, so that the RamperPro can receive triggers from external systems.
You might want to have a (short) delay after a shot is taken by the RamperPro and the moment that the motion hardware is triggered. That way you are absolutely sure that the shutter is closed before the camera is moved. You do this by setting the "Post delay time" on the Camera 1 and Camera 2 system settings in the system settings menu [63].
The RamperPro can control two cameras and interface with two motion control rigs at the same time. These cameras can run different ramping profiles and each camera can be put on their own motion control device. You can for example setup a Nikon D800 as camera one on a Stage One slider and you can put a Canon 5Dmkiii as camera two on a TB3 pan and tilt head. The RamperPro can then control both cameras and both the Stage One and TB3. Ext1 is linked to the first camera and ext2 is linked to the second camera. So in this example you would wire the Stage One to ext1 and the TB3 to ext2; use an I/O isolator in both cases.
In 3D or Stereo mode the RamperPro will accurately synchronize two camera’s to virtually act like one camera. This means that you can only receive one external trigger if you are interfacing with an external intervalometer. This trigger will then trigger both cameras at exactly the same time. You might want to connect an external intervalometer to ext1 when you are in 3D mode when you are using an external intervalometer like a DitoGear multi-axis Evolution setup. It is theoretically possible to trigger two motion control rigs in 3D mode when the RamperPro is the timing master. But we doubt if somebody will ever use that possibility. This means that you will most probably always will be using ext1 when you are using the 3D capabilities of the RamperPro.
The following paragraphs explain for each mode how to connect the RamperPro to your motion control device(s) and how to setup the required parameters to make it all happen.
How to connect the ElysiaVisuals RamperPro controller to the NMx motion controller from Dynamic Perception [64] from ElysiaVisuals [65] on Vimeo [4].
Using Ramper Pro with Second Shooter [66] from Kessler Crane [67] on Vimeo [4].
Most motion controllers expect some sort of external switch when they integrate with the outside world. The RamperPro can provide this external switch with the help of the ElysiaVisuals I/O Isolator [62]. This is a tiny solution that you connect connect between the RamperPro and controllers like the Dynamic Perception MX2, MX3 or the eMotimo TB3. Please take the following steps when you are using this kind of interfacing:
You now to to configure both the RamperPro and the motion control device in order to get the integration to work. Use the lowest possible interval on the TB3; this will indicate "External" on the display. Refer to the manual of the Dynamic Perception MX2 or MX3 about how to configure these motion controller to receive external triggers (either via the ring or tip of the cable).
The TB3 will be triggered by the tip of the TRS plug. This means that you need to configure the tip of the TRS plug in the I/O settings menu. Set the value to enabled=yes, input=no, DragonFrame=no and a trigger time of 50ms. The MX2 or MX3 can "listen" to both the ring or tip.
The I/O settings can be found in the system menu of the RamperPro (icon with the two tools on it). Then press the arrow down in the button bar until you find the icon called I/O. That will bring you to the I/O settings. There are 4 different pins (two per camera). You can reach these by pressing the up or down buttons on the I/O setup screen.
 [68] [68] |
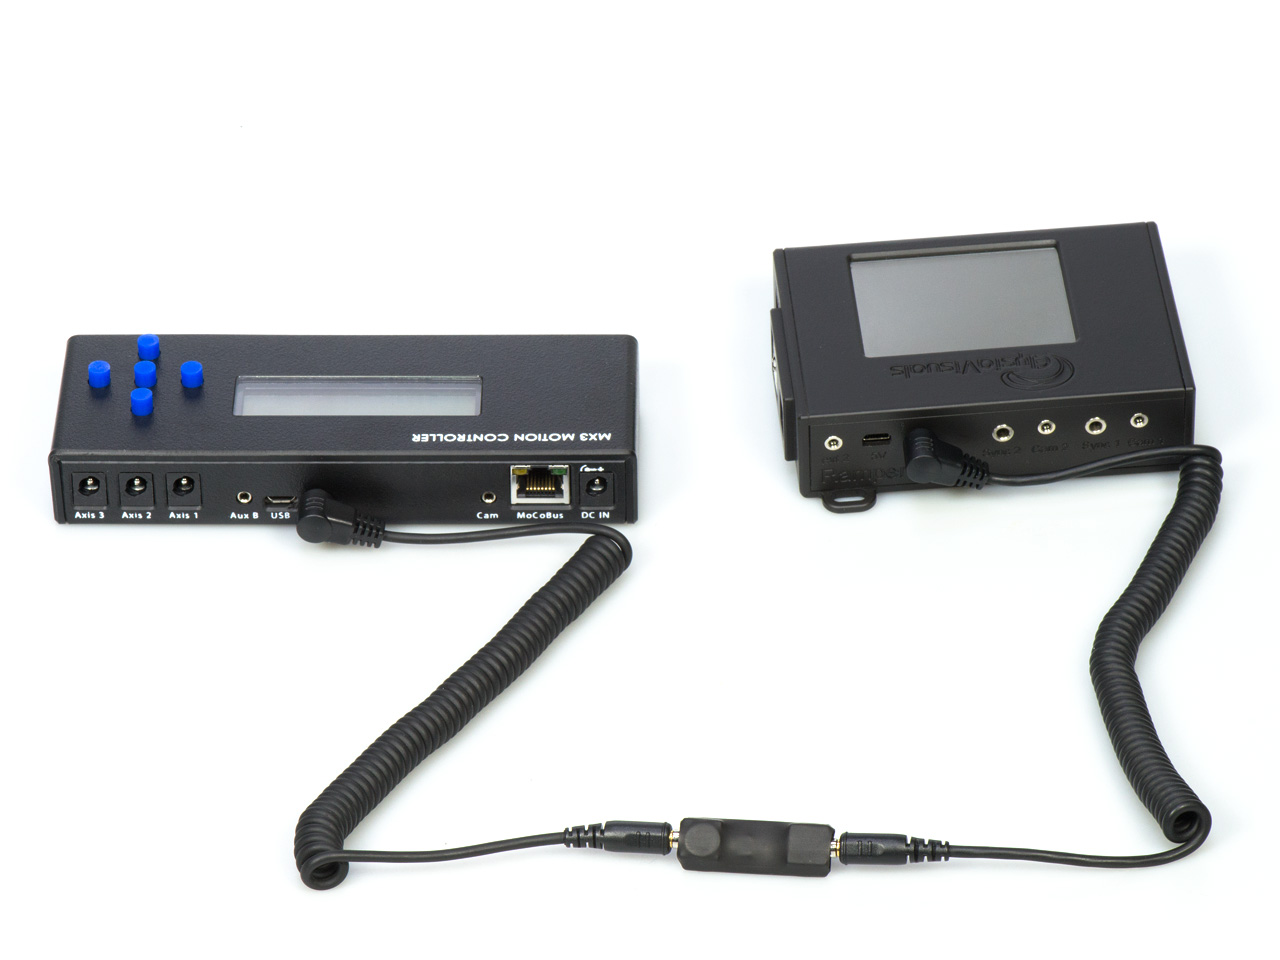 [69] [69] |
| The RamperPro connected to the MX2 motion controller. Please note the direction of the O on the I/O isolator. |
The MX3 can also be connected to the RamperPro. This gives you a three axis motion control solution. Please note the direction of the O on the isolator. |
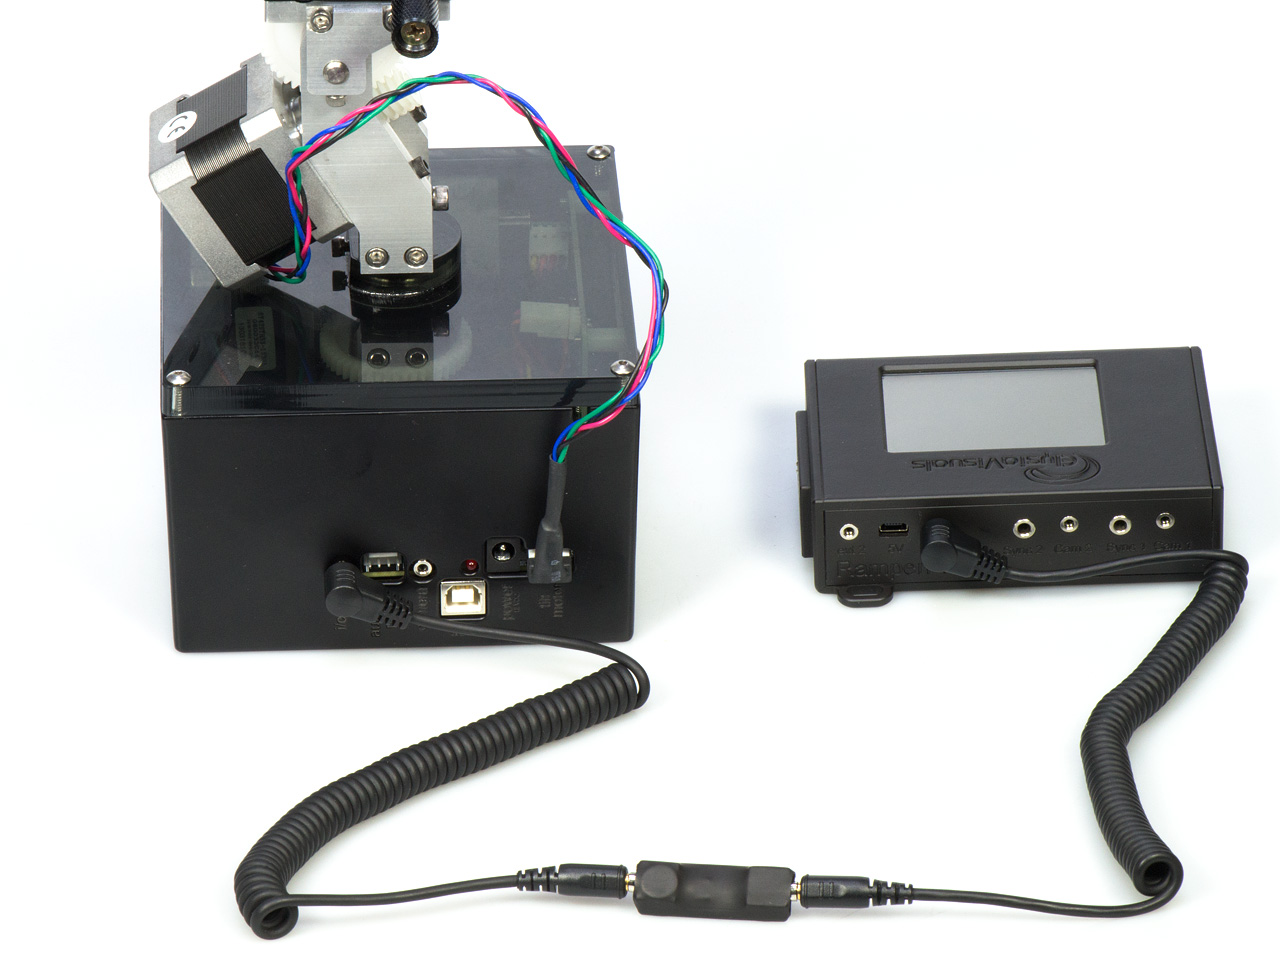 [70] [70] |
| The I/O isolator can also be used to interface the TB3. This way you get a three axis stepper motor solution. The RamperPro will trigger the TB3. This way the axis can move to the next position when the RamperPro has fired the camera. |
How to setup and use the RamperPro stepper motor driver [71] from ElysiaVisuals [17] on Vimeo [4].
External intervalometers can be used to trigger the RamperPro to take a picture. This is only valid in exposure ramping mode since it makes no sense to have an external trigger when you are running the RamperPro is basic mode. Please take the following steps when you are using this kind of interfacing:
You now need to set the appropriate settings on the RamperPro so that it will listen to the external trigger. You do this by configuring the tip of the connected Ext1 or Ext2 cable. The trigger is received by the tip of the cable. This means that you need to configure the appropriate tip I/O settings to: enabled=yes, input=yes.
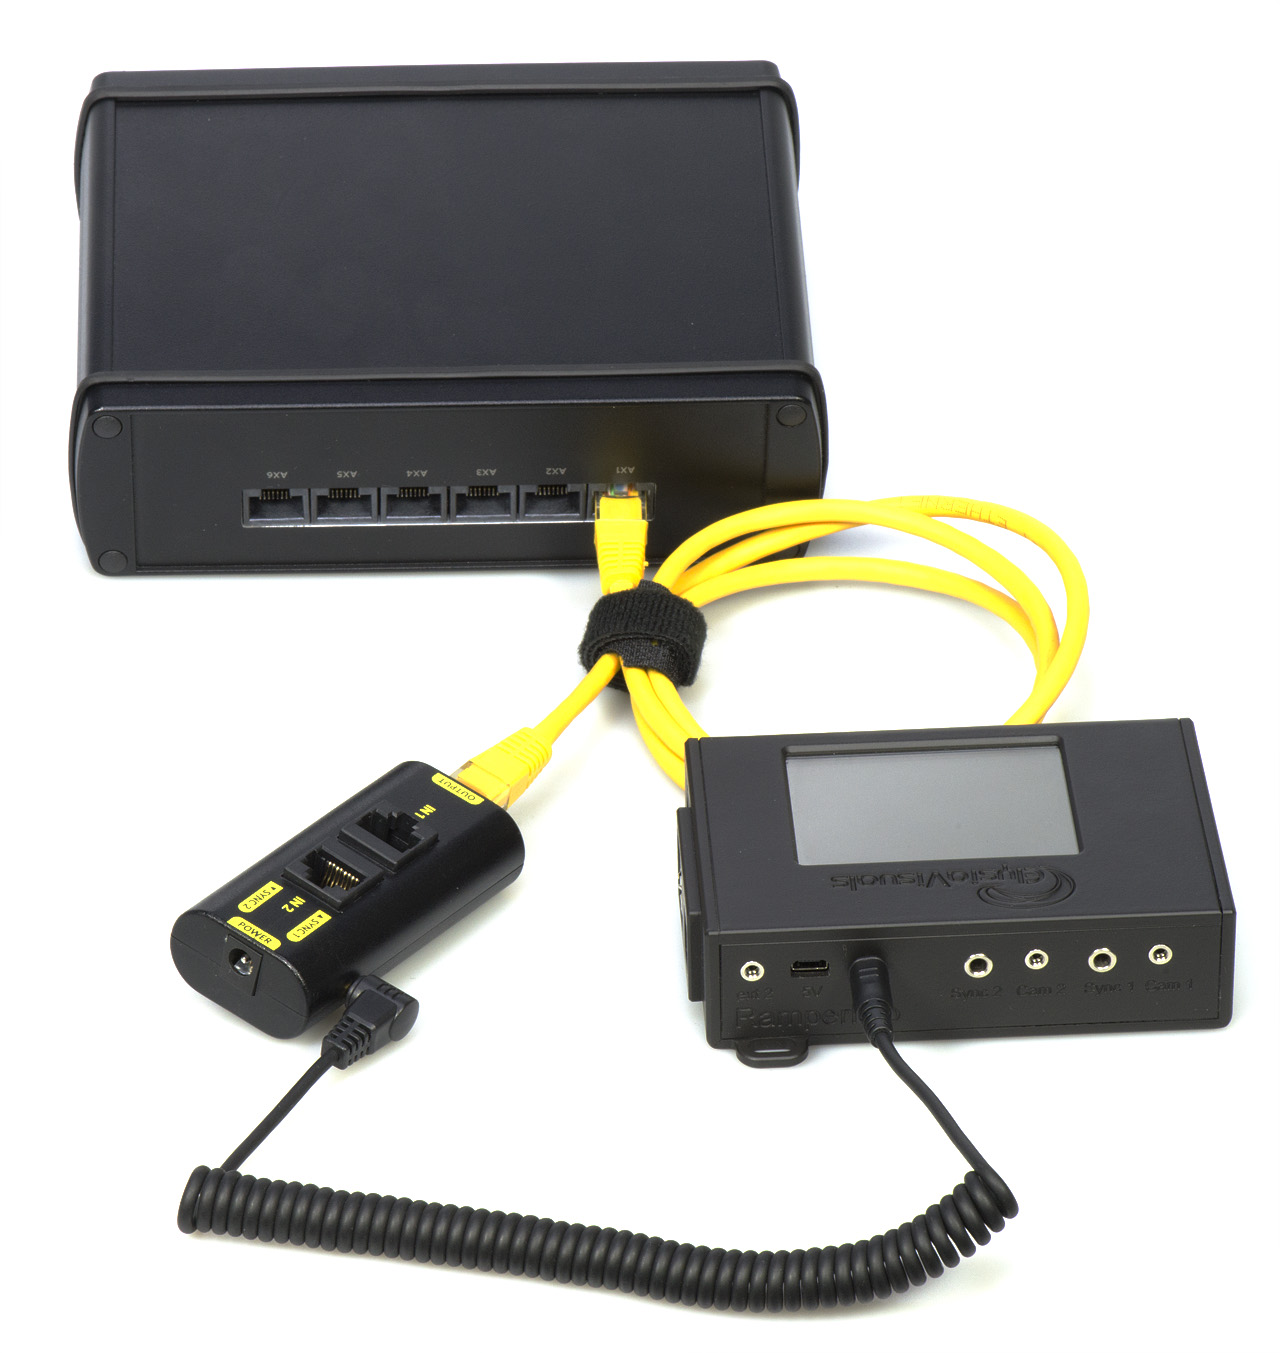 [72] [72] |
| You don't need the I/O isolator when you connect an external intervalometer. Here you see that the camera port of a DitoGear controller can be plugged directly into the RamperPro Ext ports. |
The RamperPro can act as a remote control for the fantastic DragonFrame stop motion software. In this setup you can use DragonFrame to control you stepper motor based motion control rig. This has many advantages but the most important one is that you can create highly advanced multi axis moves based on key frames with DragonFrame. DragonFrame runs on both Windows and OSX computers and it communicates to the outside word like the RamperPro via the USB port. You cannot connect the USB port of the RamperPro to the USB port of a normal computer. That is why we have developed the RamperPro DragonFrame adapter. This is a small adapter that you can use to connect the RamperPro to a computer that runs DragonFrame.
Note: The DragonFrame adapter uses both the tip and rind of the Ext connector since the interface can both send data to DragonFrame, but it can also receive data from DragonFrame. That is why you will see "DragonFrame is enabled of the previous pin" when you try to set the settings of a tip when the corresponding ring of the plug is configured to be a DragonFrame connection. Set the ring of the I/O port to enabled=yes, input=no and DragonFrame=yes when you want to configure the RamperPro to be connected to DragonFrame.
This is how you connect the RamperPro to a computer that runs DragonFrame:
You now need to configure the RamperPro so that it will trigger DragonFrame whenever an image is taken. That way DragonFrame can move all connected axis to their next position. You also need to setup DragonFrame in such a way that it will listen to a USB port for external commands to get this working.
The open source motion control bus (MoCoBus) is an exciting development that will make it possible to daisy chain various motion control devices. The DynamicPerception nanoMoCo enabled stepper motors are an example of this. You can daisy chain up to 16 of these stepper motors and you can control them via one single RJ45 cable. There will be more devices that support the MoCoBus protocol (like easier to use motor) in the near future. The double MoCoBus connectors at the side of the RamperPro are for future use. Support to control nanoMoCo and derived stepper motors will be added to the RamperPro firmware in the future. That will make the RamperPro a highly advanced motion controller that both controls your motors and your camera!
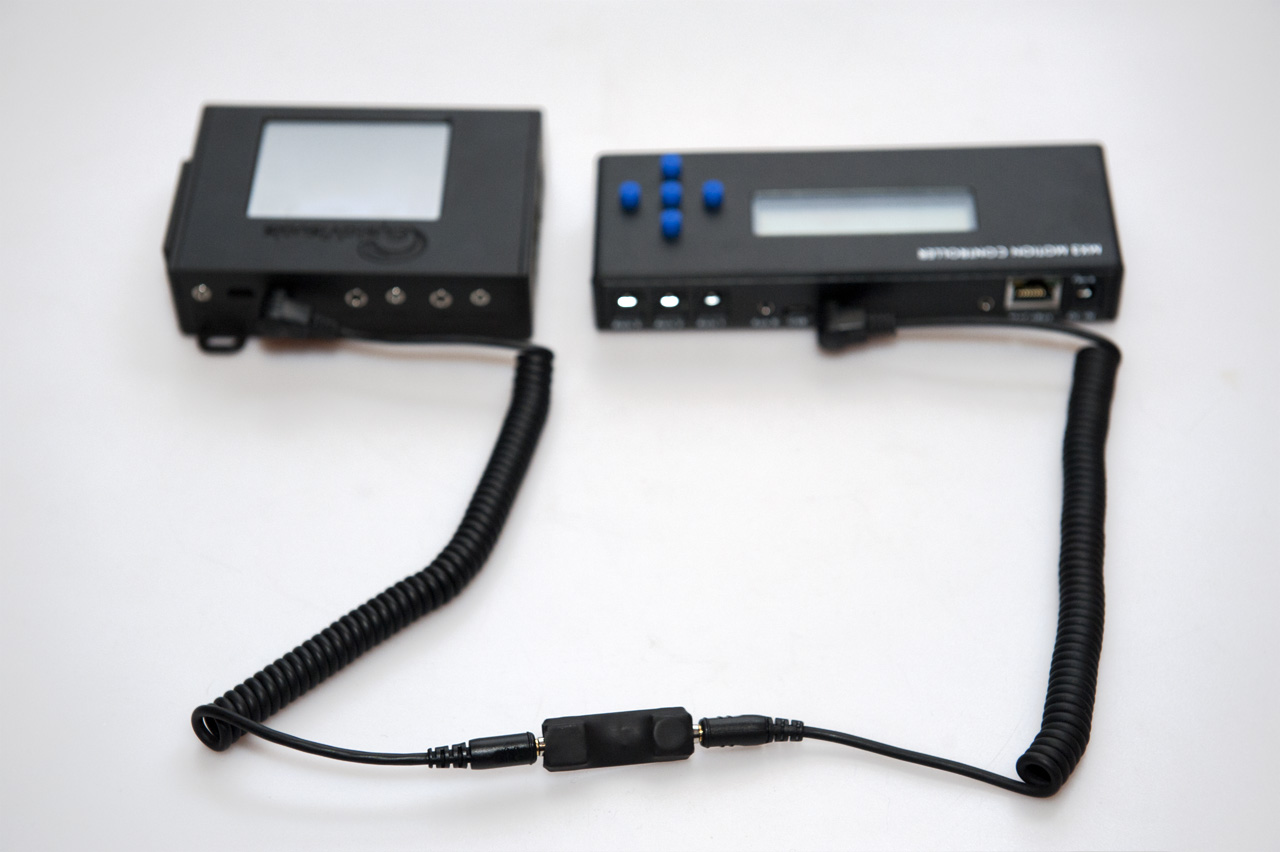 [73]The RamperPro can trigger motion controllers like the MX2 and MX3 from Dynamic Perception or the eMotimo TB3. These motion control devices suspect an external switch that notifies them to move their motors. This external switch can be provided by the ElysiaVisuals I/O isolator. This image shows how to connect the I/O isolator. The isolator has two jacks, one of them is marked with an O or circle. This O indicates Output. The output needs to be connected to the motion control hardware, the other side needs to be connected to the ext1 or ext2 port of the RamperPro. The I/O isolator really isolates the signals between the RamperPro and the MX3 by using an optical switch. This ensures you that you have a safe connection between your devices.
Please check you settings by following the steps that are described in the Interfacing with Motion Control Hardware [45] section of this manual. You can click on the image that shows the RamperPro and the MX3 to enlarge the image.
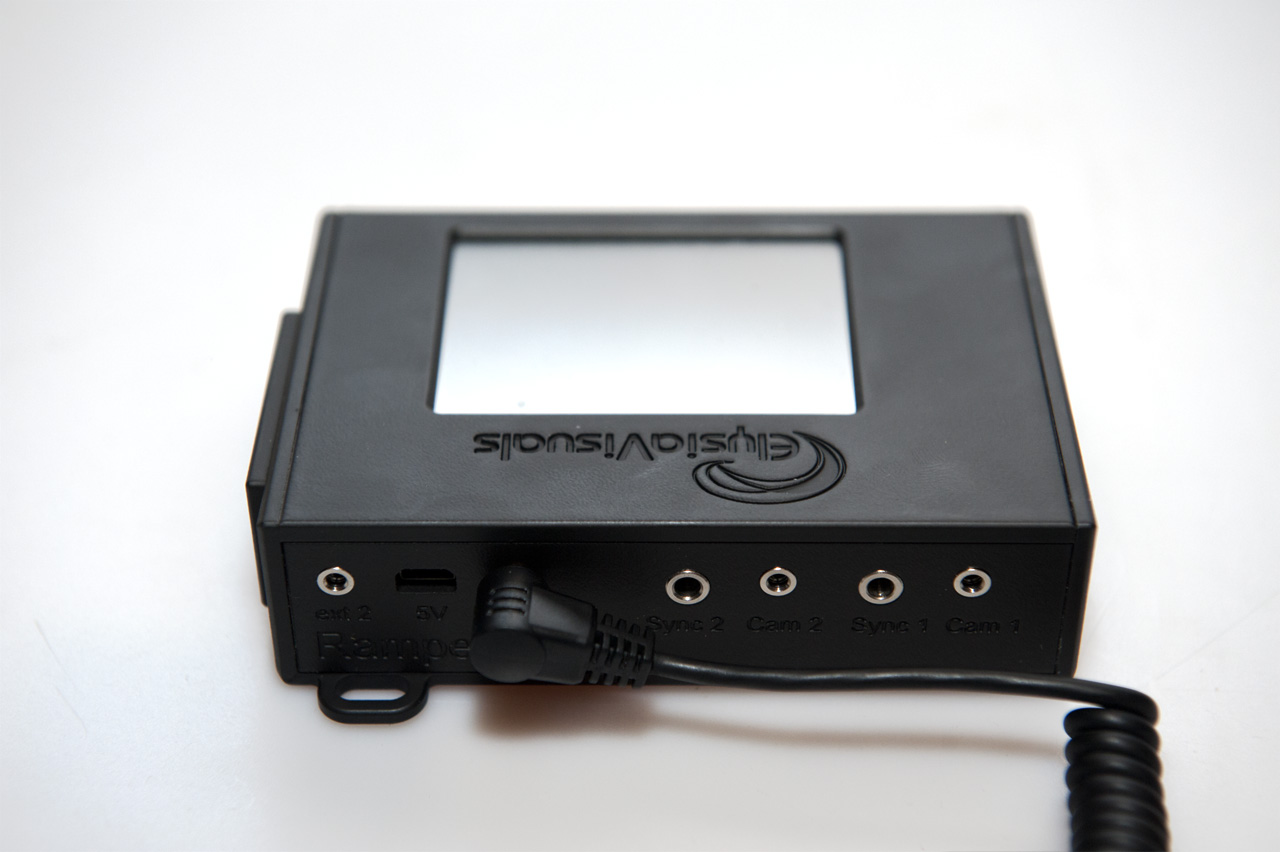 [74] [74] |
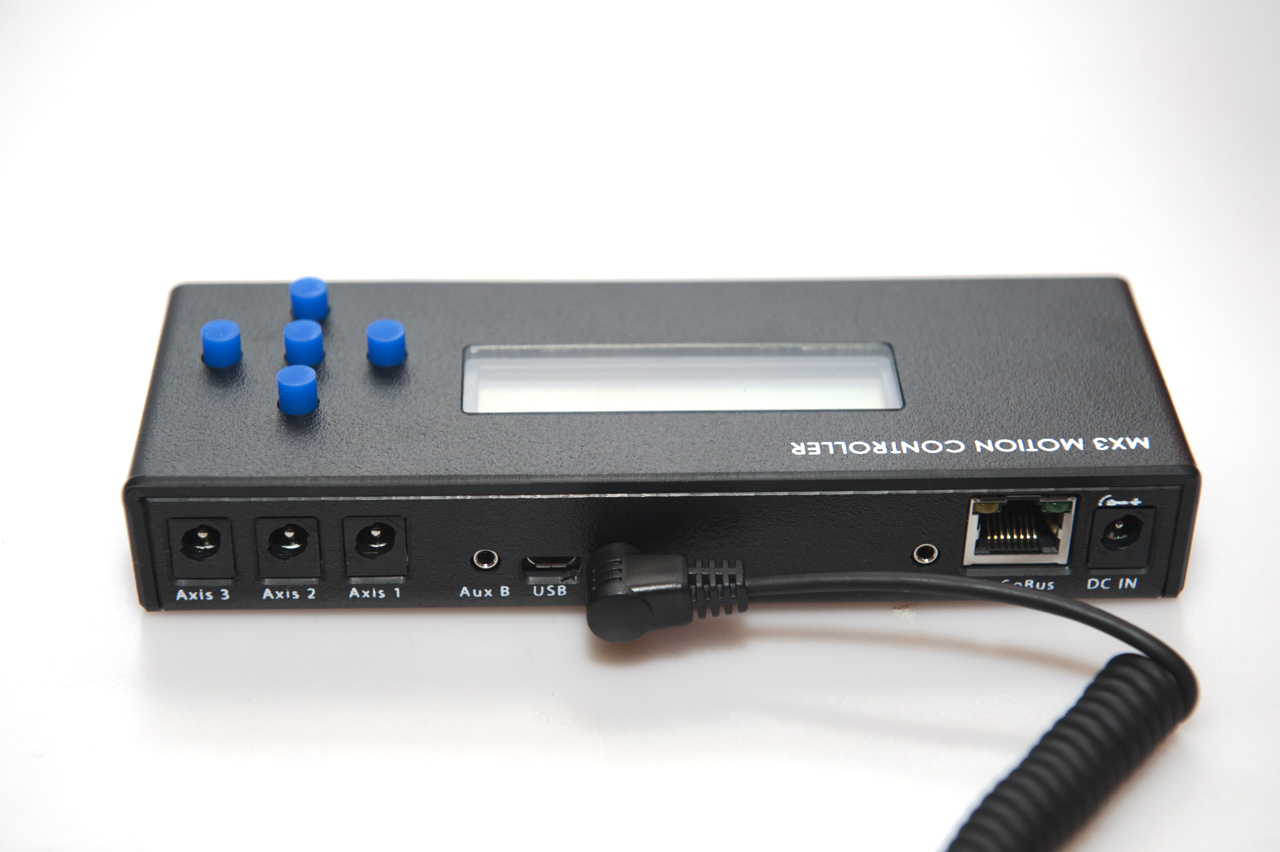 [75] [75] |
| This is how you conned the I/O isolator cable the the RamperPro | The output part of the I/O isolator needs to be connected to the Aux port of your motion control device. |
Note: you don't need the I/O isolator when an external intervalometer is triggering the RamperPro. This is described in the Interfacing with Motion Control Hardware [45] section too.
Don't point the light sensor directly to the sun! Otherwise you risk that the sensor gets too much light; more that it can handle. The light sensor measures how fast its getting darker or lighter during your shoot. It is therefore good enough to point the sensor to the direction of your subject, but not straight to the sun.
The RamperPro needs a lot of cables; especially when you are using two camera's. One of the most important cables is the PC Sync cable. This cable is used to measure the exact exposure during Bulb. A missing PC Sync cable, a badly connected one or even a broken cable will stop your sequence because the RamperPro cannot work properly in bulb without a proper cable. You really don't want your timelapse sequence to stop when the RamperPro switches to Bulb when something is wrong with any cable. The trick is to test all connections before you start.
The easy way to test all cables is to set the start exposure value higher than the "start bulb mode" value in the settings of the RamperPro. That way you force the device to use Bulb from the start. You can then start an advanced sequence as a test. The RamperPro will give an error when any of the required cables is not connected. You can even "tie" two camera's if you want to check if all cables to the second camera are connected properly.
Don't forget to set the start exposure speed back to the desired value if you really want to start ramping.
The RamperPro depends on the software that is on the SD card. This means that if, for any reason, the SD card gets corrupted you cannot use the unit. We therefore recommend to always bring a second SD card.
Nikon cameras also support some L or H ISO values. The value of these ISO values cannot be used with the RamperPro. The reason for this is that these values are not accurate. L1.0 on a D700 should be ISO 100. But it is actually ISO 160. This means that the RamperPro cannot make accurate calculations when you shift the ISO over these L of H ISO values. This is the reason why the RamperPro will give an error if you want to use ISO 100 on a D700 for example.
 The RamperPro cannot switch automatically between normal shutter speeds and bulb on many Canon cameras. This is due to the fact that bulb is a different setting and not a “special” shutter speed as it is on all supported Nikon models. This means that you need to switch between manual and bulb mode manually on Canon cameras. The RamperPro will indicate this with a popup. Change the setting of your camera and press the touch screen afterwards.

This is really not as bad as it seems. Suppose that you are ramping over a large number of stops with the following parameters. Start shutter speed is 1/250th of a second and speed is 2 seconds and you switch to bulb mode at 0.5 seconds. This will result in one switch from normal shutter speeds to bulb speed when the exposure has reached a value of 0.5 seconds; you only have to switch mode manually once with these settings when you use a Canon camera. All supported Nikon cameras are fully controlled by the RamperPro; no manual intervention is needed. Some Nikon camera’s feature a mode dial, but you will be notified by the RamperPro to set it to manual before you can start an exposure ramping sequence.
 Canon cameras seem to freeze when you connect them to the RamperPro via a USB cable. You cannot change any settings on the camera and it will display “busy” on the display. The RamperPro is actively forcing these cameras to accept external activities like changing from manual to bulb on the 1DX for example. Canon cameras are only forced to do this when a timelapse sequence is running. That is why you cannot change settings on your camera when the RamperPro is in idle mode. We recommend disconnecting the USB cable when you want to configure your Canon camera for a shoot. Wait until the RamperPro mentions that the USB connection is lost before you reconnect your camera. This way you are sure that the RamperPro discovers your camera correctly after you have reconfigured it. Settings like ISO and shutter speed are set by the RamperPro; so there is no need to set them by hand upfront.
This can happen on (Nikon) cameras with two memory cards. Please set the second card to overflow and not to backup.
Nikon cameras don’t support playback on their own LCD screen when a USB cable is connected. This means that you cannot check the individual images when they are taken by the camera. This is not a limitation of the RamperPro. This is just how Nikon has implemented their cameras. It would theoretically be possible to show the images on the touch screen of the RamperPro. We have chosen not to do this in the current version of the firmware since that would mean that the images need to be downloaded to the RamperPro via the USB cable, scaled and then displayed and all this within the interval between two images.
Yes, the RamperPro works when your camera is set to RAW. We use jpeg images for the histogram analysis because it would take too much time to analyze RAW files. You can set your camera to RAW + jpeg during a shoot. The jpeg images are used for the histogram analysis, you can use the RAW files to render the resulting timelapse movie.
Your interval needs to be long enough during histogram mode. The reason for this is that it takes some time before an image is ready for analysis. Let's say that we have a shutterspeed of 2 seconds and that it takes 3 seconds before the image is written to the memory card. In this case it takes 5 seconds after the start of the shot before the RamperPro can download and analyze the image. Downloading and analyzing a 36MP jpeg from a D800 (in basic quality) only takes 2.5 seconds. This means that in this example it takes at least 7.5 seconds from the beginning of the shot until the analysis data is available. The bulk of this time is due to the nature of how digital camera's work. This long interval can be limiting is some cases. We recommend to disable histogram mode if you need a shorter interval. Just make sure to set the proper end exposure in this case. You could determine this end exposure by doing a test shoot if you are able to do this. You can then determine the proper end ISO and shutter speed that you need to set when you are not using histogram mode.
Popular Canon camera’s like the 5Dmkii and 5Dmkiii feature a dial that you need to physically turn to choose manual or bulb mode. It can happen that the selected aperture differs between manual and bulb mode. Please make sure that you set the same aperture in both the manual and bulb mode of your camera before you start. Failure to do so will result in different exposures when you switch from normal shutter speeds to bulb mode.
Make sure to set ‘External Speedlite control’ to “Enable”. You also need to make sure that the ISO and shutterspeed steps are in 1/3 stop increments (and not in 1 stop increments). These are the default values of your camera, so you are fine if you have never changed them on your camera.
The intervalometer of the RamperPro determines when its time to take the next image. There are a few things that might be interesting to know about this. The intervalometer always starts counting again as soon as the interval has expired. This means that the interval will start counting as soon as a picture is taken. Let's say that we have set an interval of 8 seconds and a shutter speed of 5 seconds. A result of these setting is that the next image is taken 3 seconds after the exposure is finished of the previous image.
It can happen that you have a situation where the shutter speed is larger than the interval. The RamperPro will not stop when this is happening. In fact, the exposure ramper will still give good results because all calculations will take this into account. The only effect will be that the interval will be longer than expected because it will now become at least as long as the shutter speed that is used. The error detecting system of the RamperPro will try, where possible, to warn upfront that there is a possible collision between the interval and the shutter speed.
There is a shift in the shutter speeds that are used by the RamperPro. That is by design. This is because, by default, the RamperPro will always make negative XMP corrections. So, suppose you want a start shutter speed of 1/100. You will get 1/80 and a correction of -0.3 at the beginning of your shoot.
Check if you camera is not in auto focus mode because that could result on lost images if the camera cannot focus properly. Is there a memory card in your camera? We recommend to set the camera to manual focus and then focus manually on your subject. The preview mode of the RamperPro needs two cables. You need to connect both the supplied trigger cable and the USB cable. This is done by design to make sure that both cables are connected properly before you start your shoot. Note that the current version of the preview mode doesn't work in Bulb mode. Set your camera to manual to use the preview mode. Alwasy disable live view when you use the RamperPro. The camera will not be triggererd properly when live view is enabled and your camera battery will be drained too during long ramping shoots.
Here is a list of the cameras that are currently supported by the RamperPro. Don't worry if your camera is not listed. We can easily add new camera's in future versions of the firmware. Please contact us if your camera of choice is not on the list below.
Note: Not all Canon cameras can be set to Bulb mode via USB. This means that you sometimes need to set your camera to Bulb mode yourself. The RamperPro will notify you with message when you need to set your camera to Bulb. Nikon cameras don't have this drawback because they can be fully controlled via USB.
Its always possible that something is not clear and that you need help to get started. Please follow these guidelines when you need help from us:
We will normally reply to your request within 24 hours. We are located in Europe and the time difference with, for example the US or Canada, can lead to a short delay. Its night here when the US is celebrating its' evening.
Links
[1] http://www.elysiavisuals.com/sites/default/files/RamperProbase1280.jpg
[2] http://vimeo.com/101815903
[3] http://vimeo.com/user18844379
[4] https://vimeo.com
[5] http://www.elysiavisuals.com/content/elysiavisuals-ramperpro-battery-kit
[6] http://www.elysiavisuals.com/sites/default/files/D3_connected2.jpg
[7] http://www.elysiavisuals.com/content/switching-between-manual-and-bulb-exposure
[8] http://www.elysiavisuals.com/content/hot-shoe-pc-sync-connection
[9] http://www.elysiavisuals.com/sites/default/files/page_home.jpg
[10] http://www.elysiavisuals.com/sites/default/files/page_buttonpad.jpg
[11] http://www.elysiavisuals.com/sites/default/files/page_camer_setup_1_easy.jpg
[12] http://www.elysiavisuals.com/sites/default/files/page_camer_setup_1_ramper.jpg
[13] http://www.elysiavisuals.com/sites/default/files/page_camer_setup_2_ramper_easy.jpg
[14] http://www.elysiavisuals.com/sites/default/files/page_camer_setup_2_ramper_3d.jpg
[15] http://www.elysiavisuals.com/sites/default/files/page_engines_setup.jpg
[16] https://vimeo.com/123453439
[17] https://vimeo.com/user18844379
[18] http://vimeo.com/102356196
[19] http://www.elysiavisuals.com/content/word-about-light-sensor-and-automatic-exposure
[20] http://www.elysiavisuals.com/sites/default/files/_DSC6257.jpg
[21] http://www.elysiavisuals.com/sites/default/files/page_override.jpg
[22] http://www.elysiavisuals.com/content/ramperpro-wifi-dongle
[23] http://www.elysiavisuals.com/sites/default/files/img_1247.png
[24] http://www.elysiavisuals.com/sites/default/files/img_1248.png
[25] http://www.elysiavisuals.com/sites/default/files/img_1249.png
[26] http://www.elysiavisuals.com/content/setup-surises-and-sunsets
[27] http://www.elysiavisuals.com/sites/default/files/_dsc7648.jpg
[28] http://www.elysiavisuals.com/sites/default/files/_dsc7760.jpg
[29] http://www.elysiavisuals.com/content/how-read-ramperpro-sd-card-windows
[30] http://download.elysiavisuals.com/disks/RamperPro3053.zip
[31] http://download.elysiavisuals.com/disks/RamperPro2_v2_3059.img.zip
[32] http://download.elysiavisuals.com/disks/RamperPro3_3060.img.zip
[33] http://www.elysiavisuals.com/content/install-and-copy-sd-card
[34] http://www.elysiavisuals.com/content/how-update-ramperpro-firmware
[35] http://www.diskinternals.com/linux-reader/
[36] http://www.elysiavisuals.com/sites/default/files/image007.jpg
[37] http://www.elysiavisuals.com/sites/default/files/image008.jpg
[38] http://www.elysiavisuals.com/content/how-use-sony-alpha-%CE%B17r-iii-ramperpro
[39] http://www.elysiavisuals.com/sites/default/files/img_1219_0.jpg
[40] http://www.elysiavisuals.com/content/tetherpro-usb-cable-ramperpro
[41] http://www.elysiavisuals.com/content/ramperpro-128gb-memory-card-sony-a7
[42] http://www.elysiavisuals.com/content/how-fix-startup-problems
[43] http://www.xquartz.org/
[44] http://blog.planet5d.com/2011/11/getting-rid-of-flicker-in-timelapse-the-lens-twist-method/
[45] http://www.elysiavisuals.com/content/interfacing-motion-control-hardware
[46] http://www.luminous-landscape.com/tutorials/expose-right.shtml
[47] http://www.elysiavisuals.com/sites/default/files/image1.png
[48] http://www.elysiavisuals.com/sites/default/files/image2.png
[49] http://davidmilligan.github.io/BridgeRamp/
[50] https://vimeo.com/124054700
[51] http://www.elysiavisuals.com/sites/default/files/page_system1_0.jpg
[52] http://www.elysiavisuals.com/sites/default/files/page_system2.jpg
[53] http://www.elysiavisuals.com/content/camera-discovery-and-timelapse-engine-selection
[54] http://www.elysiavisuals.com/sites/default/files/xmp_overview.jpg
[55] http://www.elysiavisuals.com/content/adobe-lightroom-not-always-reading-xmp-files
[56] http://www.elysiavisuals.com/sites/default/files/datafile.jpg
[57] http://www.elysiavisuals.com/sites/default/files/plugin.jpg
[58] http://regex.info/blog/lightroom-goodies/timelapse-support
[59] http://www.lrtimelapse.com
[60] https://www.balena.io/etcher/
[61] http://www.elysiavisuals.com/sites/default/files/25TRS.jpg
[62] http://www.elysiavisuals.com/content/elysiavisuals-io-isolator
[63] http://www.elysiavisuals.com/content/system-settings
[64] https://vimeo.com/138911682
[65] https://vimeo.com/elysiavisuals
[66] https://vimeo.com/143162115
[67] https://vimeo.com/kesslercrane
[68] http://www.elysiavisuals.com/sites/default/files/mx2.jpg
[69] http://www.elysiavisuals.com/sites/default/files/mx3.jpg
[70] http://www.elysiavisuals.com/sites/default/files/tb3.jpg
[71] https://vimeo.com/124048448
[72] http://www.elysiavisuals.com/sites/default/files/dito_connecgted.jpg
[73] http://www.elysiavisuals.com/sites/default/files/isolator1.jpg
[74] http://www.elysiavisuals.com/sites/default/files/isolator2.jpg
[75] http://www.elysiavisuals.com/sites/default/files/isolator3.jpg
[76] mailto:visuals@elysia.nl?subject=RamperPro%20support%20request